How to Automate Client Onboarding for Virtual Assistants (2026): Tools, Stacks & Complete Workflow
Disclosure: This article contains affiliate links. If you purchase through them, VA Automation Lab earns a commission at no additional cost to you. All tools are evaluated independently.
The complete system for automating client onboarding as a virtual assistant, the best tools for each stage, three tested stacks from beginner to advanced, step-by-step automation for all nine onboarding stages, and a ready-to-use checklist that covers every step in the process.
Client onboarding is the highest-stakes administrative process in a VA business. It determines the client’s first impression of your operational standards, sets the expectations that govern the entire engagement, and (when handled manually) consumes 2-4 hours per new client across form collection, contract generation, folder setup, task creation, and welcome communication.
At one or two clients, this overhead is manageable. At four or five, it becomes the primary constraint on growth: every new client added means another 2-4 hours of administrative setup before any billable work begins. The solution is not to work faster, it is to build a virtual assistant onboarding system that executes those 2-4 hours of setup automatically, triggered by a single form submission.
This guide covers the complete build: how to structure the workflow, which tools connect each stage, and how to implement the automations that transform a new client inquiry into a fully configured workspace, welcome sequence, and task list, without manual intervention. The system documented here applies to any VA service type and scales without modification as client volume grows.
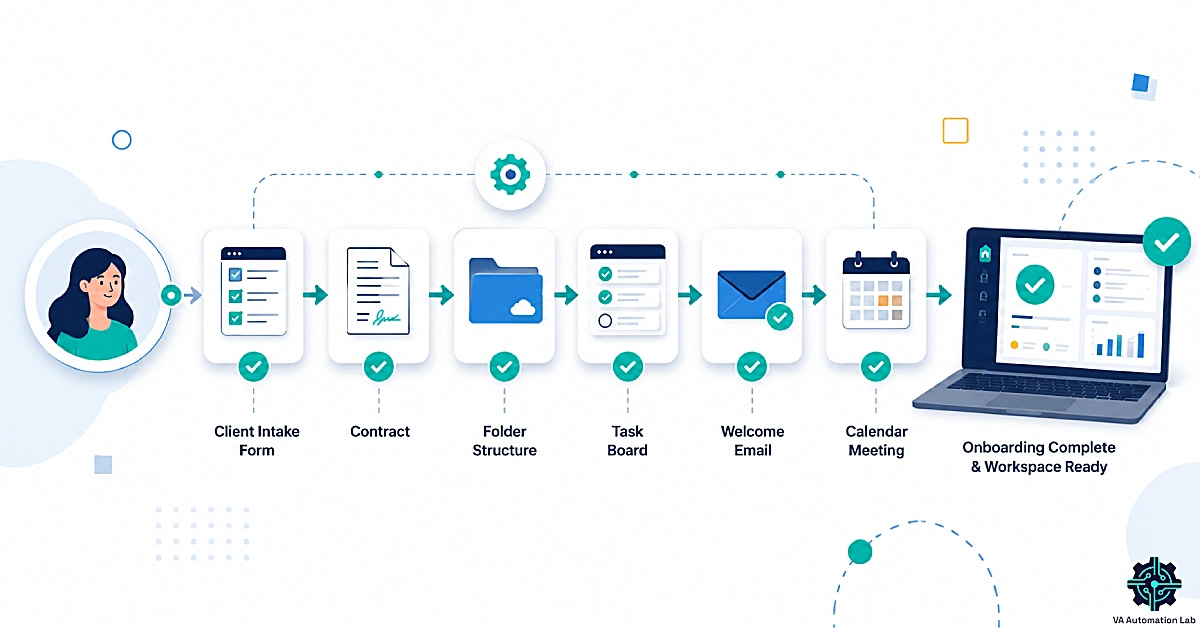
Client onboarding automation for virtual assistants means connecting a form, a contract tool, and a workflow platform (like Make) so that a single client submission triggers folder setup, task creation, and a welcome email automatically — turning 2–4 hours of manual setup into a system that runs in minutes.
What this guide covers:
- Why client onboarding automation changes the economics of a VA business
- The 9 stages of a complete onboarding workflow
- Best client onboarding tools for virtual assistants, by category
- Recommended stacks for beginners, intermediate, and advanced VAs
- Step-by-step automation for each onboarding stage
- Three complete automation workflows, implemented
- The VA client onboarding checklist
- Common mistakes that make onboarding systems fail
👉 AI Tools for Virtual Assistants: The Complete Practical Guide — the full reference for every AI tool category in VA work.
👉 Automation for Virtual Assistants: The Complete Guide — for a full automation overview covering six workflow categories and a 90-day rollout plan.
Build a Smarter, More Automated VA Business
This guide covers the automation layer of your VA business, the free toolkit gives you the AI prompts, tool recommendations, and workflow templates to run the full operation.
Inside: curated AI tools, prompt libraries, and automation starters built specifically for freelance VAs.
Table of Contents
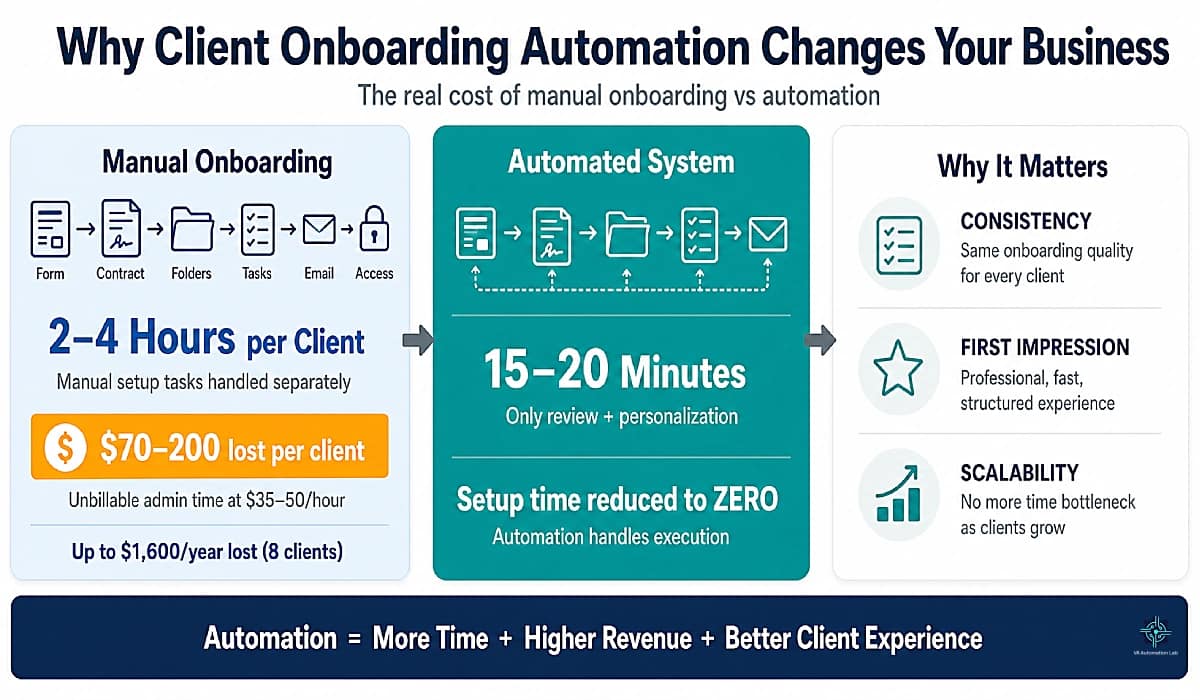
1. Why Client Onboarding Automation Changes Your Business
The business case for client onboarding automation is more specific than “save time.” The relevant number is 2-4 hours. That’s the realistic manual setup time for a single new client when intake form review, contract generation, folder creation, task setup, welcome email, and access collection are each handled as separate manual steps.
At a conservative VA billing rate of $35-50/hour, each manual onboarding cycle represents $70-200 of unbillable time. A VA who brings on 8 new clients per year at the lower end of that range spends $560-1,600 annually on onboarding administration that produces no client value and no revenue.
A configured virtual assistant onboarding system that automates the same process takes 15-20 minutes of VA time per new client. That’s the review and personalization layer that automation cannot replace. The 2-4 hours of mechanical setup execution becomes zero. The time saving is not marginal; it is the difference between a process that scales and one that does not.
Beyond time recovery, two other drivers matter:
Consistency. A manual onboarding process has as many variations as the VA’s workload on the day each client arrives. A busy week produces a rushed onboarding; a quiet week produces a thorough one. Clients receive different quality of experience based on factors unrelated to their value. An automated system delivers the identical experience to client 1 and client 10.
First impression management. The quality of the onboarding experience is the client’s primary data point for assessing your operational competence before they have seen any of your work. A polished, fast, automated onboarding (instant confirmation, professional contract, organized workspace) signals the same professionalism your actual work delivers.
2. The 9 Stages of a Complete Onboarding Workflow
Every client onboarding workflow for virtual assistants, regardless of service type or complexity, moves through the same nine stages. Understanding the full sequence before building automation is critical, systems built around a partial workflow require rebuilding when the missing stages are added.
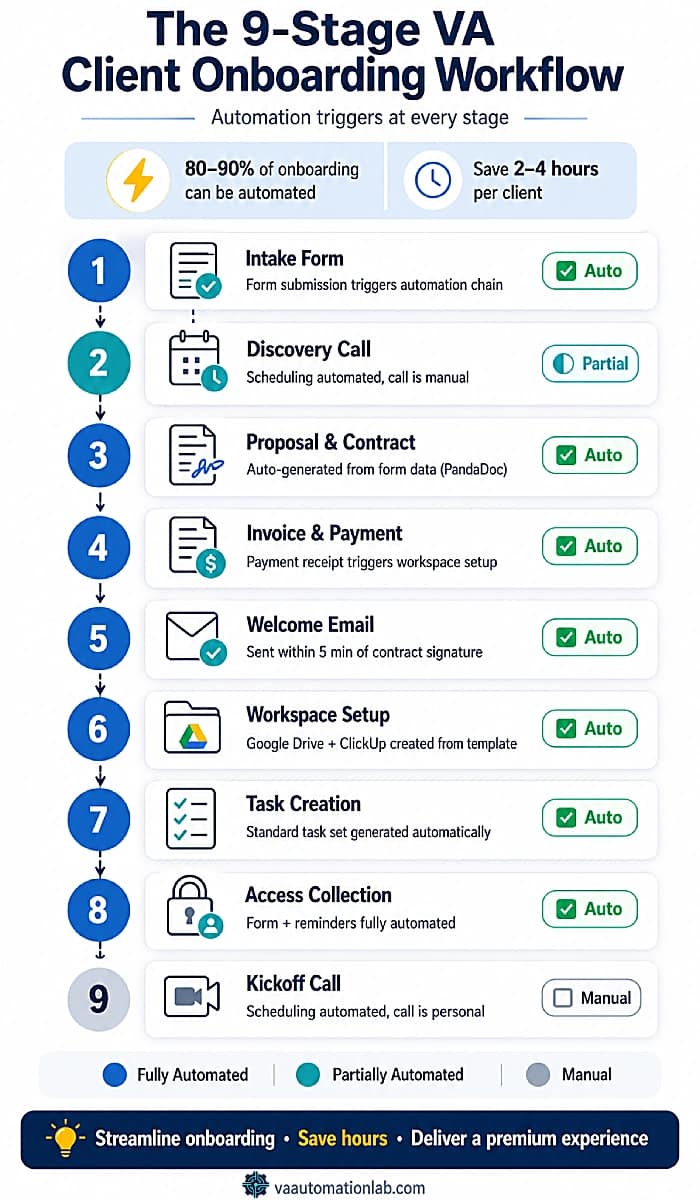
Stage 1 — Intake Form
The trigger point for the entire virtual assistant onboarding system. The intake form collects the client information that every subsequent automation uses: name, business details, service scope, tool stack, communication preferences, and access requirements. Every field should have a downstream purpose — feeding an automation, populating a template, or informing a decision.
Automation potential: High. Form submission triggers the entire downstream automation chain.
Stage 2 — Discovery Call
The qualification and expectation-setting stage. In an automated system, the discovery call is supported by automation before and after: a scheduling confirmation that includes a pre-call questionnaire, and a post-call follow-up that confirms agreed scope and next steps.
Automation potential: Medium. The call itself is manual; the scheduling, preparation, and follow-up are automatable.
Stage 3 — Proposal and Contract
The formalization stage. Tools like PandaDoc or Dubsado auto-populate contract templates with client data from the intake form: name, service scope, start date, pricing, and terms. Contract signature triggers the next automation sequence.
Automation potential: High. Generation, delivery, signature detection, and filing are fully automatable.
Stage 4 — Invoice and Payment
Payment confirmation is the cleanest automation trigger in the onboarding sequence. It is binary (paid / not paid) and maps directly to a workflow action. When payment is received, the system advances to the next stage. When pending, the system waits and sends automated reminders.
Automation potential: High. Payment received triggers workspace setup, welcome email, and task creation simultaneously.
Stage 5 — Welcome Email and Onboarding Package
The client’s first post-contract touchpoint. An automated welcome email that arrives within minutes of payment confirmation (with an onboarding guide, workspace link, and kickoff scheduling link) sets the operational standard for the entire engagement.
Automation potential: High. Trigger, personalization from form fields, and delivery are fully automatable.
Stage 6 — Folder and Workspace Setup
Google Drive folder structure, ClickUp client list, Notion workspace, whichever combination the VA uses, is created automatically from a template, renamed with the client’s name, and populated with the base documents and tasks every new client starts with.
Automation potential: High. Make handles folder template duplication and renaming natively.
Stage 7 — Task and Project Creation
The ClickUp client list is created from the standard template, onboarding tasks are assigned with due dates, recurring deliverable tasks are activated, and custom fields are populated with client-specific data from the intake form.
Automation potential: High. ClickUp automations handle this natively; Make connects external triggers to ClickUp actions.
Stage 8 — Access and Permissions Collection
This is the most frequently delayed stage in manual onboarding. Clients consistently fail to send access credentials without automated reminders. An access request form sent automatically after the welcome email, with a 48-hour reminder for non-completion, removes the manual follow-up entirely.
Automation potential: High. Form sending, reminder sequence, and ClickUp task status updates are fully automatable.
Stage 9 — Kickoff
The transition from onboarding to active collaboration. A kickoff message or call that confirms deliverables, establishes the communication rhythm, and signals that the working relationship has formally begun.
Automation potential: Low. The kickoff itself should be personal, automated only in the scheduling and pre-kickoff preparation task generation.
Day | Stage | Automation | Tools |
Day 1 | Intake form submitted | ✅ Full | Jotform → Make |
Day 1 | Confirmation email | ✅ Full | Gmail + Make |
Day 2 | Contract generated + sent | ✅ Full | PandaDoc + Make |
Day 2-3 | Contract signed → payment | ✅ Trigger | PandaDoc → Stripe |
Day 3 | Folder + workspace setup | ✅ Full | Make + Drive + ClickUp |
Day 3 | Welcome email + package | ✅ Full | Brevo/Gmail + Make |
Day 4 | Access request form sent | ✅ Full | Gmail + Jotform |
Day 4-5 | Access received → tasks updated | ✅ Full | ClickUp automations |
Day 6 | First deliverable | ⬜ Manual | ClickUp |
Day 7 | Kickoff call | ⬜ Manual | SavvyCal + Zoom |
3. Best Client Onboarding Automation Tools for Virtual Assistants
The tool stack for client onboarding automation does not need to be extensive — it needs to be connected. A five-tool stack where every tool passes data to the next outperforms a ten-tool stack where each operates in isolation.
The minimum viable stack covers six functional categories. Below is the best tool in each category for VA onboarding, with the alternatives worth knowing.
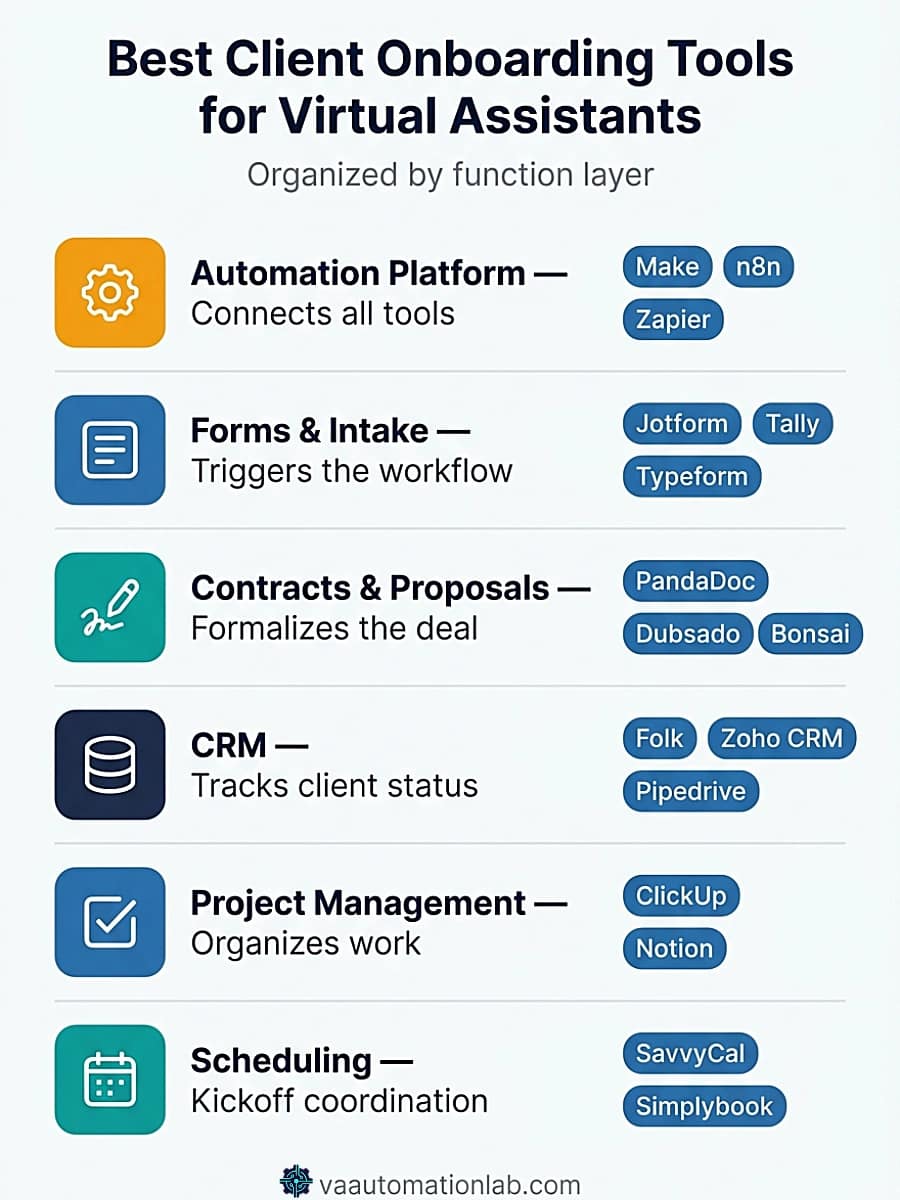
Automation Platform — The Connection Layer
The platform that connects all other tools and executes the workflow logic. This is the most important category decision you make, everything else connects through here.
Make is the strongest platform for full VA onboarding automation. Its visual scenario builder, native Router module for service-type branching, and webhook support for contract signature detection make it purpose-built for the multi-step, conditional logic that a complete onboarding system requires. The Core plan at $9/month (billed annually) covers unlimited active scenarios with minute-level scheduling, more than sufficient for most solo VA operations. The Free plan (1,000 credits/month, 15-minute minimum interval) is usable for low-volume testing.
n8n is the open-source alternative worth knowing if you are technical or want self-hosting flexibility. The cloud Starter plan is $23/month (2,500 executions), pricier than Make at equivalent volume, but the growing connector library make it a credible option for VAs who want more control. Pro is $58/month for 10,000 executions.
Zapier remains the easiest entry point for linear workflows (no branching, one service type). It is sufficient for Workflow 1 in Section 6 but becomes limiting once you need conditional routing across service types.
Tool | Best For | Starting Price | Key Advantage |
Make | Full onboarding system | Free – $9/mo Core | Router + webhook support |
n8n | Technical VAs, self-hosting | Free – $23/mo Starter | Open-source |
Zapier | Simple linear workflows | Free – $20/mo Pro | Easiest setup |
👉 Zapier vs Make for Virtual Assistants: The Complete Comparison Guide — full comparison with pricing and workflow examples.
Forms and Intake — The Trigger Layer
The intake form is the trigger point for the entire virtual assistant onboarding system. Tool selection matters less than field design, every field should have a downstream automation use.
Jotform is the strongest intake tool for VA onboarding because of its Make and Zapier native integration, conditional logic for different service types, and the AI Agents feature that can auto-process form submissions. The Starter plan is free (5 forms, 100 monthly submissions), workable for a VA with under 8–10 new clients per year. The Bronze plan is $39/month (25 forms, 1,000 submissions).
Essential fields for a VA intake form:
- Full name and business name
- Primary service requested (dropdown, feeds the Router module in Make)
- Current tools in use
- Communication preference (email / Slack / WhatsApp)
- Working hours and time zone
- Primary goals for the engagement
- Access requirements (list platforms)
- How they found you (tracking only)
Alternatives: Tally (free, clean Notion-style design), Typeform (best client experience, higher cost), Google Forms (zero cost, limited automation integration).
👉 Jotform for Virtual Assistants: Intake & Onboarding — the complete tool review, with setup and workflows.
Contracts and Proposals — The Formalization Layer
Contract automation covers three steps: template population from form data, digital delivery, and signature detection that triggers the next automation sequence.
PandaDoc is the primary contract tool for this stack. Its native Make and Zapier integration, webhook signature events, and template variable system (auto-populate client name, service scope, start date, pricing from form data) make it the cleanest fit for automated onboarding. The Free plan covers 60 documents/year and 5 e-signatures/month, workable for early-stage VAs. The Starter plan is $19/month (unlimited uploads and e-signatures, no CRM integrations). The Business plan is $49/month (CRM integrations, approval workflows, web forms). The 14-day free trial covers the full feature set.
Dubsado is the best all-in-one option for VAs who want contract, proposal, invoice, and scheduling in a single tool without connecting multiple apps. The Starter plan is $28/month (unlimited projects, invoicing, form and email templates). The Premier plan is $44/month adds scheduling, automated workflows, and Zapier integration, this is the plan that makes Dubsado a genuine automation tool rather than just a client management suite. The 21-day free trial is generous for evaluation.
Bonsai is another all-in-one covering contracts, invoices, time tracking, and a basic CRM. The Basic plan is $9/month (time tracking, task management, CRM, unlimited clients). The Essentials plan is $19/month adds invoices, proposals, contracts, client portal, and scheduling. The Premium plan is $29/month adds project insights, Gantt view, and integrations (QuickBooks, Zapier, Calendly, Google). For a VA who wants the simplest possible all-in-one at the lowest cost, Bonsai Essentials at $19/month covers the core onboarding formalization steps.
HoneyBook is a third all-in-one worth knowing. The Starter plan is $29/month (contracts, invoices, proposals, client portal, HoneyBook AI). The Essentials plan is $49/month adds scheduler, automations, and QuickBooks integration. For VAs who prefer a more design-forward client experience, HoneyBook’s polished interface is worth evaluating against Dubsado.
Signeasy is worth knowing if you only need the signature step and already have a separate form and CRM. The Personal plan is $10/month (unlimited signing, 5 contracts sent/month), and the Business plan is $20/seat/month adds AI-extracted contract summaries and template collaboration. It doesn’t replace PandaDoc’s template-population or Dubsado’s all-in-one workflow, but for a VA who wants signature-only automation without a full contract suite, it’s the lighter option.
👉 PandaDoc for Virtual Assistants: Contracts & Onboarding — Learn how PandaDoc helps virtual assistants automate contracts, proposals, and client onboarding. For the complete comparison of the tools in this category, see Best Contract Tools for Virtual Assistants.
CRM and Client Management — The Memory Layer
A CRM records every client interaction, tracks status through the onboarding stages, and provides the data layer that automation uses to personalize communications and route workflows.
Folk is the strongest lightweight CRM for solo VAs and small VA teams. Its AI-powered contact enrichment, Gmail and calendar sync, LinkedIn extension, and 5,000+ integrations make it practical for a VA business without requiring enterprise-level setup. The Standard plan is $24/member/month (pipeline management, email campaigns, Magic AI fields, LinkedIn extension). The Premium plan is $48/member/month adds email sequences, advanced permissions, and API access.14-day free trial.
Zoho CRM is the best option for VAs managing their own lead pipeline alongside client operations. The Free plan covers 3 users with leads, deals, workflows, reports, and mobile app, genuinely usable for a VA business. The Standard plan is $16/month (AI agents, cadences, sales forecasting). The Professional plan is $27/month (process automation, CPQ, email intelligence).
Pipedrive is worth mentioning for VAs who also manage sales pipelines for their clients, its Lite plan at $16/month provides a clean visual pipeline, AI-powered reporting, and 500+ integrations including Zapier and Lemlist.
👉 Best CRM for Virtual Assistants (2026) — the most direct path to automating the full sequence from proposal acceptance to project kickoff.
👉 Folk CRM for Virtual Assistants: Complete Setup Guide — the deep dive into the best CRM tool for VAs.
Project Management — The Operations Layer
Task creation from the client template produces the internal operational structure for a new client within minutes of contract signature, without the VA manually building the list.
ClickUp is the recommended project management tool for this stack. Its native automation engine, Client List Template system, and custom fields let the VA pre-configure every onboarding task with due dates relative to the start date, tasks that generate automatically when the client list is created from template. The Free plan covers 5 active automation rules, unlimited tasks, and 1 form. The Unlimited plan at $7/month (billed annually) adds unlimited spaces, integrations, native time tracking, and 1,000 automation executions, the right tier for an active VA business. The Business plan at $12/month adds unlimited dashboards, webhooks, and 5,000 automation executions.
👉 ClickUp for Virtual Assistants: Setup Guide & Templates — the complete ClickUp configuration for onboarding and client management.
Scheduling — The Calendar Layer
SavvyCal is the recommended scheduling tool for VA onboarding. Its recipient-friendly overlay feature, where clients see the VA’s availability overlaid on their own calendar, reduces back-and-forth significantly for kickoff scheduling. The Free plan covers 1 scheduling link and 1 calendar connection. The Basic plan is $12/month (unlimited calendars, unlimited links, team scheduling). The Premium plan is $20/month (custom domains, delegate to an assistant, paid bookings).
Simplybook.me is the alternative for VAs offering service bookings alongside scheduling. Its Basic plan is $14/month (100 bookings, 5 providers, payments, client app).
Communication and Email — The Sequence Layer
Welcome emails, reminder sequences, and post-kickoff communications can run through Gmail via Make for most VAs. When client volume increases or multi-step nurture sequences are needed, a dedicated email tool becomes worthwhile.
Brevo is the most cost-effective option for VAs building automated email sequences into their onboarding system. The Free plan covers 300 emails/day and basic automation. The Starter plan is $8/month (from 5,000 emails/month, AI content generator, email templates, forms). The Standard plan is $16/month (marketing automation, A/B testing, landing pages, up to 3 users). For a VA who sends welcome sequences, access form reminders, and post-kickoff emails to multiple clients simultaneously, Brevo’s automation at $8/month is a practical upgrade from Gmail-only.
ActiveCampaign is the option for VAs managing larger client communication operations. Pricing for 1,000 contacts: Starter at $15/month, Plus at $37/month (which includes advanced automation and CRM features).14-day free trial.
AI and Meeting Intelligence — The Intelligence Layer
AI enhances three specific onboarding steps where personalized output produces better client experience than pure template-based automation:
AI Use Case | What It Produces | Tool | When |
Intake summary | 3-paragraph client brief for internal use | Claude / ChatGPT | After form submission |
Welcome email | Personalized opening | Claude / ChatGPT | After contract signed |
Onboarding checklist generation | Custom checklist from intake form responses | ClickUp AI | After workspace created |
SOP drafting | Client-specific process documentation | Notion AI | First week |
Meeting notes | Kickoff call transcript + summary | Fireflies.ai | During kickoff |
Fireflies.ai records and transcribes the kickoff call, generates AI summaries, and creates action items automatically. The Free plan covers 800 minutes of storage per seat with limited AI summaries. The Pro plan is $10/month (8,000 minutes, unlimited summaries, action items, integrations). For VAs who run multiple kickoff calls per month, Fireflies eliminates the manual note-taking step entirely and produces a reference document that feeds the post-kickoff summary email.
👉 Claude AI for Virtual Assistants: Complete Guide — covers the Projects configuration workflow and the prompt library for onboarding documentation, welcome emails, and scope of work drafting.
👉 ChatGPT for Virtual Assistants: Complete Guide — for the prompt templates and system prompt configuration that produce the best onboarding document outputs.
Make Connects Your Entire Onboarding Stack
Make is the automation platform that connects Jotform, PandaDoc, Google Drive, ClickUp, and your CRM into a single onboarding scenario, without code.
The Core plan ($9/month, billed annually) covers unlimited active scenarios with minute-level scheduling, enough for any solo VA or small team.
The free plan covers 1,000 credits/month, workable for building and testing your first onboarding automation before committing.
4. Recommended Client Onboarding Stack for Virtual Assistants
The tool categories above each have multiple valid options. This section cuts through the decision fatigue: here are the specific stacks that make sense by experience level, monthly new client volume, and budget.
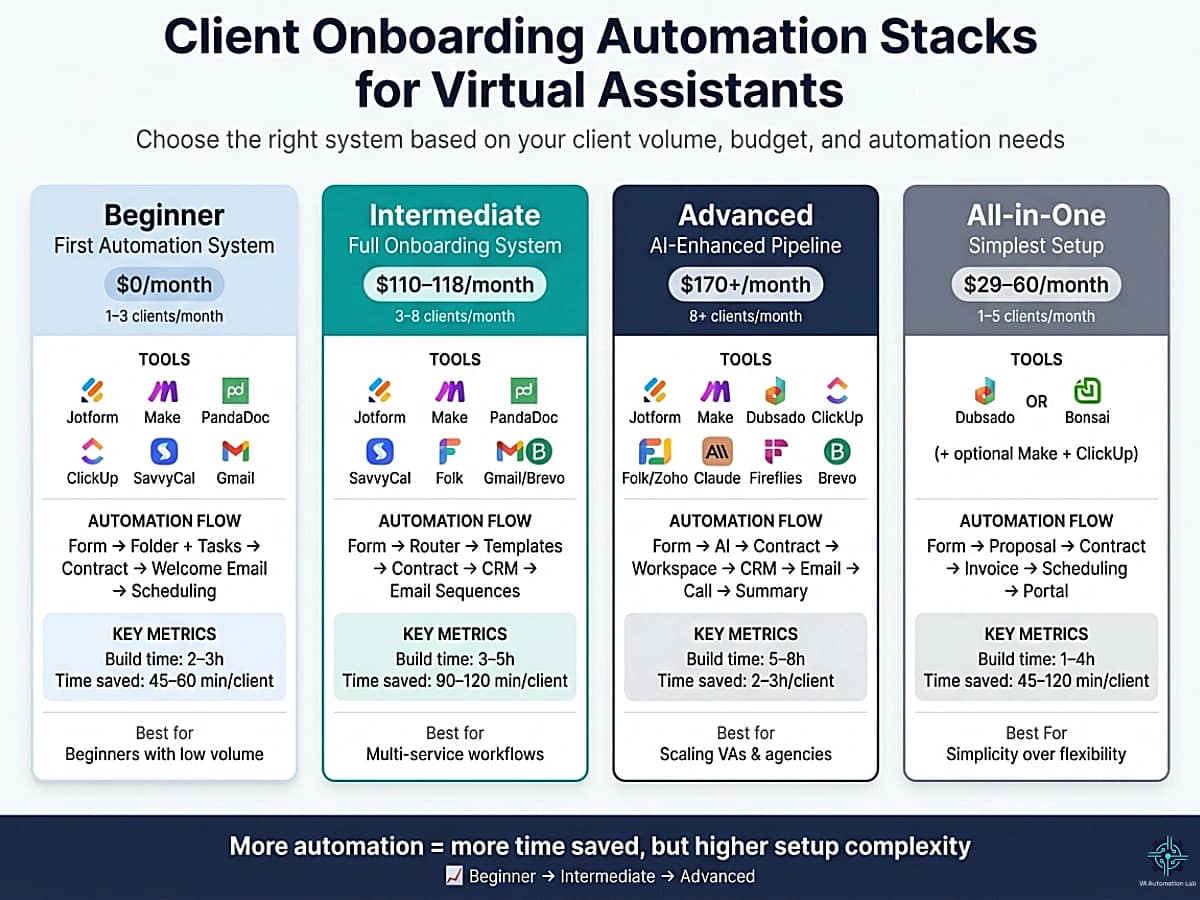
Beginner Stack — First Automation System
Best for: VAs with 1–3 new clients per month, building their first automated onboarding system, who want to start with the tools that have the least learning curve and the lowest monthly cost.
The stack:
- Intake Form: Jotform (Starter — free, 5 forms, 100 submissions)
- Automation: Make (Free plan — 1,000 credits/month, sufficient for low volume)
- Contract: PandaDoc (Free plan — 60 documents/year, 5 e-signs/month)
- Project Management: ClickUp (Free plan — 5 automation rules, unlimited tasks)
- Scheduling: SavvyCal (Free plan — 1 scheduling link)
- Email: Gmail (via Make — no additional cost)
Monthly cost: $0 (all free tiers)
What it automates:
- Jotform submission → Make creates Google Drive folder + ClickUp client list
- PandaDoc contract sent manually or triggered from Make on form submission
- PandaDoc signature → Make sends welcome email via Gmail
- Gmail sends access form link automatically 30 minutes after welcome email
- SavvyCal link included in welcome email for kickoff scheduling
What remains manual: contract template selection (if multiple service types), payment collection (Stripe/PayPal manual link), kickoff call itself
Time to build: 2–3 hours.
Time saved per new client: 45–60 minutes.
When to upgrade: When free tier limits are hit (5+ forms or 100+ submissions/month) or when you add a second service type that requires routing logic.
Intermediate Stack — Full Onboarding System
Best for: VAs with 3–8 new clients per month, managing multiple service types, who need contract automation with signature detection, CRM tracking, and Make’s Router for service-type branching.
The stack:
- Intake Form: Jotform (Bronze — $39/month, 25 forms, 1,000 submissions, conditional logic)
- Automation: Make (Core — $9/month, unlimited active scenarios, minute-level scheduling)
- Contract: PandaDoc (Starter — $19/month, unlimited e-signatures and uploads)
- Project Management: ClickUp (Unlimited — $7/month, unlimited integrations, 1,000 automation executions)
- Scheduling: SavvyCal (Basic — $12/month, unlimited links and calendars)
- CRM: Folk (Standard — $24/month, pipeline, email campaigns, AI fields)
- Email sequences: Gmail via Make (or Brevo Starter at $8/month for multi-step sequences)
Monthly cost: $110 / $118 (with Brevo)
What it automates:
- Jotform submission → Make Data Store saves all fields
- Make Router branches by service type → correct ClickUp template per service
- Google Drive folder created from master template, renamed automatically
- PandaDoc contract generated from form data, sent for signature
- Make waits for PandaDoc signature webhook, then activates next sequence
- Welcome email with personalized opening, workspace link, access form
- Access form sent automatically at 30-minute delay
- 48-hour and 96-hour reminder automations for non-submission
- Folk CRM record created and updated automatically
- VA notified via Slack or email on completion
Time to build: 3–5 hours.
Time saved per new client: 90–120 minutes.
When to upgrade: When you need AI personalization at scale, a dedicated all-in-one tool (Dubsado/Bonsai) to replace multiple tools, or when managing 8+ new clients per month.
Advanced Stack — AI-Enhanced Full Pipeline
Best for: VAs with 8+ new clients per month or VA agencies, who want personalized client communication at scale, AI-generated client briefs, and full end-to-end pipeline automation with minimal manual touchpoints.
The stack:
- Intake Form: Jotform (Silver — $45/month, 50 forms, 2,500 submissions)
- Automation: Make (Pro — $16/month, priority execution, custom variables, full-text execution logs)
- Contract + All-in-One: Dubsado (Premier — $44/month, automated workflows, scheduling, Zapier integration)
- Project Management: ClickUp (Business — $12/month, unlimited dashboards, webhooks, 5,000 automation executions)
- CRM: Folk (Standard — $24/month) or Zoho CRM (Professional — $27/month for advanced automation)
- AI Layer: Claude API via Make (pay-per-use, typically $5–15/month at onboarding volumes)
- Meeting Intelligence: Fireflies.ai (Pro — $10/month for kickoff call transcription)
- Email Sequences: Brevo (Standard — $16/month, marketing automation, A/B testing)
Monthly cost: ~$172 / $182
What it automates — beyond Intermediate:
- Claude API generates a structured client brief from intake form data automatically
- Claude generates personalized welcome email opening from form data
- Client brief saved to ClickUp Doc in the client workspace automatically
- Fireflies.ai joins the kickoff call, generates transcript and action items
- Post-kickoff summary email drafted from Fireflies transcript, sent via Brevo
- Full onboarding log in Google Sheets (client name, date, service type, contract date, workspace link)
Time to build: 5–8 hours initial setup.
Time saved per new client: 2–3 hours.
All-in-One Alternative — Simplest Possible Stack
Best for: VAs who want to minimize the number of connected tools and manage onboarding, contracts, invoicing, and scheduling from a single platform. Trades automation flexibility for operational simplicity.
The stack:
- All-in-One Platform: Dubsado (Premier — $44/month) OR Bonsai (Premium — $29/month)
- Automation layer (optional): Make (Core — $9/month)
- Project Management (recommended): ClickUp (Unlimited — $7/month)
Monthly Cost:
- Minimal setup (solo tool): $29 / $44
- With automation (Make): $38 / $53
- With full stack (ClickUp + Make): $45 / $60
What it automates:
Native (Dubsado / Bonsai)
- Intake form → automatic client record creation
- Proposal → contract → invoice (automated sequential workflow)
- Contract signed → triggers: – welcome email – invoice creation
- Built-in scheduling (calendar link included in workflows)
- Centralized client portal (documents, communication, payments)
With Make
- Automatic Google Drive folder creation from template
- Client data sync → ClickUp
- Delayed access form delivery
- Automated follow-ups for incomplete onboarding
- Internal notifications (email or Slack)
What remains manual:
- Initial personalization (welcome message, notes)
- Advanced task/project structuring
- Complex multi-service onboarding logic
What It Does Better Than Multi-Tool Stacks:
- Fewer integrations → fewer failure points
- Faster setup
- Simpler client experience (everything in one place)
Limitations:
Dubsado
- No native file system automation (e.g., Google Drive structure)
- Limited project management → needs ClickUp for scaling
- No built-in AI personalization
Bonsai
- Less advanced automation compared to dedicated tools
- Less flexible for multi-service workflows
- Not ideal for larger teams or VA agencies
When This Stack Makes Sense:
- You’re a solo VA or small operation
- You onboard 1–5 new clients per month
- You want to minimize technical complexity
- You prefer speed and simplicity over customization
Time to build: Base setup (Dubsado/Bonsai only): 1–2 hours With Make + ClickUp: 2–4 hours.
Time saved per new client: all-in-one only ~45–90 minutes with automation layer ~60–120 minutes.
ClickUp Turns Onboarding Into a One-Click Setup
The ClickUp Client List Template is the internal operations layer of the onboarding system, create it once, and every new client gets a fully configured workspace with tasks, due dates, and custom fields generated automatically.
The Unlimited plan ($7/month, billed annually) covers unlimited integrations and 1,000 automation executions, the right tier for an active VA business.
5. How to Automate Each Onboarding Stage — Step by Step
Before you automate client onboarding, you need a reliable way to bring new clients in — and our guide on How to Get Clients Using AI shows how to build a predictable acquisition system using AI-driven prospecting, content, and outreach.
The six stages below cover every automatable step in the client onboarding workflow for virtual assistants, from form submission to kickoff preparation. Each stage includes the trigger, the automation logic, and the specific tools that implement it.
Stage 1 — Intake Form Automation
Trigger: form submitted.
Automation sequence:
1. CRM record creation: Map form fields to Folk or Zoho CRM properties, client name, email, service type, start date, source. Make creates the record automatically on submission.
2. Internal notification: Slack or email notification to the VA with a summary of form responses, arriving within 60 seconds of submission.
3. Intake summary generation (AI-assisted): Paste form responses into Claude with this prompt:
Summarize this client intake form for internal use.Output:- Client name and business (1 line)- Primary service requested (1 line)- Key goals (bullet list, max 3)- Tools they currently use (bullet list)- Communication preference and time zone- Access requirements (list platforms)- Any flags or unusual requestsTone: factual and concise. No padding.Form responses: [PASTE FORM DATA]
4. Confirmation email to client: Automated reply confirming receipt, setting expectation for next steps (contract within 24 hours), and thanking them for their submission.
5. Recommended configuration: Jotform → Make → Folk/Zoho CRM + Gmail (confirmation) + Slack (notification)
Stage 2 — Contract Automation
Trigger: form submission or proposal accepted.
Automation sequence:
1. Template population: PandaDoc pulls client name, service scope, start date, and pricing from the intake form or CRM record, no manual editing of the contract template required.
2. Contract delivery: Sent automatically to the client email within 2–4 hours of intake form submission (or immediately if the trigger is proposal acceptance in Dubsado).
3. Signature detection: When the contract is signed, PandaDoc sends a webhook to Make that activates the next automation sequence, folder creation, task setup, and welcome email simultaneously.
4. Signed contract filing: Automatically saved to /Clients/[Client Name]/01 — Admin/Contract.
Stage 3 — Folder and Workspace Creation
Trigger: contract signed or payment received.
Make scenario for folder automation:
TRIGGER: PandaDoc — Contract signed
MODULE 1: Google Drive— Copy folderSource: /Templates/Master Client Folder Template
MODULE 2: Google Drive — Rename folderNew name: /Clients/[Client Name from form]
MODULE 3: Google Drive — Move to /Clients/
MODULE 4: Google Drive — Set sharing permissionsShare with: [client email from form] — Viewer
MODULE 5: Google Drive — Upload signed contractTo: /Clients/[Client Name]/01 — Admin/
MODULE 6: ClickUp — Create list from templateTemplate: "Client List Template"Rename: [Client Name]Folder: Client Work
MODULE 7: ClickUp — Update custom fieldsClient Name: [from form] ServiceCategory: [from form]Start Date: [from form]
Build time: 60–90 minutes for the full Make scenario. Execution for each new client: automatic, zero additional time.
Standard Google Drive folder structure:
/Clients/[Client Name]/
├── 01 — Admin (contract, invoice, intake form)
├── 02 — Deliverables
├── 03 — Assets (brand files, credentials, media)
└── 04 — Reports
Stage 4 — Task and Project Setup
Trigger: ClickUp list created (Stage 3) or contract signed.
Once the client list is created from the template, the following automations activate automatically because they are pre-configured in the template:
– Onboarding task set (10–12 tasks) generated with due dates relative to start date
– Recurring weekly deliverable tasks activated with the correct recurrence interval
– Client Name custom field populated from the list name
– Dashboard widget updated to include the new client
Standard onboarding task set to include in the ClickUp template:
ONBOARDING TASKS (generated automatically):
□ Review intake form and create client brief
□ Set up Google Drive folder structure
□ Configure ClickUp workspace
□ Send welcome email + onboarding package
□ Send access request form
□ Collect and verify all platform access
□ Create client-specific SOPs (if applicable)
□ Schedule kickoff call
□ Prepare kickoff agenda
□ Send kickoff confirmation + pre-call questionnaire
□ Run kickoff call
□ Send post-kickoff summary email
Stage 5 — Welcome Email Automation
Trigger: contract signed or payment received.
Automation: Gmail or Brevo via Make sends the welcome email within 5 minutes of the trigger event. No manual drafting, the email is assembled from a template with client-specific fields populated from form data.
Welcome email template structure:
Subject: Welcome, [First Name] — Here's What Happens Next
Hi [First Name],
Your contract is signed and everything is in motion.
Here's what's happening right now:
- Your client workspace is being set up
- Your onboarding folder is ready: [DRIVE LINK]
- Your project dashboard is live: [CLICKUP LINK]
Your next step: Please complete this short access form so I can
get started on the right tools immediately: [JOTFORM ACCESS LINK]
I'll be in touch within 24 hours to schedule our kickoff call.
[Your Name]
AI-enhanced personalization prompt:
Write a professional and warm welcome email for a new VA client.
Use the intake form data below to personalize the opening paragraph, reference their specific goal or business context in 1–2 sentences.
Tone: professional, warm, confident. Under 200 words.
Do not use filler phrases like "I'm excited to" more than once.
Client intake data: [PASTE FORM RESPONSES]
Standard next steps: workspace link, access form link, kickoff scheduling link.
Stage 6 — Access Collection Automation
Trigger: welcome email sent.
Automation sequence:
1. Access form sent automatically 30 minutes after the welcome email via Make scheduler.
2. ClickUp task status update: When access form is submitted, Make updates the “Collect platform access” task to Done automatically.
3. 48-hour reminder (non-submission):
Subject: Quick reminder — access form for [Client Name]
Hi [First Name], Just a quick reminder to complete the access form I sent yesterday, it takes about 5 minutes and allows me to get started on your accounts immediately.
[JOTFORM ACCESS LINK]
[Your Name]
4. Second reminder at 96 hours if still not submitted, same email with direct offer to handle via a brief call instead.

A structured access request form that helps Virtual Assistants collect the permissions and credentials needed to set up client systems efficiently and securely (Stage 6).
Capture Client Data Once — Automate Everything That Follows
Every automated onboarding system starts with one thing: a structured intake form. Jotform lets you collect all the information you need upfront and instantly pass it into your automation workflows.
Instead of back-and-forth emails and missing details, you get clean, structured data that powers your entire onboarding system.
6. Three Complete Automation Workflows — Implemented
The three workflows below represent three levels of client onboarding automation, from a functional beginner system to a fully automated multi-branch architecture. Each is documented at the implementation level with the specific trigger, module sequence, and time-to-build estimate.
Workflow 1 — Simple Onboarding (Make Free / Zapier)
Best for: VAs building their first onboarding automation, administrative VAs, or onboarding workflows with one service type and no branching.
Time to build: 45-60 minutes.
Time saved per new client: 60-90 minutes.
SCENARIO: Intake → Workspace → Welcome

TRIGGER: Jotform — New submission

MODULE 1: Google Drive — Create folder from template
  Name: [Client Name from form]
  Location: /Clients/

MODULE 2: ClickUp — Create list from template
  Name: [Client Name]
  Folder: Client Work

MODULE 3: Gmail — Send confirmation email
  To: [Client email from form]
  Template: intake confirmation

---

TRIGGER 2: PandaDoc — Document completed

MODULE 4: Gmail — Send welcome email
  To: [Client email]
  Template: welcome email
  Delay: 0 min

MODULE 5: Gmail — Send access form
  Delay: 30 minutes after MODULE 4
  To: [Client email]
  Template: access request
What this system covers: form submission, folder creation, welcome email, access form, Slack notification, task activation on payment.
What it does not cover: contract generation (manual trigger), branching by service type, CRM update.
Workflow 2 — Full Onboarding System (Make Core)
Best for: VAs managing multiple service types, systems-building VAs, or any onboarding workflow where branching logic based on client type is required.
Time to build: 3-4 hours for the full scenario.
Time saved per new client: 2-3 hours.
Make scenario structure:
TRIGGER: Jotform — New submission

MODULE 1: Data Store — Save all client fields
  (client name, email, service type, start date, goals, tools, communication pref)

MODULE 2: Google Drive — Copy master folder template
  Rename: /Clients/[Client Name]/

MODULE 3: Google Drive — Create subfolders
  01 — Admin / 02 — Deliverables / 03 — Assets / 04 — Reports

MODULE 4: PandaDoc — Create document from template
  Populate: client name, service scope, start date, pricing from Module 1
  Action: Send for signature

MODULE 5: Make — Wait for webhook
  Wait until PandaDoc signature confirmation received

MODULE 6: Router — Branch by Service Type
  IF "Social Media Management" →
    ClickUp: Create list from Social Media Client Template
  IF "Admin Support" →
    ClickUp: Create list from Admin Client Template
  IF "Executive Support" →
    ClickUp: Create list from Executive Client Template

MODULE 7 (all branches): Gmail — Send welcome email
  Personalized opening from service type field
  Include: workspace link + access form link

MODULE 8: Gmail — Send access form
  Delay: 30 minutes

MODULE 9: Folk — Create/Update CRM record
  Status: Lead → Active Client
  Start date, service type, contract date populated

MODULE 10: Slack — Notify VA
  " [Client Name] fully onboarded — [Service Type] — ClickUp ready"
What this system covers: full intake-to-workspace pipeline, contract generation and signature detection, service-type branching, CRM update, onboarding log, VA notification. Zero manual steps between form submission and kickoff scheduling.
Workflow 3 — AI-Enhanced Onboarding (Make Pro + Claude API)
Best for: VAs who want personalized client communication at scale without manual writing. Combines Make‘s automation architecture with Claude or ChatGPT for the communication layer.
Time to build: 5-6 hours (includes AI prompt configuration and testing).
Time saved per new client: 2-3 hours + 20-30 minutes of manual writing per client.
Implementation:
Stages 1–10 are identical to Workflow 2. The AI enhancement adds three additional modules:
MODULE 11: HTTP — Claude API call
  System prompt: [see below]
  Input: all form fields from Module 1 data store
  Output: JSON with "brief" and "email_opening" fields

MODULE 12: ClickUp — Create Doc
  Title: "Client Brief — [Client Name]"
  Content: brief field from Module 11
  Location: /Clients/[Client Name]/ workspace

MODULE 13: Gmail — Send personalized welcome email
  Opening paragraph: email_opening from Module 11
  Body: standard next steps template
System prompt for Claude API (Module 11):
You are a professional virtual assistant writing an internal client brief and a personalized welcome email opening.

Task 1 — Internal Brief:
Summarize this intake form into a structured client brief. Include:
- Client overview (name, business, service type)
- Primary goals (max 3 bullet points)
- Current tools and platforms
- Communication preferences
- Access requirements
- Flags or unusual requests (if any)

Task 2 — Welcome Email Opening:
Write 2–3 sentences that open a welcome email for this specific client.
Reference their business context or primary goal naturally.
Tone: professional and warm. No filler phrases.

Output format: JSON only — no preamble, no markdown.
{"brief": "[full brief text]", "email_opening": "[2–3 sentences]"}

Intake form data: [ALL FORM FIELDS]
👉 Make.com for Virtual Assistants: The Beginner Setup Guide — setting up your first scenarios, connecting tools, and creating your first automated onboarding workflow, no technical background required.
👉 Best Automation Workflows for Virtual Assistants — the complete automation workflow library for VA businesses.
Automate Contracts and Trigger Your Entire Onboarding Workflow
Stop manually creating and sending contracts for every new client.
With PandaDoc, you can generate professional agreements from your intake form data, send them instantly, and trigger the next steps of your onboarding automatically as soon as the client signs.
Instead of chasing signatures and switching between tools, your contract becomes the starting point of a fully automated onboarding system.
7. The Client Onboarding Checklist for Virtual Assistants
The checklist below is the operational reference for every new client onboarding cycle, the complete sequence of steps that the automated system executes, with manual steps clearly identified. Use it to verify your automation covers every stage and to audit any onboarding where a manual step may have been missed.
PRE-ONBOARDING (System Setup — One-Time)
□ Intake form built with all required fields
□ Form connected to Make (webhook or native integration)
□ Contract template configured with dynamic fields in PandaDoc
□ Master folder template ready in Google Drive
□ ClickUp client list template configured with standard task set
□ Welcome email template written and tested
□ Access request form created (separate Jotform)
□ All automations tested with a test submission
STAGE 1 — INTAKE (Automated)
□ Form submission received
□ CRM record created automatically
□ Internal notification sent to VA (Slack/email)
□ Client confirmation email sent automatically
□ Intake summary generated (AI-assisted or manual)
STAGE 2 — CONTRACT (Automated)
□ Contract generated from template with client data
□ Contract sent for signature automatically
□ Signature received
□ Signed contract filed in Google Drive automatically
□ Next automation sequence triggered
STAGE 3 — WORKSPACE SETUP (Automated)
□ Google Drive folder created from template
□ Subfolders (Admin, Deliverables, Assets, Reports) created
□ ClickUp client list created from template
□ Custom fields populated (client name, service type, start date)
□ Onboarding task set generated with due dates
□ Recurring deliverable tasks activated
STAGE 4 — CLIENT COMMUNICATION (Automated)
□ Welcome email sent within 5 minutes of contract/payment
□ Onboarding guide attached or linked
□ Workspace link included
□ Access request form link included
□ Kickoff scheduling link (SavvyCal) included
STAGE 5 — ACCESS COLLECTION (Automated + Manual)
□ Access request form sent automatically (30 min after welcome)
□ 48-hour reminder sent if form not completed (automated)
□ 96-hour second reminder sent if still pending (automated)
□ Access credentials received and verified (manual)
□ All platform access confirmed working (manual)
□ ClickUp access task marked Done (automated on form submission)
STAGE 6 — KICKOFF PREPARATION (Manual)
□ Kickoff call scheduled via SavvyCal
□ Pre-kickoff questionnaire sent (automated via SavvyCal)
□ Kickoff agenda prepared using intake form and client brief
□ All platform access confirmed before kickoff
STAGE 7 — KICKOFF (Manual)
□ Kickoff call conducted (Fireflies.ai recording active)
□ Deliverables and timeline confirmed
□ Communication rhythm established
□ Post-kickoff summary email sent (AI-assisted draft from Fireflies transcript)
□ Client transitioned to active status in CRM (automated)
□ Onboarding tasks archived in ClickUp
Every new client onboarding should include:
✅ Intake form connected to automation platform
✅ Contract generation and signature detection automated
✅ Folder and workspace created from template on trigger
✅ Welcome email sent within 5 minutes of contract/payment
✅ Access form sent automatically with 48h reminder
✅ All stages tested with a real test submission before going live
✅ Manual steps documented as tasks in ClickUp
8. Common Mistakes That Break Onboarding Systems
Automating Before the Process Is Defined
The most common reason onboarding automation fails in the first month: automation was built before the underlying process was clear. Every undefined step becomes a configuration decision during automation build, decisions made under time pressure produce systems that require constant adjustment.
The consequence: the automation runs, but produces inconsistent outputs, the wrong folder structure for some clients, missing tasks for others, welcome emails that arrive out of sequence.
The fix: map the complete 9-stage workflow on paper before opening any automation tool. Every trigger, every action, every conditional path should be decided at the process level before being implemented at the technical level. The automation build then becomes execution of a pre-defined design, not design and execution simultaneously.
Over-Automating Communication
Automation handles the logistics of onboarding communication efficiently. It handles the relationship dimension of that communication poorly. A welcome email that arrives in 90 seconds, personalized with the client’s name and business goal, and followed by an access form 30 minutes later, and a reminder 48 hours after that, creates a mechanized experience that signals the absence of human attention, the opposite of the professional impression onboarding is meant to create.
The fix: identify the two or three communication touchpoints in onboarding that most benefit from human presence, typically the post-signing personal note, the kickoff preparation call, and the post-kickoff summary, and keep those manual. Automate the transactional communications (confirmation, contract delivery, access form, reminders) and personalize the relational ones.
Building Without Testing
An onboarding automation tested only in theory will fail in production at the moment it matters most: when a real client is waiting for a contract that did not generate, or a welcome email that did not arrive.
The fix: before any client uses the system, run a complete end-to-end test with your own email address as the test client. Submit the intake form. Receive the confirmation. Sign the test contract. Verify the folder was created. Confirm the welcome email arrived. Submit the access form. Check the ClickUp tasks were generated with correct due dates. Fix every failure before the system goes live.
Using Too Many Tools
A seven-tool onboarding stack where each tool connects to the next via a separate automation creates seven potential failure points. When something breaks, and it will, diagnosing which tool in the chain failed requires checking six different dashboards.
The fix: use the minimum number of tools that cover the full onboarding function. For most VAs, this is: one form tool, one contract tool, one automation platform, Google Drive, and ClickUp, five tools, all connected through Make in a single scenario. Every additional tool added to the stack should replace an existing one, not add to it.
Not Documenting the System
An onboarding automation that lives only in the automation platform, with no written documentation of what triggers what, what each automation does, and what the manual steps are, cannot be maintained, delegated, or audited when something goes wrong.
The fix: maintain a ClickUp Doc or Notion page titled “Onboarding System Documentation” that includes: a plain-language description of each automation stage, the trigger for each stage, the tools involved, the manual steps, and the last date the system was tested. Update it every time the system changes.
Forgetting to Update Templates
Contracts, welcome emails, access forms, and ClickUp task lists created when the VA business was at one service type become outdated as the business evolves. A client who signed a contract with outdated pricing, received a welcome email referencing a service that no longer exists, or was onboarded into a ClickUp template built for a different service type has experienced a system failure even if every automation ran correctly.
The fix: schedule a quarterly template audit, review every template (contract, email, form, ClickUp list, folder structure) against your current service offering. Thirty minutes per quarter prevents the accumulation of outdated content that erodes the professional standard the onboarding system was built to maintain.
👉 How to Manage Multiple Clients as a Virtual Assistant Using AI — extending onboarding automation into the full client management workflow.
9. Conclusion
Learning how to automate client onboarding for virtual assistants is a one-time investment with compounding returns. The 3-5 hours required to build a complete virtual assistant onboarding system is recovered within the first two new clients it processes, after which every subsequent onboarding represents 2-3 hours of recovered time that the VA does not spend on manual setup.
The system described in this guide, intake form trigger, contract automation, folder and workspace creation, welcome email, access collection, and kickoff preparation, is not technically complex. It requires no programming knowledge, no advanced automation skills, and no expensive tool subscriptions. It requires a defined process, a connected tool stack, and one session of build-and-test to produce a client onboarding automation that runs reliably for as long as the business operates.
The client onboarding checklist for virtual assistants in section 7 is the starting point: map which steps are already systematic in your current process, identify which steps are inconsistent or manual, and build the automation for the highest-frequency manual step first. One automation per week for four weeks produces a complete system.
The starting point is simpler than it looks:
- Choose your stack from Section 4 based on current client volume and budget
- Map the 9-stage workflow for your specific service types
- Build the Beginner Stack first, even if you plan to move to Intermediate later, starting simple gets the system running and earning time back immediately
- Upgrade one layer at a time: add PandaDoc when you need contract automation, add the Make Router when you add a second service type, add the Claude API when welcome email personalization at scale becomes a priority
The Make Core plan at $9/month is the single highest-leverage investment in this stack, it is the platform that connects everything else and eliminates the manual overhead that currently sits between your intake form and your first billable task for every new client.
👉 Client Management Systems for Virtual Assistants: The Complete Guide — extending onboarding into the full client-lifecycle system: reporting, multi-client management, and retention.
Build Your First Onboarding Automation This Week
Make‘s free plan lets you build and test the complete Beginner Stack before spending a dollar, intake form trigger, Google Drive folder creation, ClickUp workspace setup, and welcome email, all in a single scenario.
The Core plan at $9/month unlocks unlimited active scenarios and minute-level scheduling, enough to run the full 9-stage onboarding pipeline at any client volume.
3,000+ app integrations include PandaDoc, ClickUp, Jotform, Google Drive, Folk, Zoho CRM, Brevo, and Slack, every tool in this guide connects natively.
Frequently Asked Questions About Automating Client Onboarding for Virtual Assistants
What is the best tool for automating client onboarding as a virtual assistant?
There is no single best tool, the right choice depends on your volume and budget. For most VAs, Make is the best automation platform ($9/month Core) because it handles the branching logic, webhook detection, and multi-step sequences that a complete onboarding system requires. For the contract layer, PandaDoc (free to $19/month) is the most automation-friendly option. For forms, Jotform (free tier workable for low volume) provides the conditional logic and native Make integration that makes the intake trigger reliable.
If you want a single all-in-one that covers contracts, invoicing, proposals, and scheduling without connecting multiple tools, Dubsado ($44/month Premier) or Bonsai ($19/month Essentials) are the strongest options in that category.
How long does it take to set up an automated client onboarding system?
The Beginner Stack (Make Free + Jotform + PandaDoc free + ClickUp free) takes 2–3 hours to build for a VA doing it for the first time. The Intermediate Stack with service-type branching and CRM integration takes 3–5 hours. The Advanced Stack with Claude API and Fireflies integration takes 5–8 hours including testing.
The time investment is recovered within the first two new clients the system processes. After that, every subsequent onboarding represents 2–3 hours of recovered time that the VA does not spend on manual setup.
Can I automate client onboarding without technical skills?
Yes. All tools in this guide (Make, Jotform, PandaDoc, ClickUp, Dubsado) are no-code. Make uses a visual canvas with drag-and-drop module connections rather than programming. The most technically demanding component is the AI-enhanced workflow (Workflow 3), which requires making an HTTP request to the Claude API via Make’s HTTP module, this involves copying a URL and a JSON body, not writing code. A VA with no prior automation experience can build the Beginner Stack (Workflow 1) in under 2 hours.
Do I need both Zapier and Make for client onboarding automation?
No. One automation platform is sufficient. Make is the stronger choice for a complete multi-step onboarding system because it handles branching logic (different workflows for different service types), folder creation sequences, and the contract signature waiting step natively in a single scenario. Zapier is sufficient for simpler onboarding workflows with one service type and linear step sequences, and its free tier handles basic automations if you are not yet ready to pay for Make Core.
What is the most important onboarding stage to automate first?
The folder and workspace creation stage (Stage 6) produces the highest time saving per automation-hour invested. It is the most consistently manual, most frequently skipped under time pressure, and most impactful on the client’s first impression of your organizational standards. Configuring Make to create the Google Drive folder structure and ClickUp client list automatically from a contract signature trigger takes approximately 60–90 minutes to build and saves 20–30 minutes of manual setup per new client indefinitely.
How do I handle onboarding for multiple service types without rebuilding the system?
Use Make’s Router module to branch the onboarding workflow based on the service type field in the intake form. One Make scenario handles all service types: the Router reads the service type value and directs the workflow to the branch configured for that type. Each branch creates the appropriate ClickUp template, sends the appropriate welcome email variant, and populates the CRM with the correct service category. Adding a new service type requires adding one new Router branch, the rest of the scenario remains unchanged.
What should a VA intake form include?
At minimum: full name and business name, primary service requested (dropdown that feeds the Make Router), current tools in use, communication preference (email/Slack/WhatsApp), working hours and time zone, primary goals for the engagement, access requirements (list platforms), and how they found you. Every field should have a downstream automation use, either feeding a template, populating a CRM field, or triggering a conditional branch. Avoid fields that collect information you will never use; they create form friction without adding automation value.
Is PandaDoc’s free plan sufficient for a VA onboarding system?
The PandaDoc free plan covers 60 documents/year and 5 e-signatures/month. For a VA with fewer than 5 new clients per month, the free plan is workable. Beyond that volume, the Starter plan at $19/month (unlimited uploads and e-signatures) is the correct tier. The Business plan at $49/month is only necessary if you need CRM integrations (Salesforce, HubSpot), approval workflows, or bulk send — features most solo VAs do not need.
Can Dubsado replace Make, PandaDoc, and Jotform as a single tool?
For the contract-through-invoice sequence, yes. Dubsado’s Premier plan at $44/month includes intake forms, proposals, contracts, invoicing, automated workflow sequences, and scheduling in a single platform. However, Dubsado does not replace Make for cross-app automation: it cannot create Google Drive folders, update a ClickUp task list, or make API calls. For a complete onboarding system, Dubsado + Make (Core at $9/month) + ClickUp is the all-in-one-plus-automation-glue combination that covers the full pipeline.
Glossary: Key Client Onboarding and Automation Terms for Virtual Assistants
Client Onboarding: The structured process of welcoming a new client, collecting information, establishing systems, and setting expectations before active work begins. A well-automated client onboarding workflow for virtual assistants completes this process in hours rather than days.
Virtual Assistant Onboarding System: The complete set of tools, templates, automations, and manual steps that a VA uses to process every new client from first form submission to active client status, consistently and without rebuilding for each new client.
Intake Form: The form submitted by a prospective or new client that collects the information needed to trigger the automation chain, name, service scope, tools, communication preferences, and access requirements.
Trigger: The event that starts an automation sequence, typically a form submission, contract signature, or payment confirmation in a client onboarding context.
Webhook: A real-time data transfer from one tool to another triggered by a specific event, used in Make to detect contract signatures from PandaDoc and activate the next onboarding stage.
Template (Folder/ClickUp): A pre-configured structure duplicated for each new client, a Master Client Folder Template in Google Drive or a Client List Template in ClickUp that is copied and renamed rather than built from scratch.
Router (Make): A Make module that branches an automation scenario into multiple parallel paths based on conditions — used in VA onboarding to direct different service types to different workflow sequences without building separate scenarios per service.
Dynamic Fields: Placeholders in email or contract templates that are automatically populated with client-specific data from the intake form, client name, service type, start date, pricing.
Access Request Form: A form sent to new clients that collects the platform credentials and permissions the VA needs to begin work, typically sent automatically 30 minutes after the welcome email.
All-in-One Tool: A platform that covers multiple onboarding functions in a single subscription, for VAs, this typically means contracts, invoices, proposals, and scheduling (Dubsado, Bonsai, HoneyBook) rather than requiring separate tools for each function.
Onboarding Stack: The specific combination of tools a VA uses to automate the client onboarding pipeline, chosen by experience level, client volume, and budget.
About the Author
Alex Stratton has spent the better part of a decade working at the intersection of virtual assistance and operational systems, first as a VA supporting founders and small business owners, then as a workflow consultant helping remote teams reduce the manual overhead that accumulates when businesses grow faster than their processes. The tools and workflows here reflect decisions made repeatedly in real client contexts, where the wrong choice costs hours, not minutes. Learn more about VA Automation Lab → About.