Make for Virtual Assistants: The Beginner Setup Guide (2026)

Disclosure: This article contains affiliate links. If you purchase through them, VA Automation Lab earns a commission at no additional cost to you. All tools are evaluated independently.
Make is a no-code automation platform that connects the apps in a VA’s stack — Gmail, ClickUp, Notion, Buffer, Google Sheets — into visual scenarios that run automatically. Unlike Zapier’s linear trigger-action model, Make adds conditional routing, bulk record processing, and direct AI integration, making it the right tool once VA workflows outgrow simple linear automations.
Make is not a tool you evaluate, it is a tool you graduate to. Most VAs encounter it at a predictable moment: their Zapier workflows are running well, the logic is clear, and then a client asks for something the linear, step-by-step model cannot handle cleanly. A multi-branch onboarding sequence that routes differently for each service type. A report that processes twenty completed task records into one formatted email. A workflow where what happens next depends on what the data actually says.
That is the moment Make becomes the right tool.
This guide is not a comparison article. If you are still deciding between Zapier and Make, the Zapier vs Make Comparison Guide for VAs covers that decision in full. This guide is for VAs who have decided, or are ready to decide, and need the practical starting point: how the tool works, how to set up the workspace, how to build the first scenario, and which five workflows deliver the fastest return.
No code required. No prior Make experience assumed.
What this guide covers:
- Why Make is the right automation upgrade for VAs past the Zapier beginner stage
- Plans and pricing and what you actually need as a solo VA
- The five core Make concepts to understand before building anything
- First-time workspace setup: connections, notifications, folder structure
- Your first Make scenario, documented step-by-step in one session
- Five ready-to-use Make scenarios for VA operations, with full module sequences
- The error handling system that prevents silent automation failures
- How to scale your Make stack across multiple clients without rebuilding from scratch
👉 Tools for Virtual Assistants: The Complete AI Systems & Software Guide — for a complete overview of the best AI tools for Virtual Assistants.
👉 Automation for Virtual Assistants: The Complete Guide — for a broader automation context for VA workflows covering six workflow categories and the full tool stack.
Get the Free AI Toolkit for Virtual Assistants
The Make scenarios in this guide work best as part of a complete AI-powered VA workflow.
The free toolkit includes automation checklists, a Make scenario blueprint template for client reporting, and the Claude prompt library that feeds the AI narrative steps in Scenarios 2, 4, and 5.
Built for freelance VAs, curated for practical daily use.
Table of Contents
1. Why Make Is the Automation Upgrade for Growing VA Operations
Zapier is the correct starting point for VA automation. Its trigger-action model is intuitive, setup is fast, and for linear two-to-five-step workflows connecting mainstream apps, it works reliably without configuration overhead.
Make becomes the right tool when VA operations outgrow that linear model. The transition point is not a preference, it is defined by specific workflow requirements that Zapier’s architecture cannot meet cleanly:
Conditional routing
A client onboarding form that should trigger a different workspace setup for social media clients versus admin clients versus executive support clients. In Zapier, this requires three separate Zaps with identical triggers, triple the maintenance overhead. In Make, a single Router module handles all three branches within one scenario.
Bulk data processing
A weekly report that collects every completed task from the past seven days, formats them into a single structured email, and delivers it automatically. Zapier processes one record per trigger, it sends one email per task. Make’s Iterator and Aggregator modules loop through all records and compile them into one output.
Cost efficiency at volume
At the volume a VA managing four or five retainer clients generates, Make’s Core plan at approximately $9/month covers 10,000 operations, equivalent functionality to Zapier Professional at $20/month for 750 tasks. For high-frequency automations running daily across multiple clients, the cost difference compounds quickly.
AI integration on all paid plans
Custom AI provider connections (Claude via the Anthropic API, ChatGPT via the OpenAI API, and others) are available on all Make paid plans, including Core. VAs on Core can connect their own API keys directly within scenario modules, enabling Claude-powered narrative generation, lead scoring, and client briefing automation without upgrading to Pro. Make also ships native AI Agents and an AI Toolkit (all paid plans); the scenarios in this guide use direct HTTP API calls instead, which keep AI steps at one operation each and let you pay your provider directly for tokens.
The practical outcome: Make does not replace Zapier in most VA stacks, it extends it. Simple, linear workflows that already run cleanly in Zapier stay there. Complex workflows with branching logic, data transformation, or AI integration move to Make. Both platforms running simultaneously, each handling the task type it handles best, is the production configuration for most VAs managing four or more active clients.
👉 Best Automation Workflows for Virtual Assistants: Complete Guide — includes real Zapier and Make scenarios, ClickUp automations, and step‑by‑step workflows you can copy and adapt to your clients.
2. Make Plans for Virtual Assistants
Make’s pricing is consumption-based: every module execution in a scenario counts as one operation (also called a credit, the two terms are equivalent). Understanding how quickly operations accumulate for typical VA workflows determines which plan actually covers your usage.
Plan Comparison Table
Plan | Monthly Cost (annual) | Operations/month | Interval | Best for VA operations |
Free | $0 | 1,000 | 15 min minimum | Testing, first 1–2 clients, learning the platform |
Core | $9 | 10,000 | 1 min minimum | 3–6 clients, production workflows, AI API integration |
Pro | $16 | 10,000 | 1 min minimum | VAs billing automation as a service; priority execution + full logs |
Teams | $29 | 10,000 | 1 min minimum | VA agencies; multi-user access, shared scenario libraries |
Enterprise | Custom | Custom | Custom | Large agencies; SSO, audit logs, overage protection |
Core plan recommendation: For most solo VAs managing 3–6 active retainer clients, Make Core at $9/month is the correct plan. 10,000 operations/month covers standard VA automation at comfortable headroom. The 1-minute schedule interval is essential for time-sensitive workflows like email-to-task notifications and onboarding triggers. Custom AI provider connections (Claude, ChatGPT) are included.
Realistic Operation Volume for a VA Managing Three Clients
Workflow | Modules | Runs/week | Ops/week | Ops/month |
Client onboarding (2×/month) | 10 | 0.5 | 5 | 20 |
Weekly task report (×3 clients) | 8 | 3 | 24 | 96 |
Email-to-task conversion | 4 | 15 | 60 | 240 |
Social content → scheduling | 6 | 5 | 30 | 120 |
AI-powered lead scoring | 8 | 3 | 24 | 96 |
Total | — | — | — | ~572/month |
At this volume, the Free plan (1,000 ops/month) is sufficient for testing and the first one or two clients. The Core plan at $9/month (10,000 ops/month) becomes appropriate when a third or fourth client is added, or when the email-to-task workflow runs at higher frequency. Core’s 1-minute schedule interval, versus the Free plan’s 15-minute minimum, is the binding constraint for time-sensitive automations, and the single most practical reason to upgrade.
The Pro plan at $16/month adds priority execution and full-text execution log search, the latter is most valuable when debugging complex multi-step scenarios across multiple clients. For VAs offering automation as a billable service to clients, Pro’s logging depth justifies the additional $7/month. For internal VA operations, Core is sufficient.
Build Your First VA Automation — Free
Make is the automation platform for VAs who need conditional routing, bulk data processing, and direct AI integration, capabilities Zapier’s linear model can’t handle cleanly.
The free plan includes 1,000 operations per month, enough to build and fully test your first three VA scenarios.
The Core plan at $9/month (annual) unlocks 1-minute scheduling intervals, 10,000 operations, and custom AI provider connections (Claude, ChatGPT), everything needed to run production automations across multiple clients.
3. How Make Works: Five Core Concepts Before You Build Anything
Spending twenty minutes understanding how Make processes information before opening the canvas prevents the most common beginner frustration: building a scenario that fails unexpectedly and not knowing why. These five concepts explain the model. Everything in Make is an expression of them.
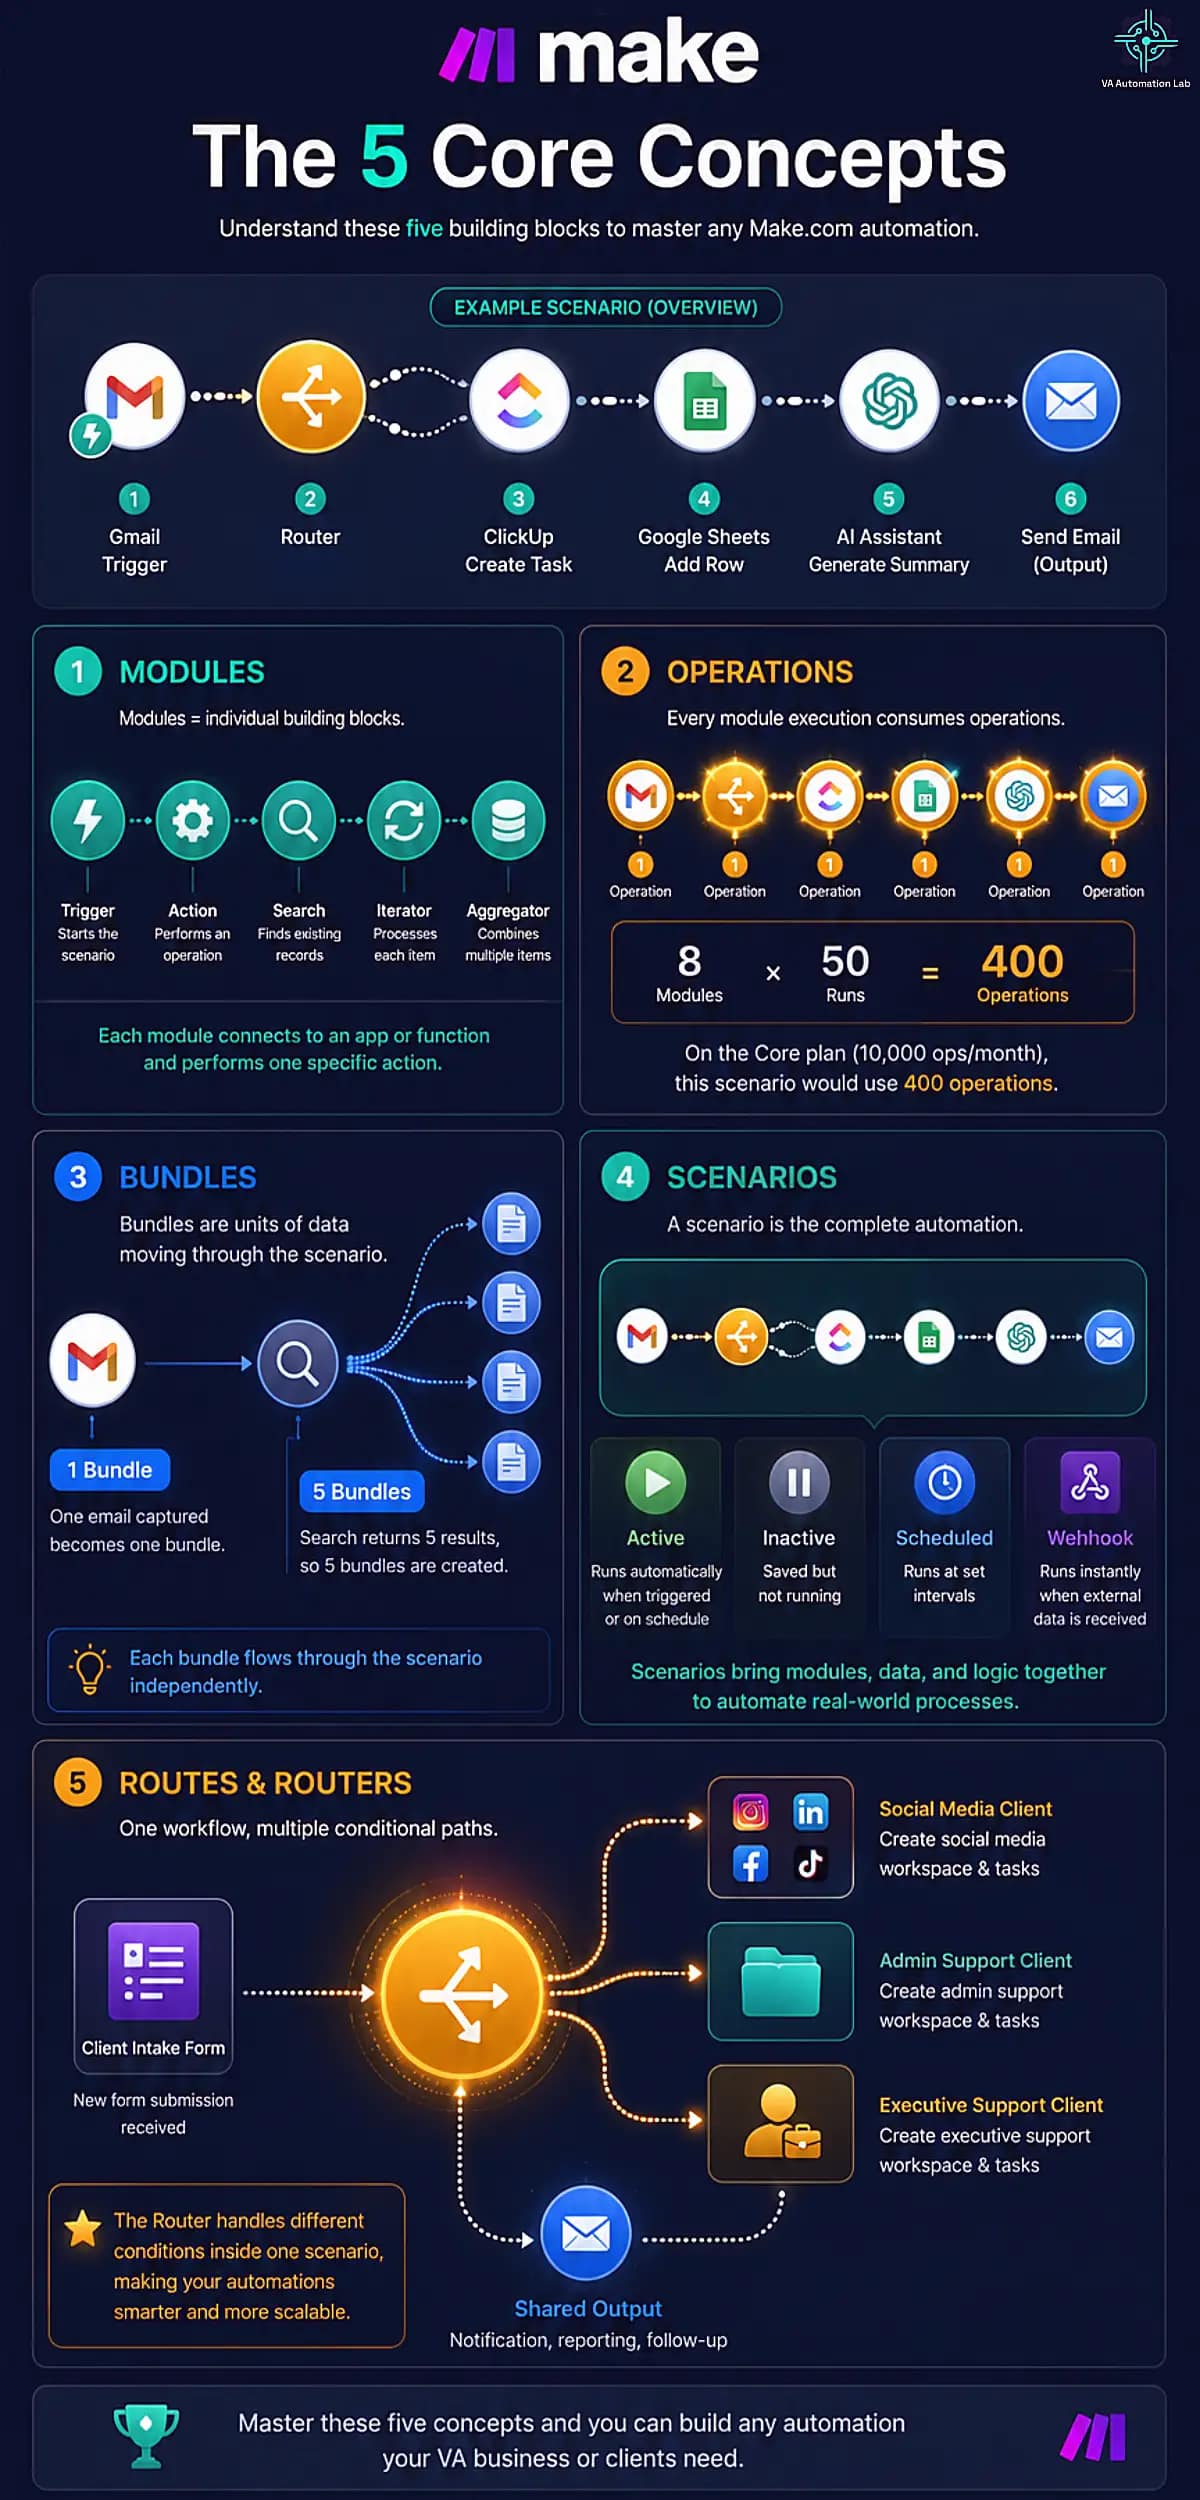
Concept 1 — Modules
A module is a single automated step. Every module connects to one app or function and performs one action: watch a Gmail inbox, create a ClickUp task, send an HTTP request to an API, transform data, or route the workflow conditionally.
There are five module types:
- Triggers — watch for an event and start the scenario (e.g., ‘New email in Gmail label X’)
- Actions — perform one operation in an app (e.g., ‘Create task in ClickUp’)
- Searches — find existing records in an app (e.g., ‘Search for contact in HubSpot’)
- Aggregators — combine multiple bundles of data into one output (essential for reports)
- Iterators — split one bundle containing an array into individual bundles for sequential processing
You use Triggers and Actions in your first scenario. Aggregators and Iterators appear in the reporting and bulk-processing scenarios in Section 6.
Concept 2 — Operations
An operation is one module execution. Every time a module runs as part of a scenario, each module execution counts as one operation against your monthly plan limit. A scenario with 8 modules that runs 50 times in a month uses 400 operations. On the Core plan’s 10,000-operation monthly allowance, that leaves 9,600 operations for all other scenarios.
Important: Operations also count when a scenario encounters an error and executes an error-handling module. Configure error handlers deliberately, covered in Section 7.
Concept 3 — Bundles
A bundle is one unit of data flowing through a scenario. When a trigger fires and captures a new Gmail email, that email’s data becomes one bundle (carrying subject, body, sender, and timestamp) available for mapping in every subsequent module.
When a module produces multiple outputs (for example, a search returning five matching ClickUp tasks), it produces five bundles. Each bundle moves through the scenario independently, which is why the Iterator module is required when processing multiple records: it explicitly loops through each bundle one at a time.
Understanding bundles prevents the most common beginner mistake: expecting one module to automatically process multiple records without an Iterator.
Concept 4 — Scenarios
A scenario is the complete automation: one or more triggers, a sequence of connected modules, and all the configuration that tells each module what to do with the data it receives. Scenarios can be:
- Active — scheduled to run automatically at a defined interval or in response to a webhook
- Inactive — saved but not running (use for scenarios under construction or temporarily paused)
- Scheduled — run at set intervals (every 15 minutes, every hour, every Monday at 8am)
- Webhook-triggered — run instantly when an external event sends data to Make
For VA operations, most scenarios are either scheduled (weekly reports, Monday planning tasks) or webhook-triggered (immediate response to form submissions, contract signatures, new bookings).
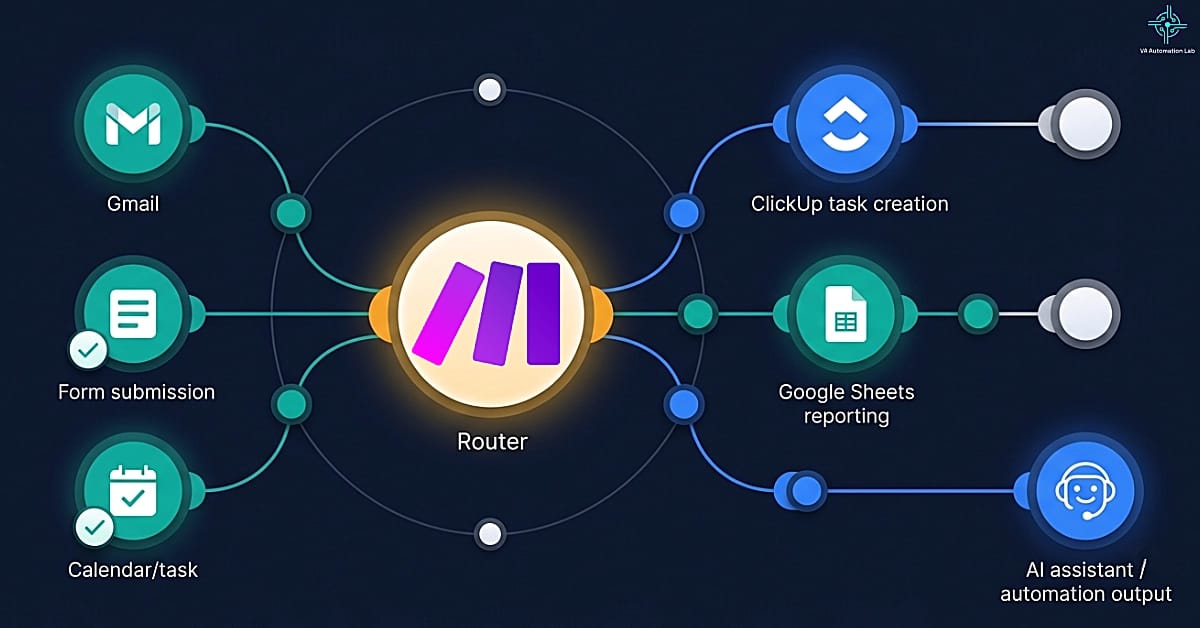
Concept 5 — Routes and Routers
A Router module splits a scenario into multiple conditional branches. Instead of building separate scenarios for different clients or different trigger conditions, a Router handles all variations within one scenario.
Example: a client intake form arrives. If the service type field says ‘Social Media Management,’ route to Branch A (create a social media client workspace). If it says ‘Admin Support,’ route to Branch B (create an admin client workspace). Both branches continue to shared modules after diverging.
The Router is the feature that makes Make more powerful than Zapier for complex VA workflows. Section 6 includes a scenario with a Router so you can see it in practice.
4. First-Time Workspace Setup (Step-by-Step)
Configuring the Make workspace correctly in the first session prevents the friction that accumulates when you build on top of an inconsistently organized foundation. This section covers the one-time setup every VA should complete before building any production scenarios.
Step 1 — Create Your Account
Create an account on Make with your business email, the same address associated with your Google Workspace or primary client communication account. Select the Free plan at signup and upgrade to Core when your first production scenarios are stable.
Step 2 — Create Your Organization
When you first log in, Make prompts you to create an Organization, the top-level container for your workspace. Use your VA business name. Under your Organization, you can create Teams for different client groups if you eventually upgrade to the Teams plan. For a solo VA starting out, the default organization structure is sufficient.
Step 3 — Connect Your Core Apps
Before building any scenario, add your connections in the left sidebar under Connections. A connection is the authenticated link between Make and an external app, configured once, referenced by every scenario that uses that app. Connect these in your first session:
– Gmail or Google Workspace — your primary email (OAuth flow, takes 2 minutes)
– ClickUp or Notion — your task management tool (OAuth)
– Google Sheets — essential for the reporting and data hub scenarios (OAuth)
– Slack — if you use Slack for client communication or internal notifications (OAuth)
– Anthropic (Claude API) or OpenAI (ChatGPT API) — requires your API key from the respective platform
Pre-connecting your core apps means the first build session stays focused on logic, not repeated authentication windows.
Step 4 — Configure Failure Notifications
In Organization Settings, enable email notifications for scenario errors. This is non-negotiable for production use, a scenario that fails silently and does not deliver a client’s weekly report is a professional issue, not a technical inconvenience.
Settings → Notifications → enable ‘Scenario error’ and ‘Scenario incomplete execution’ notifications to your primary email.
Step 5 — Create Your Folder Structure
In the Scenarios section, create folders that match your client structure:
📁 Client Operations
📁 [Client A Name]
📁 [Client B Name]
📁 Internal — VA Business
📁 Templates — Do Not Activate
The Templates folder stores scenario blueprints you build once and duplicate for each new client, the scalability pattern covered in Section 8. Every new client scenario is a blueprint duplicate renamed, not a build from scratch.
5. Your First Make Scenario: Email-to-Task Automation
The email-to-task automation is the ideal first Make scenario: it uses two of the most common VA apps, involves clean predictable data mapping, produces an immediately visible result, and builds the mental model you need for every subsequent scenario.
This scenario watches a Gmail label for new emails and creates a ClickUp task automatically, no manual copy-paste, no missed action items buried in threads.
Before you start:
- Gmail connection active
- ClickUp connection active
- One Gmail label created for action-required emails (‘⚡ Task’ works well)
- One ClickUp list where tasks should land
- Time to build: 30–45 minutes
- Operations per run: 2–3
- Plan required: Free tier is sufficient
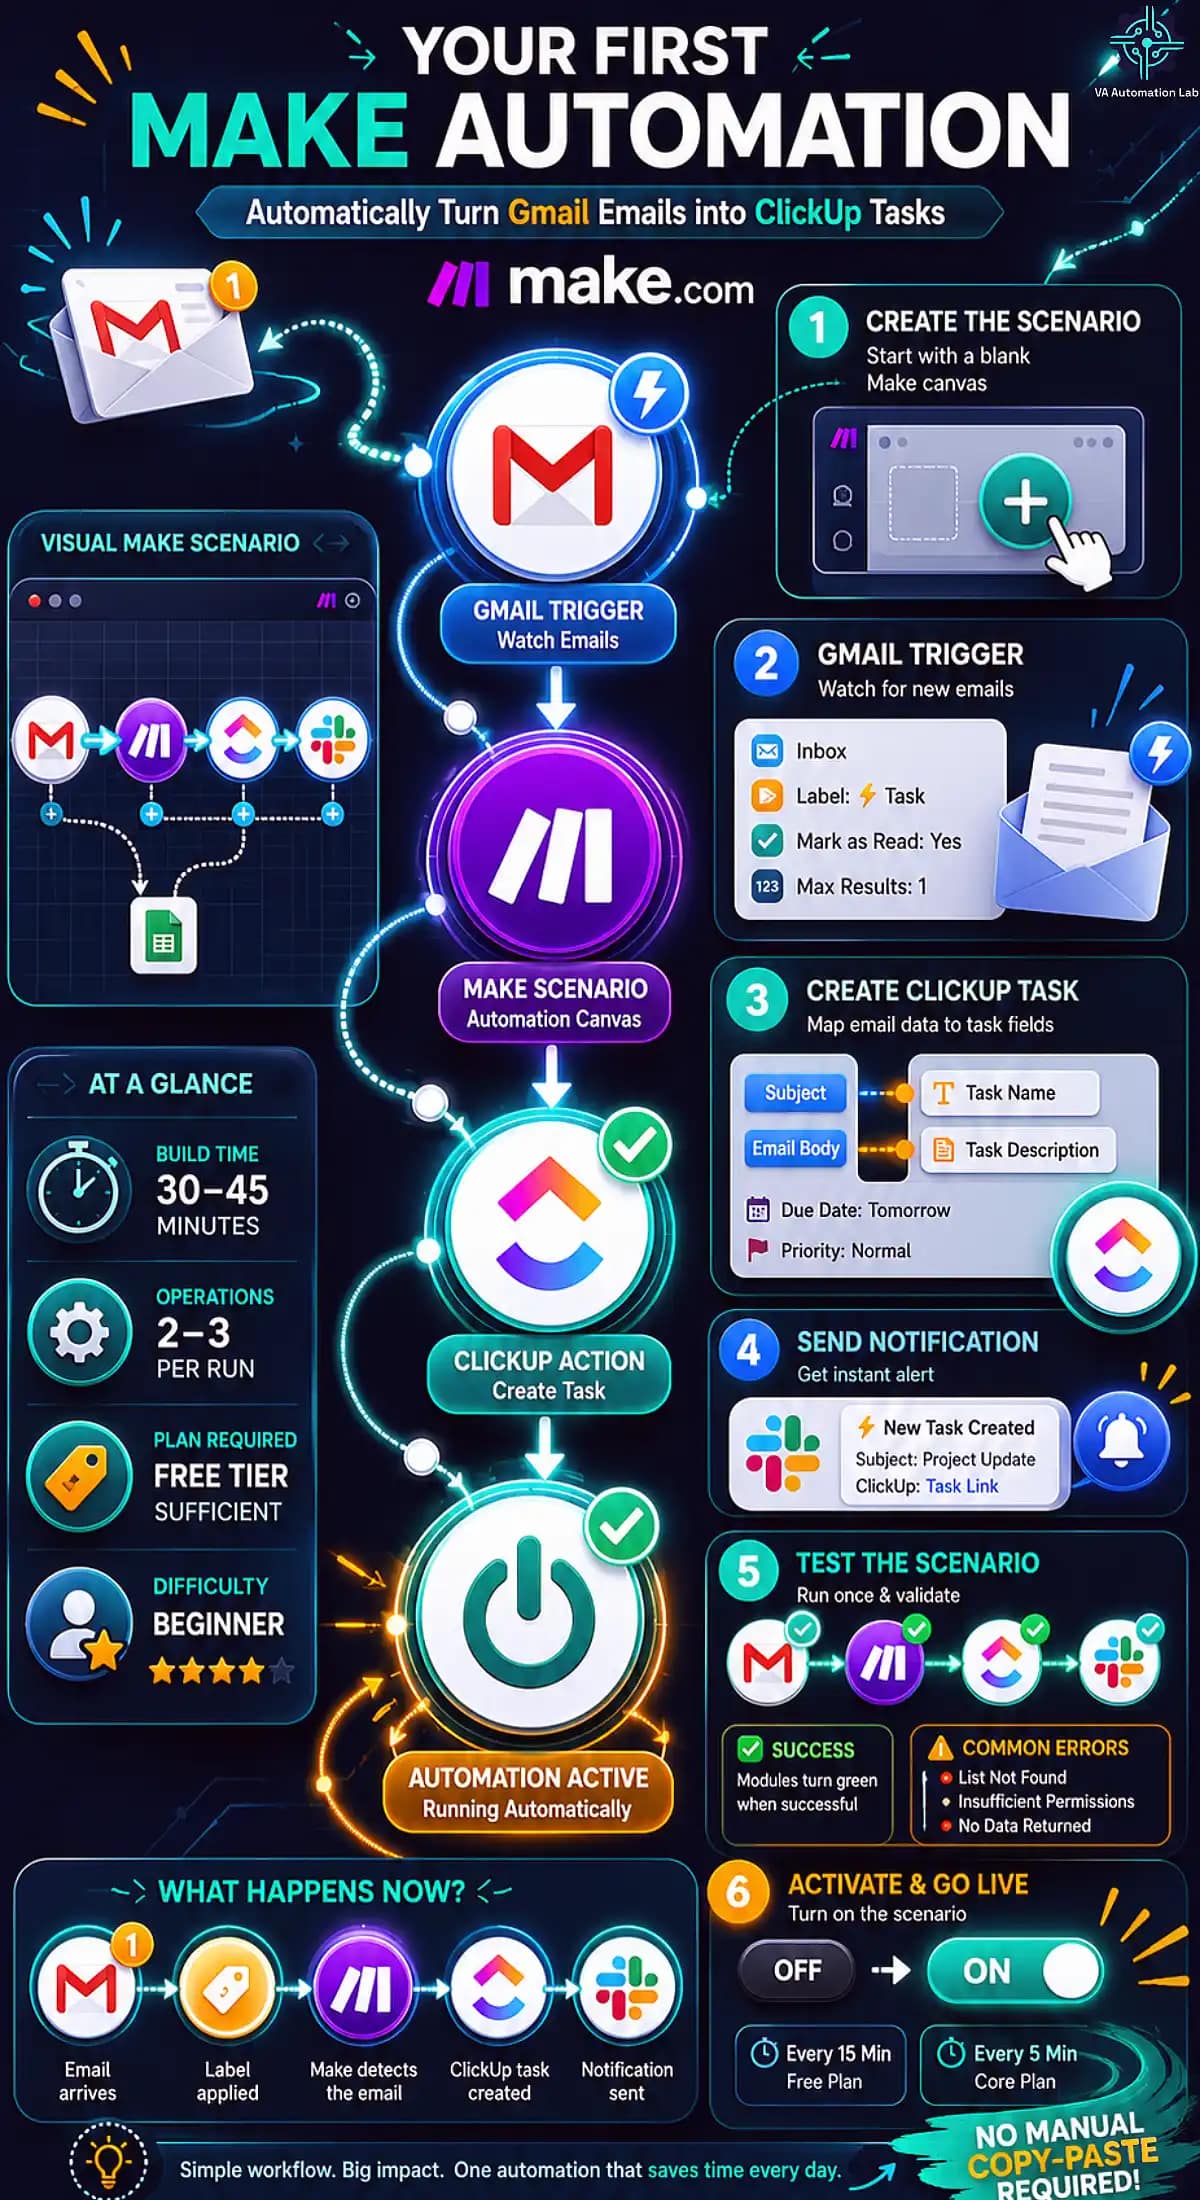
Step 1 — Create the Scenario
In Make, click Create a new scenario. The canvas opens blank with a prompt to add the first module. Click the + icon.
Step 2 — Configure the Trigger Module
Search for Gmail → select ‘Watch Emails.’ In the module configuration:
- Connection: select your Gmail connection
- Folder: INBOX
- Search filter: label:⚡ Task (exact syntax, use whichever label you apply to action-required emails)
- Mark email as read: Yes
- Maximum number of results: 1
Click OK. Make asks you to run the trigger to find an existing email for test data, apply your label to a real email and click Run to capture it. This test bundle becomes the sample data you use to map fields in the next module.
Step 3 — Configure the Action Module
Click + to add a module after the trigger. Search for ClickUp → select ‘Create a Task.’ In the module configuration:
ClickUp field | Value / Mapping |
Connection | Select your ClickUp connection |
Team | Select your workspace |
Space | Select the relevant Space |
List | Select the List where tasks should land |
Name | Map from Gmail: Subject field |
Description | Map from Gmail: Text Content (plain text body) |
Due Date | Leave blank, or use formula: {{addDays(now; 1)}} for tomorrow |
Priority | ‘Normal’ as default |
To map a field: click the empty field → click the lightning bolt icon → select the Gmail module → choose the data field. The mapped value appears in orange.
Step 4 — Add a Notification Module
Click + to add a third module. Search for Slack → ‘Send a Message’ (or Gmail → ‘Send an Email’ if you use email for self-notifications). Configure a brief notification to yourself:
Channel: your #task-alerts channel or your own email
Message: ⚡ New task: {{1.subject}} | ClickUp: {{2.url}}
Where {{1.subject}} maps the Gmail subject and {{2.url}} maps the ClickUp task URL returned by the create action.
Step 5 — Test the Scenario
Click ‘Run once.‘ Apply your label to a real email. Watch the scenario execute module by module, each module turns green on success. Verify the ClickUp task was created with the correct name and description.
If a module turns red, click it to see the error message. Common beginner errors:
- ‘List not found’ — the List mapping is missing or the List ID changed. Reconnect and re-map.
- ‘Insufficient permissions’ — the ClickUp connection needs re-authorization. Go to Connections → refresh.
- ‘No data returned from trigger’ — the Gmail search filter found no emails. Verify the label is applied and the filter syntax is exact.
Step 6 — Activate the Scenario
Click the toggle switch from Off to On. Set the scheduling interval, for email-to-task, every 15 minutes on Free or every 5 minutes on Core. The scenario is now live. Every email you label triggers a ClickUp task without your involvement.
6. Five Ready-to-Use Make Scenarios for Virtual Assistants
These five scenarios cover the highest-impact automation categories in VA operations, organized from simplest to most complex. Each is documented at the module level, not as a concept, but as a buildable sequence.
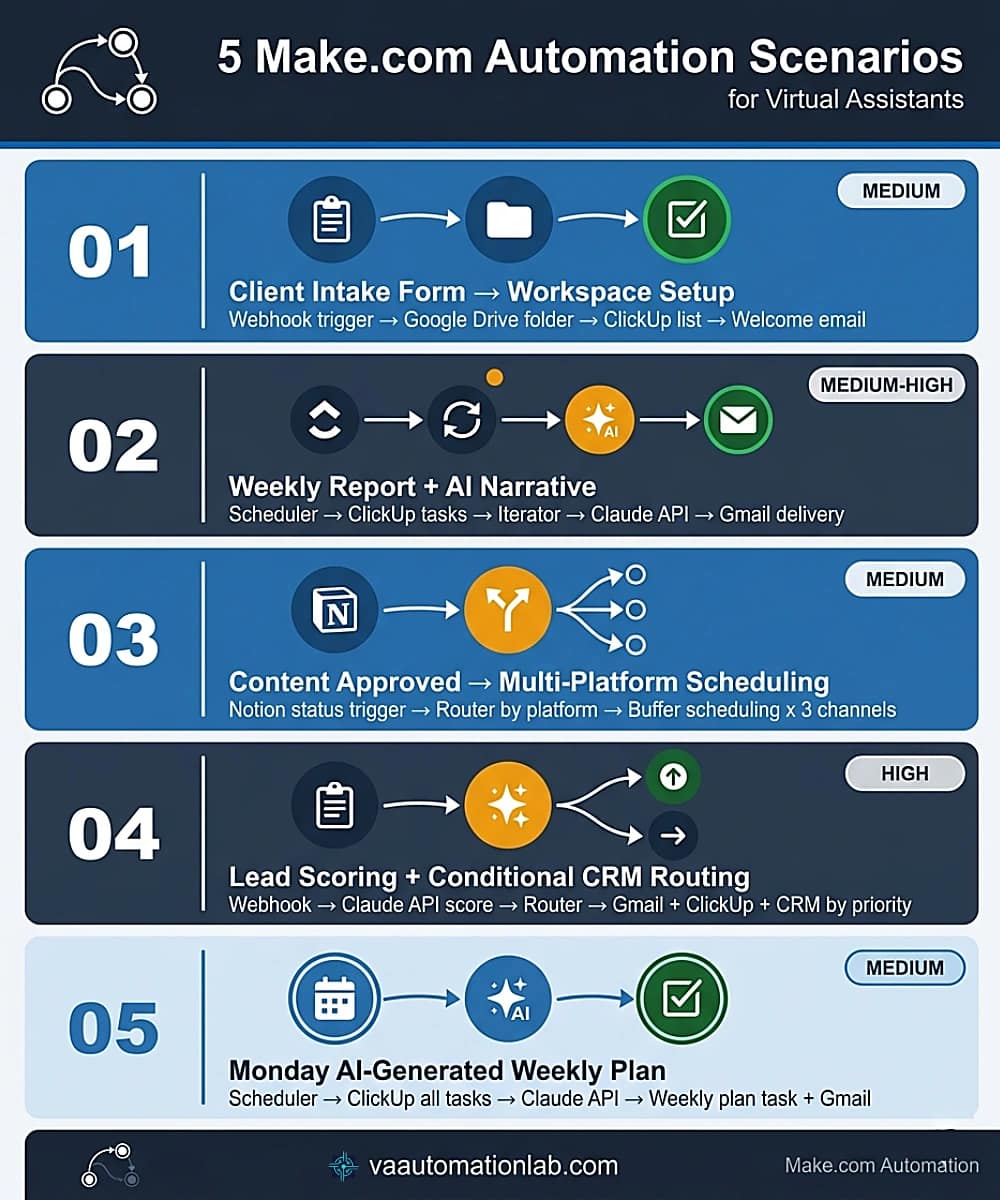
Scenario 1 — Client Intake Form → Full Workspace Setup
What it does: Converts a new client intake form submission into a complete operational setup (Google Drive folder structure, ClickUp client list, and welcome email) without manual intervention.
Field | Value |
Complexity | Medium |
Modules | 6 |
Operations per run | 6 |
Plan required | Core (for 1-minute interval on webhook trigger) |
Time to build (first) | 90–120 minutes |
TRIGGER: Webhooks → 'Custom Webhook'
(Paste webhook URL into Tally or Typeform submission settings)

MODULE 1: Google Drive → 'Create a Folder'
  Name: map from form field 'Client Name'
  Parent: /Clients/ (your master client folder)

MODULE 2: Google Drive → 'Create a Folder' (repeat ×3 for subfolders)
  Parent: output URL from Module 1
  Create: Admin / Deliverables / Assets

MODULE 3: ClickUp → 'Create a List'
  Name: map from form field 'Client Name'
  Folder: Client Work

MODULE 4: Gmail → 'Send an Email'
  To: form field 'Client Email'
  Subject: 'Welcome, [Client Name] — Here's What Happens Next'
  Body: welcome email template with workspace link

MODULE 5: Slack → 'Send a Message'
  Message: '✅ [Client Name] workspace ready — ClickUp + Drive configured'
Router variant: Insert a Router between the webhook trigger and Module 1. Configure the Router’s filter to read the ‘Service Type’ field from the form. Branch A runs the standard admin template; Branch B runs a social media client template with a different ClickUp list structure. One scenario handles all service types without duplication.
For the complete onboarding system this scenario fits into, see How to Automate Client Onboarding for Virtual Assistants.
Scenario 2 — Weekly Client Task Report with AI Narrative
What it does: Pulls every completed task from a client’s ClickUp list for the current week, compiles them via Iterator and Aggregator, sends them to Claude for a narrative summary, and delivers the formatted report via email every Friday at 4:00 PM, without manual production work.
Field | Value |
Complexity | Medium-High |
Modules | 7 |
Operations per run | ~15–30 (depends on task volume; Iterator × task count) |
Plan required | Core |
Time to build (first) | 2–3 hours |
TRIGGER: Make Scheduler → Every Friday at 4:00 PM

MODULE 1: ClickUp → 'Search Tasks'
  List: [client list ID]
  Status: Done
  Date Completed: after {{formatDate(addDays(now; -7); 'YYYY-MM-DD')}}

MODULE 2: Iterator → processes each task bundle
  Array: output from Module 1

MODULE 3: Tools → 'Set Variable' (per iteration)
  Value: '• {{task.name}} — completed {{formatDate(task.date_closed; 'DD MMM')}}'

MODULE 4: Text Aggregator
  Source module: Iterator (Module 2)
  Text: {{3.task_entry}}
  (Combines all task strings into one block)

MODULE 5: HTTP → Anthropic Claude API
  URL: https://api.anthropic.com/v1/messages
  Method: POST
  Headers: Content-Type: application/json
           x-api-key: [your Anthropic API key]
  Body: JSON prompt referencing aggregated task list

MODULE 6: Gmail → 'Send an Email'
  To: [client email]
  Subject: 'Weekly Update — [Client Name] — {{formatDate(now; DD MMM)}}'
  Body: AI output from Module 5 + Looker Studio dashboard link

MODULE 7: Google Sheets → 'Add a Row' (reporting log)
  Data: client, date, task count, report sent date
The Iterator + Aggregator combination is the key Make capability this scenario demonstrates. Without it, a Zapier equivalent would send one email per task. Make compiles all tasks into a single professional summary.
👉 How to Automate Client Reporting as a Virtual Assistant — for the complete 4-layer reporting stack including Google Looker Studio dashboards.
Scenario 3 — Content Approved → Multi-Platform Scheduling (with Router)
What it does: When a content item in a Notion database is marked ‘Approved,’ routes it to the correct Buffer channel based on platform, schedules the post, and notifies the client automatically.
Field | Value |
Complexity | Medium |
Modules | 5 + Router branches |
Plan required | Core |
Time to build (first) | 60–90 minutes |
TRIGGER: Notion → 'Watch Database Items'
  Database: [Content Calendar database ID]
  Filter: Status = 'Approved'

ROUTER → branches by Platform field:
  Branch A: Platform = 'Instagram'
  Branch B: Platform = 'LinkedIn'
  Branch C: Platform = 'X'

  [Each branch]
  MODULE: Buffer → 'Create Update'
    Profile: [client's channel for this platform]
    Text: map from Notion 'Caption' field
    Scheduled At: map from Notion 'Publish Date' field

MODULE 4: Notion → 'Update a Database Item'
  Status → set to 'Scheduled'

MODULE 5: Gmail → 'Send an Email'
  To: [client email]
  Subject: 'Content scheduled: [post title] — [publish date]'
The Router handling all three platform branches in one scenario, versus three separate Zapier Zaps with identical triggers, is the practical demonstration of why Make is the right tool for content pipeline automation.
👉 How to Automate Social Media as a Virtual Assistant — for the full social media automation system this scenario belongs to.
Scenario 4 — New Lead → AI Scoring → Conditional CRM Routing
What it does: Receives a new lead from a contact form, sends the data to Claude for AI scoring, routes high/medium/low leads to different follow-up sequences, and creates the appropriate ClickUp task with priority set by the AI score.
Field | Value |
Complexity | High |
Modules | 8–10 (including Router branches) |
Plan required | Core |
Time to build (first) | 2–3 hours |
TRIGGER: Webhooks → 'Custom Webhook' (form submission)

MODULE 1: HTTP → Claude API (Anthropic)
  Prompt: 'Score this lead 1–10. Criteria:
  Budget mentioned: +3 | Timeline <30 days: +2
  Service matches specialty: +2 | Referral source: +1
  Complete form submitted: +1 | Specific project described: +1
  Output: JSON { score: N, rationale: '...' }
  Lead data: {{webhook.body}}'

MODULE 2: JSON → 'Parse JSON' (extract score from AI output)

ROUTER → branches by score:
  Branch A: score >= 7 (High priority)
    → Gmail: personalized response + discovery call link
    → ClickUp: Priority = Urgent, Due = Today
    → CRM: Status = Hot Lead

  Branch B: score 4–6 (Medium priority)
    → Gmail: intake form sent
    → ClickUp: Priority = High, Due = Today + 2
    → CRM: Status = Warm Lead

  Branch C: score <=3 (Low priority)
    → Gmail: standard info email
    → ClickUp: Priority = Normal, Due = Today + 5
    → CRM: Status = Cold Lead
For choosing the CRM these statuses write to, see Best CRM for Virtual Assistants.
Scenario 5 — Monday AI-Generated Weekly Plan
What it does: Every Monday at 7:30 AM, pulls all open tasks across active client lists, sends the combined data to Claude, and creates a prioritized weekly plan task in ClickUp, ready for review when the VA starts work.
Field | Value |
Complexity | Medium |
Modules | 6 |
Plan required | Core |
Time to build (first) | 60–90 minutes |
TRIGGER: Make Scheduler → Every Monday at 7:30 AM

MODULE 1: ClickUp → 'Search Tasks' (across all active client lists)
  Status: not Done
  Due date: before {{formatDate(addDays(now; 14); 'YYYY-MM-DD')}}

MODULE 2: Text Aggregator
  Combines task names, due dates, and client labels into one block

MODULE 3: HTTP → Claude API
  Prompt: 'Create a prioritized weekly plan from this task list.
  Priority logic: Deadline within 2 days = URGENT.
  Client-flagged = HIGH. Blocking client next step = HIGH.
  All else = by deadline proximity.
  Output: structured Mon–Fri plan with time blocks.
  Tasks: {{aggregator.text}}'

MODULE 4: ClickUp → 'Create a Task'
  Name: 'Weekly Plan — {{formatDate(now; DD MMM)}}'
  List: Admin & Operations
  Description: AI output from Module 3
  Due Date: this Friday

MODULE 5: Gmail → 'Send an Email'
  To: [your email]
  Subject: 'Your weekly plan is ready'
  Body: AI plan output + ClickUp task link
Build Your VA Automation Stack with Make
The five scenarios above are the foundation of a complete VA automation operation.
Make Core at $9/month (billed annually) gives 10,000 operations per month, enough to run all five scenarios across five active clients without hitting limits.
Custom AI provider connections for Claude and ChatGPT are included on Core.
Start with the free plan to build and test, then upgrade when your production workflows are stable.
7. The Error Handling System: Stop Silent Failures
Every production scenario needs an error handling route. Without one, a failed module stops the scenario silently, no notification, no fallback, and no client receives the output they were expecting. Silent failures are the most professionally damaging automation failure because they are invisible until a client asks why something did not arrive.
Setting Up an Error Handler
In any scenario module, right-click the module to access the contextual menu. Click ‘Add error handler.’ Make adds an error route branching from that module, a separate path that executes only when the module fails. For most VA scenarios, the error handler should send a notification:
Error Handler → Gmail → 'Send an Email'
  To: [your email]
  Subject: '⚠️ Automation failure: [scenario name]'
  Body: 'Module [X] in [scenario name] failed at {{now}}
         Error: {{error.message}}'
This notification arrives within minutes of any failure with enough context to diagnose and fix the issue before it affects a client.
Using the Execution Log
In every active scenario, the History tab shows every execution: modules that ran, bundles processed, operations consumed, and errors encountered. For debugging unexpected output, the execution log is the first place to check, it shows exactly what data each module received and returned.
On the Core plan, execution logs are retained for 30 days. On Pro, full-text log search is available, which is valuable when debugging a specific error that occurred in one execution among dozens, one practical reason to consider Pro if you build automation as a billable service.
Monthly Maintenance Habit
Once a month, open the History tab for each active production scenario and verify all executions show ‘Success’ status. Quarterly, check that all app connections are still authorized, OAuth tokens for Google and Slack expire periodically and require reauthorization. A 20-minute monthly check prevents the client trust damage of a silent failure caught three weeks late.
8. Scaling Your Make Stack Across Multiple Clients
The difference between a Make stack that takes 20 minutes to extend to a new client and one that takes two hours is one architectural decision made when building the first scenario: duplication-ready design.
The Three Conventions That Enable Duplication
Convention 1: Name every scenario with a client prefix
Format: [Client Name] — [Scenario Type]. Example: Acme Corp — Weekly Report. This keeps the scenario list scannable and makes the copy-rename-reconfigure flow obvious when onboarding client 5.
Convention 2: Store all client-specific variables in a Data Store, not hardcoded in modules
A Make Data Store is a simple key-value database within Make that scenarios can read from. Instead of hardcoding ‘client email = sarah@acme.com’ in a Gmail module, store it in a Data Store record for ‘Acme Corp’ and map from there. When the email changes, you update one Data Store record, not every module in every scenario.
Set up a Data Store named ‘Client Config’ with records for each client: email, ClickUp list ID, Google Drive folder ID, Slack channel, and preferred reporting cadence.
Convention 3: Save scenario blueprints before duplicating
Make allows export of any scenario as a JSON blueprint file (Scenario → More → Export Blueprint). Save every template scenario as a blueprint in your local drive. When building for a new client, import the blueprint, rename it, and update the Data Store values. Never rebuild the module sequence from scratch.
The 20-Minute New Client Setup
- 5 minutes: create a new Data Store record with the client’s config values
- 10 minutes: import the blueprint for each scenario type needed, rename with the client prefix, verify Data Store connection
- 5 minutes: run each scenario once in test mode to confirm Data Store values are reading correctly and all connections are authorized
That is the return on the investment made in structured design during the first client setup.
Make works best as part of a connected VA tool stack. For a structured view of which tools to layer on top of your first automation — and in what order — the VA resource hub has a skill-level learning path built specifically for that progression.
9. ROI: What Make Actually Saves a VA Running Multiple Clients
The time figures in this guide (Section 6) describe what it costs to build each scenario. What they don’t show directly is what each scenario replaces — the manual work it removes every week, for as long as the scenario keeps running.
Take the two highest-frequency scenarios from Section 6:
- Weekly client reporting (Scenario 2). Manually compiling a week’s completed tasks into a formatted client update typically takes 20–30 minutes per client. For a VA managing three clients, that’s roughly 60–90 minutes a week, 4–6 hours a month, spent on a task that produces zero new client value, just formatting and re-typing. The automated version replaces that with a 5-minute review of the AI-drafted summary before it goes out.
- Client onboarding (Scenario 1). Manually creating folder structures, task lists, and a welcome email for a new client runs 30–45 minutes per onboarding. A VA onboarding even one new client a month recovers most of that time permanently, and recovers it again on every client added afterward, no extra build cost.
Stacked together, these two scenarios alone return somewhere in the range of 5–7 hours a month for a VA running three active clients, against a Core plan that costs $9/month. At even a conservative VA hourly rate, that’s not a marginal saving, it’s the plan paying for itself dozens of times over before factoring in Scenarios 3–5, or the harder-to-quantify benefit of a client report that never arrives late.
The real ROI of Make isn’t the automation itself, it’s what stops competing for your attention once the automation is reliable: the hours that used to go into reporting and onboarding become hours you can bill to client work that actually requires you.
10. Make vs. Zapier: Quick Decision Reference
This section is a brief routing guide. For the complete analysis covering pricing, integration depth, and real workflow examples at every complexity level, see the Zapier vs Make for Virtual Assistants Comparison Guide.
Use Zapier when: | Use Make when: |
Workflow is linear, 2–5 steps, no branching | Workflow requires conditional routing (Router module) |
First automation needed in under an hour | Processing multiple records in one run (Iterator + Aggregator) |
Client needs to view or edit the automation | AI integration via direct API call (Claude, ChatGPT on Core+) |
Low frequency, low task volume | High frequency or multi-client volume where Zapier task limits become expensive |
Speed to first result is the priority | Building automation as a billable service for clients |
Most experienced VAs run both: Zapier for simple, high-reliability workflows already running; Make for complex, multi-step scenarios Zapier’s linear model cannot handle cleanly. The tools are complementary, not mutually exclusive.
11. Conclusion: How to Know Your Make Stack Is Production-Ready
Building five scenarios is not the same as graduating to Make. The real transition this guide describes happens when the stack stops behaving like a collection of individual automations and starts behaving like infrastructure — something that keeps running correctly whether or not you’re paying attention to it that day.
Four checks separate a stack that’s “built” from one that’s actually production-ready:
- Every scenario that touches a client has an error handler — not just the ones that have already failed once. (Section 7)
- Client-specific values live in a Data Store, not inside individual modules. If updating one client’s email means editing more than one record, the stack isn’t duplication-ready yet. (Section 8)
- Every production scenario has been deliberately broken, once. Disconnect a connection, submit bad test data, and confirm the failure notification arrives — and that you know what to do with it. A scenario that has only ever succeeded is untested, not reliable.
- You can answer, without opening Make, roughly how many operations your stack uses in an average month. If the number only exists in your head as “probably fine,” it isn’t being managed, it’s being hoped for.
A stack that passes all four travels well: it survives a new client being added, a module breaking, or you being unavailable for a week. A stack that’s only ever been built and never stress-tested tends to reveal its gaps at the worst possible time — mid-retainer, in front of a client. That’s the actual finish line for this guide: not five working scenarios, but a stack you’d trust to keep running if you stepped away from it for two weeks.
Ready to Build a Stack That Runs Without You?
Everything in this guide — the five scenarios, the error handling, the duplication system — exists to get you to the point above: a stack you’d trust to keep running if you stepped away for two weeks.
That only happens by building, not by reading.
Start on the Free plan, build the email-to-task scenario this week, and upgrade to Core when your first production scenario needs the 1-minute interval.
Frequently Asked Questions About Make for Virtual Assistants
Do I need to know how to code to use Make?
No. Make is a visual, no-code platform, every module, connection, and route is configured through a point-and-click interface. The only area that touches code-adjacent syntax is formula functions used for data formatting (dates, text manipulation, arithmetic), which follow a pattern similar to spreadsheet formulas. Make’s documentation and the in-interface formula reference cover every function a VA is likely to need.
How is Make different from Zapier?
The core difference is architectural. Zapier uses a linear trigger-action model, one trigger, a sequence of actions, top-to-bottom. Make uses a visual modular canvas that supports branching logic (Routers), bulk data processing (Iterators and Aggregators), and data transformation within the workflow itself. Zapier is faster to configure for simple workflows; Make is the correct tool when workflows have conditional logic, process multiple records in one run, or need AI API integration. The Complete Comparison Guide covers both platforms in depth.
How many operations does a typical VA scenario use?
A straightforward 4-module scenario uses 4 operations per run. A complex onboarding scenario with 10 modules uses 10 operations per run. A reporting scenario that iterates through 20 completed tasks uses approximately 22 operations (trigger + 20 iterations + aggregator + delivery). On the Core plan’s 10,000 monthly operations, a VA managing three to five active clients typically uses anywhere from a few hundred to a few thousand operations per month depending on automation frequency — the worked example above totals roughly 570 for three clients at moderate frequency — leaving significant headroom.
What is the Make free plan actually useful for?
The Free plan is genuinely useful for testing, learning, and building your first two or three scenarios. Its 1,000 operations per month covers a VA running light automation across one or two clients. The binding constraint is the 15-minute minimum schedule interval, which makes the Free plan unsuitable for time-sensitive workflows (email-to-task should respond within minutes). Upgrade to Core when you have stable production scenarios needing 1-minute intervals or when you approach 1,000 operations in a month.
Can I connect Claude or ChatGPT to Make on the Core plan?
Yes, custom AI provider connections (Anthropic Claude, OpenAI ChatGPT, Google Gemini, and others) are available on all paid Make plans, including Core. VAs on Core ($9/month) can connect their own Anthropic or OpenAI API key directly within Make scenarios — you pay your AI provider directly for token usage — enabling Claude-powered report generation, lead scoring, and planning automation without upgrading to Pro.
Is Make safe for client data?
Make is SOC 2 Type II certified and GDPR compliant. Data processed through scenarios is handled according to Make’s data processing agreement available at Securing data with Make – Help Center. For clients with strict data requirements (legal, healthcare, financial), review Make’s privacy documentation and confirm your use case is within the client’s compliance framework before building scenarios that process confidential data.
How long does it take to build a complete VA automation stack in Make?
The email-to-task scenario (Section 5) takes 30–45 minutes for a VA doing it for the first time. The client onboarding scenario takes 90–120 minutes. The weekly reporting scenario with AI narrative takes 2–3 hours. A complete stack covering all five scenarios in Section 6 takes 8–12 hours total, distributed across the first two to three weeks of active building. After the first client stack is built and tested, duplicating it for subsequent clients takes 20 minutes using the blueprint export and Data Store approach in Section 8.
What should I do when a scenario fails?
First, check the execution log (Scenario → History tab), it shows exactly which module failed, what error was returned, and what data the module received. Most failures fall into three categories: authentication expired (reconnect the app connection), field mapping broken by an upstream change (re-map the affected field), or the upstream app returned unexpected data (add a Filter module to handle the edge case). The error notification system described in Section 7 ensures you know about failures within minutes rather than discovering them when a client asks.
Glossary: Key Make Terms for Virtual Assistants
Scenario: A complete automated workflow built on Make’s visual canvas, one or more trigger modules connected to a sequence of action modules, configured to run automatically when triggered.
Module: A single step in a Make scenario. Each module connects to one app and performs one action, watching for data, creating a record, sending a message, transforming data, or routing the workflow conditionally.
Operation (Credit): The unit Make uses to count automation consumption. Each module execution counts as one operation (also called a credit in newer Make documentation, equivalent terms). The Core plan includes 10,000 operations per month.
Bundle: One unit of data flowing through a scenario. When a Gmail trigger captures one email, that email becomes one bundle carrying all its fields (subject, body, sender, date).
Trigger: The first module in a scenario — the event that starts execution. Triggers are either scheduled (run at set intervals) or webhook-triggered (run instantly when external data arrives).
Webhook: A URL Make generates that external apps can send data to in real time. When a Tally form is submitted or a PandaDoc contract is signed, the app sends event data to the webhook URL, triggering the scenario immediately.
Router: A Make module that splits a scenario into multiple parallel branches based on filter conditions, the core feature that makes Make more powerful than Zapier for multi-condition workflows.
Iterator: A Make module that processes arrays of data one item at a time, enabling bulk operations on multiple records in a single scenario run.
Aggregator: A Make module that combines multiple bundles back into a single bundle, the reverse of an Iterator. Used to compile task names from an iterated loop into one text block for a report email.
Data Store: A simple key-value database within Make that scenarios can read from and write to. Used to store client configuration values (emails, list IDs, folder paths), enabling clean template duplication when onboarding new clients.
Blueprint: A JSON export of a Make scenario that captures the complete module structure, field mappings, and configuration. Used to save template scenarios and import them as starting points for new client automations.
About the Author
Alex Stratton has spent the better part of a decade working at the intersection of virtual assistance and operational systems, first as a VA supporting founders and small business owners, then as a workflow consultant helping remote teams reduce the manual overhead that accumulates when businesses grow faster than their processes. The tools and workflows here reflect decisions made repeatedly in real client contexts, where the wrong choice costs hours, not minutes. Learn more about VA Automation Lab → About.