Best Automation Workflows for Virtual Assistants: Tools, Stack & Complete System (2026)
Disclosure: This article contains affiliate links. If you purchase through them, VA Automation Lab earns a commission at no additional cost to you. All tools are evaluated independently.
The complete guide to building a virtual assistant automation system, from the right tool stack at each level, to the first 10-minute workflow that pays for itself immediately, to the advanced multi-step systems that run client onboarding, content pipelines, and reporting cycles without manual intervention. Organized by complexity level and VA niche, with real workflow configurations and exact tools for every stage.
An automation workflow for virtual assistants is a sequence of connected tools (an automation platform, project management system, and intake form) that executes repeatable client-service tasks — folder creation, task assignment, reporting, follow-ups — without manual input, triggered automatically by a defined event.
The economic case for VAs is straightforward: every hour spent on repeatable administrative tasks (creating folders, sending confirmation emails, updating CRM records, generating reports, assigning tasks) is an hour not spent on billable, client-facing work. At one client, this overhead is tolerable. At four or five clients, it becomes the primary constraint on both revenue and quality of work.
The solution is not to work faster. It is to build a system where the mechanical layer of your operations executes itself, triggered by events, connected across tools, running without monitoring, while your attention goes to the work that requires judgment, relationship, and strategy.
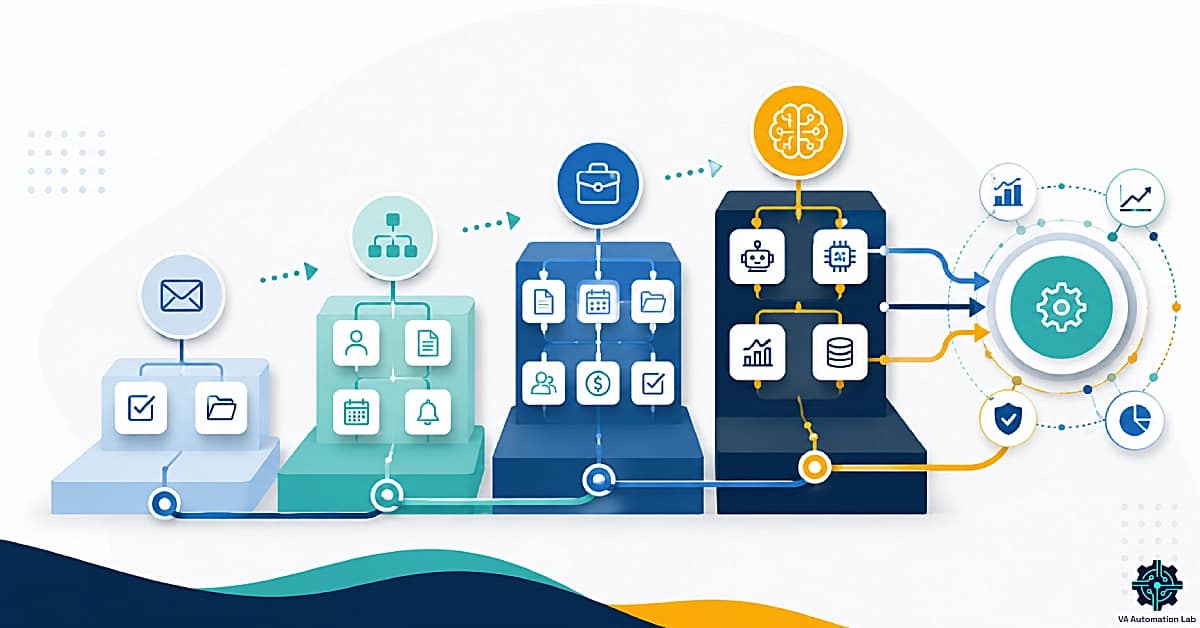
This guide covers the complete automation stack for virtual assistants: the right tools at each level, 14 configured workflows from beginner to advanced, niche-specific setups, and a step-by-step implementation sequence that builds the system in four weeks without disrupting active client work. Every workflow here is no-code, no programming required, no technical background assumed. What is required is a clear process, a connected tool stack, and the discipline to build one layer at a time.
What this guide covers:
- Why automation changes the economics of a VA business
- The complete recommended tool stack by level (Beginner → Intermediate → Advanced → AI)
- 4 beginner workflows, under 30 minutes each
- 4 intermediate workflows, client operations layer
- 3 advanced workflows, full system architecture
- 3 AI-powered workflows, the intelligence layer
- Niche-specific automation stacks (social media, executive, content, admin VAs)
- Time tracking, scheduling, and meeting automation
- A step-by-step sequence for implementing without rebuilding everything at once
- Common mistakes that break automation systems
Every workflow in this guide relies on a specific tool stack. If you need to evaluate or set up any of those tools before building the automations, the VA resource hub has a quick reference table and dedicated guides for each one.
👉 Tools for Virtual Assistants: The Complete AI Systems & Software Guide — the full reference for every tool category that integrates with automation workflows.
👉 Automation for Virtual Assistants: The Complete Guide — if you need a framework for deciding which workflows to automate first and how to sequence your rollout.
Ready to Work Smarter as a Virtual Assistant?
If you’re building your first automation system, the AI Toolkit includes automation workflow templates and a tool stack configuration guide to help you get started without guessing.
It covers the tools, templates, and prompts used throughout this guide.
Table of Contents
1. Why Automation Workflows Change the Economics of a VA Business
The standard argument for automation “save time, reduce errors, scale your business” is correct but abstract. The more useful framing is specific: which hours are being consumed by work that automation can execute, and what is the cost of not automating them.
For a VA managing three retainer clients, a realistic accounting of weekly manual overhead looks like this: 45-60 minutes per client per week on status updates and communication that follows a predictable template; 30-45 minutes per client per month on report generation that pulls from the same sources in the same format. 20-30 minutes per new client setup that duplicates a folder structure and task list every time; 15-20 minutes per week on task creation from emails and messages that follow identifiable patterns.
Total: 4-6 hours per week of work that is not billable, not strategic, and not relationship-building. At a $40/hour billing rate, that is $160-240 per week ($8,000-12,000 annually) in time spent on mechanical repetition.
A configured virtual assistant automation system that covers those categories reduces the equivalent time to 30-45 minutes per week, the review and exception-handling layer that automation cannot replace. The remaining 3-5 hours per week become available for billable work, additional clients, or the system-building that increases the value of the VA’s services.
The second economic argument is capacity. A VA without automation systems has a capacity ceiling determined by hours available minus administrative overhead. A VA with complete workflow automation for virtual assistants has a capacity ceiling determined by hours available minus the minimum time for exception handling and client relationship management — a significantly higher number.
The third argument is consistency. Manual processes produce variable quality correlated with the VA’s workload at the moment of execution. Automated workflows produce identical quality regardless of workload. Client 5 receives the same onboarding experience as client 1. The Friday report for client 3 is delivered with the same accuracy as the report for client 1, even if the VA’s week was unusually full.
2. Recommended Automation Stack for Virtual Assistants
The tool stack for the best automation workflows for virtual assistants follows a natural progression. You do not need every tool from day one, adding tools before the foundation is stable creates maintenance overhead without operational value. The tiers below define what to add, when, and why. Choosing the right workflow automation tools at each stage determines whether the system scales cleanly or collapses under its own complexity.
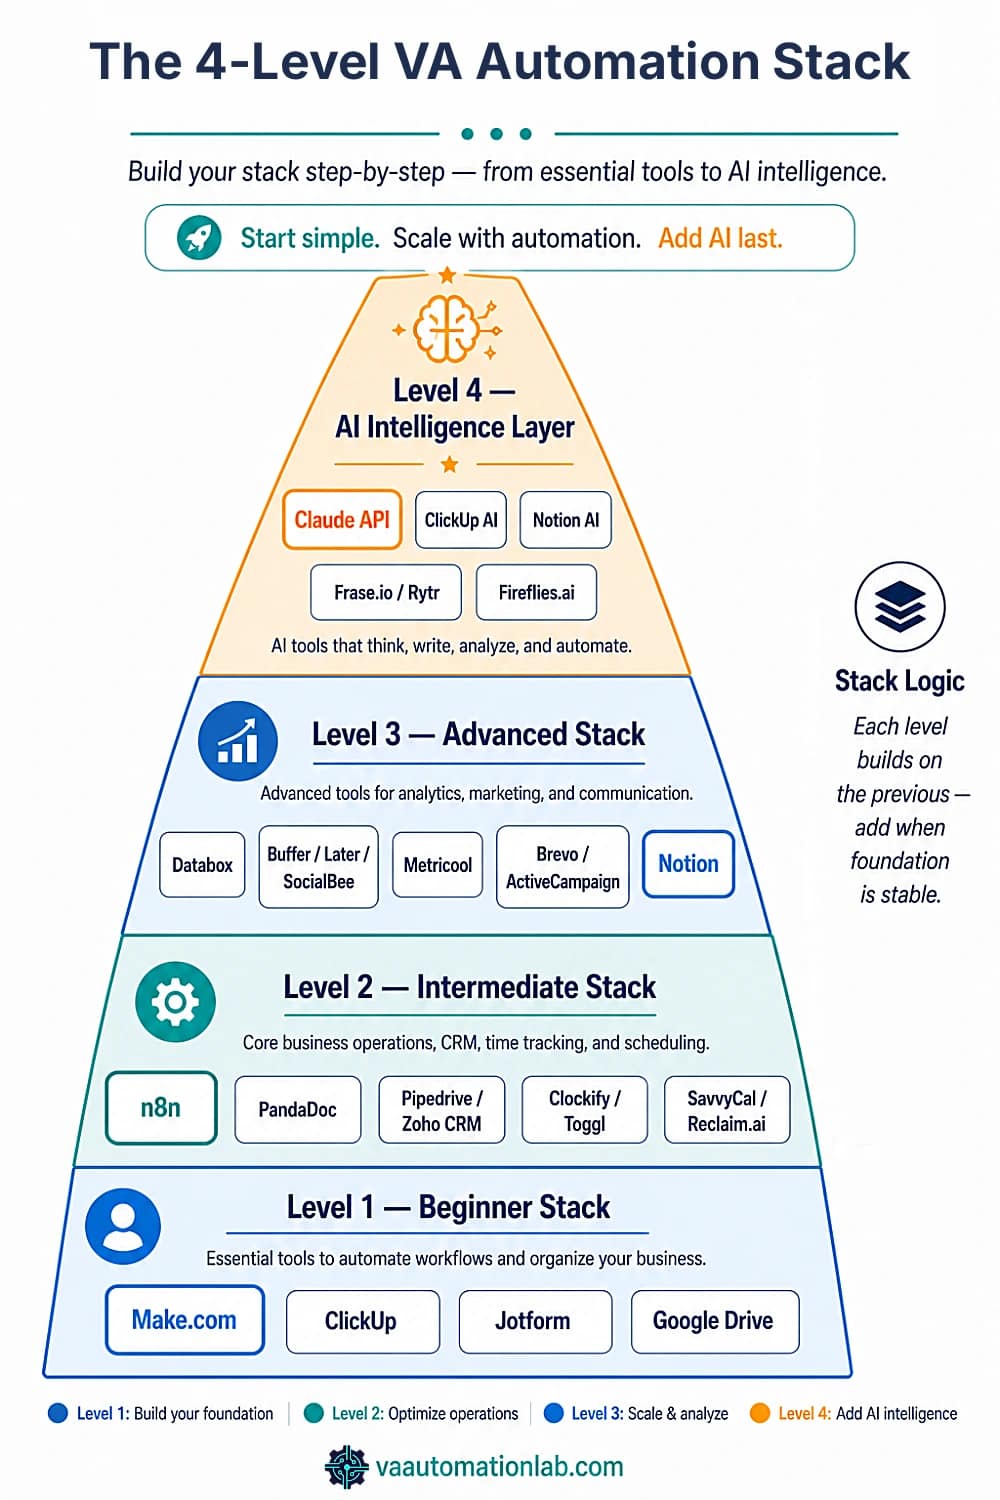
Level 1 — Beginner Stack (Start Here)
Core principle: one automation platform + one project management tool + one intake form.
This three-tool foundation covers 80% of VA automation at the beginner and intermediate level.
Automation platform: Make handles both simple and complex workflows on a single visual canvas, branching logic, data transformation, bulk operations, and AI API calls are all native. The Core plan at $9/month (billed annually) unlocks unlimited active scenarios, minute-level scheduling, and Make API access: the complete beginner and intermediate workflow stack runs on it. The Free plan (1,000 credits/month, 15-minute minimum interval) covers testing and low-volume use. Zapier remains an option for single-step linear workflows, relevant for VAs already embedded in it, but Make handles everything Zapier does and scales further without the per-task cost escalation.
Project management: ClickUp (Free plan covers tasks, automations, forms, 5 active automation rules; Unlimited at $7/month removes all limits) for operations-heavy VAs managing tasks, templates, and dashboards. Notion (Free plan includes databases, calendar, mail sync; Plus at $10/month adds unlimited file uploads and custom forms) for documentation-heavy VAs building SOPs, knowledge bases, and client wikis. Many VAs run both, ClickUp for task execution, Notion for documentation. For VAs who need relational databases instead of flat folders, Airtable is a common alternative to Notion for structured client data.
Intake forms: Jotform (Starter plan: free, 5 forms, 100 monthly submissions, sufficient for testing; Bronze at $39/month covers 25 forms and 1,000 submissions for an active VA practice) provides native integrations with Make, Zapier, and most CRMs. Use Jotform for client intake, lead capture, and any structured data collection that feeds into automation triggers.
File storage: Google Drive with a Master Client Folder Template. Make handles folder duplication and renaming natively, no plugin required.
Level 2 — Intermediate Stack
Add after the beginner layer is stable and tested.
Contract and proposal: PandaDoc (Free: 60 docs/year, 5 eSignatures/month, functional for testing; Starter at $19/month: unlimited uploads and eSignatures; Business at $49/month: CRM integrations, approval workflows, bulk send) integrates directly with Make for contract-triggered onboarding automation. PandaDoc Business is the plan that makes the full onboarding workflow below buildable.
Alternative automation: n8n (Starter: $23/month for 2,500 workflow executions and 1 shared project; Pro: $58/month for 10,000 executions and 20 concurrent runs) is the self-hosted alternative to Make for VAs comfortable with slightly more configuration. n8n runs the same logic as Make (triggers, routers, HTTP modules, API calls) but costs less at high execution volumes. Start with Make; consider n8n when execution costs become meaningful. Pabbly Connect (Free: 100 tasks/month; Standard: $16/month — 10,000 tasks/month, unlimited path routers, unlimited premium apps; Unlimited: $69/month — unlimited tasks, AI Assistant, MCP servers) is the lowest-cost automation platform in this category, relevant for VAs on tight budgets who need more volume than Make’s free tier without n8n’s self-hosted complexity.
CRM: Pipedrive (Lite: $16/month, pipeline management, reports, 500 integrations; Growth: $46/month, email sync, automation sequences, meeting scheduler) for VAs managing lead pipelines or supporting clients with sales operations. Zoho CRM (Free for up to 3 users; Standard: $16/month, workflows, reports, AI agents; Professional: $27/month, CPQ, process automation, inventory) as the budget-friendly alternative with a broader feature set at lower price points. Both integrate natively with Make and Zapier.
Time tracking: Clockify (Free plan: unlimited tracking, timesheets, billable rates, reports, covers most VA needs permanently; Basic at $5/month adds historical rates, project templates, and import tools; Standard at $6/month adds invoicing and approval workflows) or Toggl Track (Free: time tracking, Google/Outlook calendar integration, productivity reports; Starter: $9/month, billable rates, project estimates, revenue analysis). Both integrate with ClickUp, Make, and Zapier for automated time log entries triggered by task status changes.
Scheduling: Reclaim.ai (Lite: free, 1 scheduling link, 1 habit, 1-week scheduling range; Starter: $10/month, 3 scheduling links, unlimited habits, 8-week range, full integrations) for AI-powered time blocking that automatically schedules focus time, habits, and meetings around existing calendar commitments. SavvyCal (Free: 1 link, 1 calendar; Basic: $12/month, unlimited calendars and links, team scheduling) for polished client-facing scheduling with calendar overlay. Motion is a comparable AI-scheduling alternative to Reclaim.ai, bundling task prioritization directly into the calendar view.
Level 3 — Advanced Stack
Add when client operations workflows are running stably.
Reporting and analytics: Databox (Free: 3 data sources, 1 dashboard, 10 custom metrics, daily data refresh — enough for a single-client proof of concept; Analyst: $64/month (5 data sources, 500 AI credits, all integrations, hourly sync); Pro: $159/month — 1,500 AI credits/month, hourly data refresh, unlimited users, MCP server & API, sharing & notifications) aggregates metrics from Google Analytics, social platforms, ad platforms, and project management tools into a single client-facing dashboard. Metricool (Free: 1 brand, 20 posts/month, 5-competitor analysis; Starter: $20/month — 10 brands, unlimited publishing, PDF/PPT reports, LinkedIn; Advanced: $53/month — 50 brands, team management, post approval, Metricool API for Make/Zapier integration) for multi-client social management with reporting.
Social media scheduling: Buffer (Free: 10 scheduled posts/channel, 1 user, AI Assistant, basic analytics; Essential: $5/month — unlimited scheduled posts per channel, advanced analytics, hashtag manager, first comment scheduling; Team: $10/month — unlimited team members, content approval workflows, access levels) is the lowest-friction entry point. Later (Starter: $19/month — 1 social set of 8 profiles, 1 user, 30 posts/profile/month, AI credits; Growth: $37.50/month — 2 social sets, 2 users, 180 posts/profile, social inbox, collaboration and approval workflows) for VAs managing multi-platform content for clients. SocialBee (Bootstrap: $24/month — 5 profiles, 1 workspace, unlimited AI content generation; Accelerate: $40/month — 10 profiles, advanced analytics, bulk editor, post approval) for VAs who need content category management and recycling.
Email marketing (for VAs managing client newsletters): Brevo (Free: 300 emails/day, single user, basic automation; Starter: $8/month — from 5,000 emails/month, email & SMS, AI content generator, advanced segmentation; Standard: $16/month — marketing automation, A/B testing, AI send-time optimization, landing pages) or ActiveCampaign (Starter: $15/month for 1,000 contacts — core email marketing; Plus: $37/month — advanced automation, CRM; Pro: $79/month — predictive sending, website personalization) for clients requiring deeper marketing automation. Moosend (Pro: $7/month for 500 contacts — unlimited email campaigns, automation, landing pages, SMTP) as the budget option for small client lists.
Documentation hub: Notion (Business: $20/month — Notion Agent, AI Meeting Notes, Enterprise Search, granular permissions, private teamspaces) at this level for managing multi-client knowledge bases, SOPs, and internal wikis with AI-assisted drafting.
Level 4 — AI Intelligence Layer
Add after the mechanical automation layer is stable. AI enhances a working system — it cannot substitute for one that is not yet configured.
AI generation inside workflows: Claude and ChatGPT via Make’s HTTP module for email drafting, client summaries, SOP generation, and report narrative. Both accessible as API calls embedded directly in automation scenarios, no copy-paste, no manual trigger. ClickUp AI (Brain Add-On: $9/user/month) for task generation from briefs and AI-assisted project setup. Notion AI (included in Business plan) for documentation drafting and knowledge base management.
AI writing for content VAs: Rytr (Free: 10,000 chars/month; Unlimited: $7.50/month — unlimited AI content, 1 tone match, 50 plagiarism checks/month; Premium: $24/month — multiple tone matching, 100 plagiarism checks) for fast short-form content generation inside content workflows. Frase.io (Starter: $39/month — 10 AI-optimized articles/month, SERP research, 1 domain; Professional: $103/month — 40 articles, 3 domains, 3 seats) for SEO-focused content production.
Meeting notes: Fireflies.ai (Free: unlimited transcription, 800 minutes storage/seat, 2-hour recording limit, AskFred AI assistant; Pro: $10/month — 8,000 minutes, action items, unlimited integrations; Business: $19/month — unlimited storage, 3-hour recording limit, video recording, conversation intelligence) for automated meeting transcription and action item extraction integrated with ClickUp and Notion.
Recommended Tool Stack Summary
The table below maps each workflow category to the recommended primary tool, automation platform, and supporting tools at each level.
Workflow Category | Level | Primary Tool | Automation Platform | Supporting Tools |
Email-to-task | Beginner | Gmail | Make / Zapier | ClickUp |
Lead intake & follow-up | Beginner | Jotform | Make / Zapier | ClickUp, Pipedrive |
File organization | Beginner | Google Drive | Make | ClickUp |
Task notifications | Beginner | ClickUp | Zapier | Slack |
Contract & e-signature | Intermediate | PandaDoc | Make | ClickUp, Gmail |
Content scheduling | Intermediate | Buffer / Later / SocialBee | Zapier / Make | ClickUp, Metricool |
CRM & lead management | Intermediate | Pipedrive / Zoho CRM | Zapier / Make | ClickUp, Gmail |
Client reporting | Intermediate | Google Sheets / Databox | Make | ClickUp, Claude API |
Time tracking | Intermediate | Clockify / Toggl Track | Zapier | ClickUp |
Scheduling | Intermediate | Reclaim.ai / SavvyCal | Native | Google Calendar |
Full client management | Advanced | ClickUp | Make | PandaDoc, CRM, Gmail |
Lead qualification | Advanced | Pipedrive / Zoho CRM | Make | ClickUp, Gmail |
Content production pipeline | Advanced | ClickUp | Make / n8n | Claude API, Buffer/Later |
AI client summaries | AI Layer | Claude API | Make / n8n | ClickUp |
AI email drafting | AI Layer | Claude API | Make | ClickUp, Gmail |
AI-enhanced reporting | AI Layer | Claude API + Databox | Make | Google Sheets |
Meeting notes & actions | AI Layer | Fireflies.ai | Zapier | ClickUp, Notion |
Make: The Automation Platform Built for Complex VA Workflows
Make handles every workflow in this guide, from the 10-minute email-to-task beginner setup to the full 7-module AI reporting pipeline, on a single visual canvas.
The Core plan at $9/month covers unlimited active scenarios, minute-level scheduling, and Make API access: the complete beginner and intermediate stack runs on it.
The free plan is available for testing.
3. Beginner Workflows — Quick Wins
(Under 30 Minutes Each)
These four workflows are the starting point for building the best automation workflows for virtual assistants at the beginner level. Each takes under 30 minutes to configure, uses mainstream tools with reliable native integrations, and produces an immediate, measurable time saving. Build all four in the first week before moving to intermediate workflows.
Workflow 1 — Email-to-Task Automation
Time to build: 10–15 minutes.
Time saved: 5-10 minutes per actionable email.
Tools required: Gmail + Make (or Zapier) + ClickUp Free.
Best for: VAs managing client inboxes or operations-heavy accounts.
How it works: When an email arrives in Gmail containing specific keywords (configurable per client), Make (or Zapier) creates a ClickUp task automatically with the email subject as the task name, the email body as the task description, and a due date set to today + 1 day.
Make scenario:
TRIGGER: Gmail — New email matching search
Search filter: subject:(invoice OR approval OR urgent OR "action required")
AND from:[client email domain]

ACTION 1: ClickUp — Create task
Name: [Gmail subject]
Description: [Gmail body plain text]
List: [relevant client list]
Due date: today + 1 day
Priority: High
The one configuration decision that matters: The Gmail search filter. Too broad (every email creates a task) produces noise. Too narrow (misses relevant emails) defeats the purpose. Start with 3-4 keywords specific to the client’s communication style, then refine after one week of testing.
Workflow 2 — Auto-Send Intake Form to New Leads
Time to build: 15–20 minutes.
Time saved: 10-15 minutes per new lead.
Tools required: Jotform (contact form trigger) + Make (or Zapier) + Gmail + ClickUp.
Best for: VAs with active lead generation or referral-based business development.
How it works: When a new lead submits a contact form, Make sends the Jotform intake link automatically with a confirmation email, and creates a follow-up task in ClickUp due in 3 days.
System architecture:
TRIGGER: Jotform — New submission (contact / inquiry form)

ACTION 1: Gmail — Send email
To: [lead email from form]
Subject: "Next step — tell me about your project"
Body: [Jotform intake link + brief intro paragraph]

ACTION 2: ClickUp — Create task
Name: "Follow up — [Lead Name]"
List: Admin & Operations
Due date: today + 3 days
Priority: Medium
Why Jotform: The Starter plan (free, 5 forms, 100 submissions/month) is sufficient to start. The Bronze plan at $39/month covers 25 active forms and 1,000 monthly submissions, appropriate for a VA with multiple client intake flows and a lead form on the website.
Workflow 3 — Auto-Organize Files in Google Drive
Time to build: 20-25 minutes.
Time saved: 5-10 minutes per file uploaded to the wrong location.
Tools required: Google Drive + Make Core.
Best for: VAs managing high document volume across multiple clients.
How it works: When a new file is uploaded to a designated “Inbox” folder in Google Drive, Make reads the filename, identifies the client name or file type based on naming conventions, and moves the file to the correct client subfolder automatically.
Requires: a consistent file naming convention before the automation can work, files must include the client name or project code in the filename for the router logic to function.
System architecture:
TRIGGER: Google Drive — Watch files in folder
Folder: /Inbox/

MODULE 1: Router — Branch by filename pattern
IF filename contains [Client A name] → Move to /Clients/Client A/02 — Deliverables/
IF filename contains [Client B name] → Move to /Clients/Client B/02 — Deliverables/
IF filename contains "invoice" OR "contract" → Move to /Admin/Finance/
DEFAULT → Move to /Inbox/Review/ AND notify VA via Slack
Workflow 4 — Automated Task Notifications
Time to build: 8-10 minutes.
Time saved: eliminates manual monitoring of multiple tools simultaneously.
Tools required: ClickUp + Make (or Zapier) + Slack (or Gmail).
Best for: all VA types, the highest frequency manual check in any VA operation.
How it works: When a new task is created in ClickUp (by any method, automation, client, team member), Make sends a Slack notification with the task name, assignee, due date, and a direct link to the task. No more opening ClickUp to check for new tasks.
System architecture:
TRIGGER: ClickUp — New task in list
List: [all client lists, Space-level trigger]

ACTION: Slack — Send channel message
Channel: #task-alerts
Message: "🔔 New task: [task name]
Due: [due date] | Priority: [priority]
Client: [list name] | Link: [task URL]"
👉 How to Automate Repetitive Tasks as a Virtual Assistant — the complete guide to identifying and automating the highest-frequency manual steps.
4. Intermediate Workflows — Client Operations Layer
These four workflows form the core of a professional VA operation. They cover the highest-impact automation opportunities in client-facing work (onboarding, content, CRM, and reporting) and collectively save 8-15 hours per month for a VA managing 3-4 active clients. Build them after the four beginner workflows are stable and tested.
Workflow 5 — Client Onboarding System
Time to build: 3-4 hours.
Time saved: 2-3 hours per new client.
Tools required: Jotform (intake trigger) + Make Core + PandaDoc Starter + Google Drive + ClickUp + Gmail.
Best for: all VA types managing retainer or project-based clients.
This is the highest-ROI workflow in the entire virtual assistant automation system, the one that produces the most visible operational improvement per hour of setup investment.
System architecture:
TRIGGER: Jotform — New submission (onboarding intake form)

ACTION 1: Make — Google Drive
Create client folder from Master Template
Rename: /Clients/[Client Name] — [Start Date]/
Subfolders: 01 Onboarding / 02 Deliverables / 03 Reports / 04 Admin

ACTION 2: PandaDoc — Create document from template
Template: [Service Agreement]
Variables: Client Name, Service Type, Start Date, Rate, Terms
Send to: [client email]

ACTION 3: Make — Wait for PandaDoc webhook (document completed)
Continue when: document_status = "document.completed"

ACTION 4: ClickUp — Create list from template
Space: [Client Name]
Template: [Service Type template]
All tasks and due dates populated automatically

ACTION 5: Gmail — Send welcome email
Subject: "Welcome — here's what happens next"
Body: kickoff call link + Drive folder access + what to expect Week 1

ACTION 6: Jotform — Send access collection form
Subject: "One last thing — tool access"
Body: Jotform form for login credentials and platform access details

ACTION 7: Make — Update CRM
Status: Active Client
Start Date: today
Contract Status: Signed
PandaDoc note: The Starter plan at $19/month covers unlimited eSignatures and document uploads. CRM integrations (Pipedrive, Zoho) require the Business plan at $49/month, but the Starter plan is fully functional for the onboarding sequence above via Make’s native PandaDoc integration.
👉 How to Automate Client Onboarding for Virtual Assistants — full implementation detail, tool configuration, and Make scenario structure.
Workflow 6 — Content Approval-to-Scheduling
Time to build: 25–45 minutes.
Time saved: 3-5 hours per week for content-focused VAs.
Tools required: ClickUp + Make (or Zapier) + Buffer (or Later/SocialBee/Metricool) + Gmail.
Best for: Social media VAs, content managers, VAs managing editorial workflows for clients.
System architecture:
TRIGGER: ClickUp — Task status changes to "Approved"
In list: [Client Name] Content Calendar

ACTION 1: Buffer / Later / SocialBee — Create scheduled post
Platform: [from ClickUp custom field]
Content: [from task description]
Schedule: [from due date custom field]

ACTION 2: ClickUp — Update task status → "Scheduled"
Apply tag: "Ready to Publish"

ACTION 3: Gmail — Send notification to client
Subject: "[Platform] post scheduled — [Date]"
Body: post title + scheduled date + platform

ACTION 4: ClickUp — Create follow-up task
Name: "Check analytics — [post title]"
Due date: scheduled date + 7 days
Tool selection note: Buffer Essential at $5/month covers unlimited posts per channel and is the lowest-cost entry point. Later Growth at $37.50/month adds collaboration and approval workflows for multi-user client accounts. SocialBee Accelerate at $40/month is the choice for VAs managing content category systems with recycling. Metricool Advanced at $53/month adds the API for Make/Zapier integration if you need to pull analytics data back into ClickUp automatically.
👉 How to Automate Social Media as a Virtual Assistant — the complete four-layer system (content generation, scheduling, client approval, and automated reporting) with the full Make scenario sequence.
Workflow 7 — CRM and Lead Pipeline Automation
Time to build: 30-45 minutes.
Time saved: 1-2 hours per day for VAs managing lead pipelines.
Tools required: Pipedrive (or Zoho CRM) + Make (or Zapier) + ClickUp + Gmail.
Best for: executive VAs, sales support VAs, VAs managing client acquisition.
System architecture:
TRIGGER: Pipedrive / Zoho CRM — New contact created
OR deal/lead status changes

ACTION 1: ClickUp — Create task
Name: "Follow up — [Lead Name] — [Company]"
List: Admin & Operations > Business Development
Due date: today + 1 day (new lead) OR today + 3 days (status change)

ACTION 2: Gmail — Send lead response email
Template: [appropriate template for lead source]
Personalization: first name + company from CRM

ACTION 3: CRM — Update fields
Last contacted: today
Status: In Progress / Hot Lead / Warm Lead [from router]

ACTION 4: Slack — Notify VA
"New lead: [Name] — [Company] | Source: [lead source]"
CRM selection: Pipedrive Lite at $16/month is the cleaner implementation for VAs focused on pipeline management. Zoho CRM Standard at $16/month offers more breadth (workflows, AI agents, sales forecasting) and the free plan supports 3 users, making it a functional testing environment before committing.
Workflow 8 — Client Reporting Automation
Time to build: 2-3 hours.
Time saved: 4-8 hours per month across all clients.
Tools required: Make Core + ClickUp + Claude API + Gmail + Google Sheets (optional: Databox Free for dashboards).
Best for: all VA types managing clients with reporting deliverables.
System architecture:
TRIGGER: Make Scheduler — Every Friday 4:00 PM (or first Monday of month for monthly reports)

MODULE 1: ClickUp — Search tasks
Filter: Status = Done | Date completed = this week | List = [Client Name]

MODULE 2: Iterator — Loop through completed tasks
Extract: task name, completion date, time tracked

MODULE 3: Aggregator — Compile task list

MODULE 4: Google Analytics / Social Platform API — Pull metrics (if applicable to client's service type)

MODULE 5: HTTP — Claude API — Generate narrative
Prompt: "Summarize these completed tasks and metrics into a professional weekly client report. Include: key accomplishments, metrics summary, observations, next week priorities. Tone: professional and concise. Under 300 words."

MODULE 6: Gmail — Send report
To: [client email]
Subject: "Weekly Update — [Client Name] — [Date]"
Body: AI-generated narrative + task list + metrics table

MODULE 7: Google Sheets — Log metrics
Row: client, date, tasks completed, time tracked, key metrics
Databox note: If the client wants a live dashboard rather than an email report, Databox’s free plan (3 data sources, 1 dashboard, daily refresh) allows you to build a proof-of-concept at no cost. Analyst plan at $64/mo adds 5 data sources, 500 AI credits, all integrations, and hourly sync. The Pro plan at $159/mo adds hourly refresh, unlimited users, and MCP server & API access, appropriate when reporting is a core billable service for multiple clients.
👉 How to Automate Client Reporting for Virtual Assistants — for a deeper implementation guide, including the 4-layer stack architecture, Google Sheets hub setup, Looker Studio dashboard, and per-VA-type routing.
Pabbly Connect: The Budget Engine for Scaling Automation
Unlimited workflows, unlimited path routers, and no per-task cost escalation as your client volume grows.
Pabbly Connect runs the same branching logic and multi-step sequences covered in this guide, at a fraction of the cost.
5. Advanced Workflows — Full System Architecture
These three workflows represent the highest complexity level, end-to-end systems that automate entire business functions rather than individual tasks. Each requires the intermediate workflows to be stable before implementation and is built primarily in Make (or n8n for VAs who prefer the self-hosted model at lower per-execution cost).
Workflow 9 — Automated Client Management System
Time to build: 6-8 hours across multiple sessions.
Time saved: 10-15 hours per month across a full client portfolio.
Tools required: Make + ClickUp + PandaDoc + Gmail + Pipedrive (or Folk) + Google Drive + SavvyCal (or Reclaim.ai) + Jotform + Databox.
This is the backbone of a scalable VA business, a single connected system that manages the complete client lifecycle from onboarding to renewal without manual coordination between stages.
System architecture:
STAGE 1 — ONBOARDING (triggered by Jotform submission)
→ Google Drive: create folder from template
→ PandaDoc: generate + send contract
→ ClickUp: create list from template (wait for signature)
→ Pipedrive: create new client record + pipeline stage “Onboarding”
→ Gmail: send welcome email + SavvyCal booking link for kickoff

STAGE 2 — ACTIVE DELIVERY (recurring triggers)
→ Pipedrive: update client status → “Active Client” → log interactions automatically (emails, tasks, reports)
→ ClickUp: weekly recurring tasks generate automatically
→ Make Scheduler: weekly report sent every Friday (Workflow 8) → monthly invoice on last business day
→ Databox: client dashboard updated in real time (if applicable)

STAGE 3 — RENEWAL (triggered by contract end date - 30 days)
→ Pipedrive: move deal to “Renewal” stage → trigger renewal automation via Make
→ ClickUp task: "Prepare renewal proposal — [Client]" | Priority: High
→ Gmail: send renewal discussion email with SavvyCal link
→ PandaDoc: draft renewal contract (triggered if client responds)

STAGE 4 — OFFBOARDING (triggered by status change to "Offboarding")
→ ClickUp: create offboarding checklist from template
→ Google Drive: archive client folder to /Archive/[Year]/
→ Pipedrive: update status to "Past Client" + log end date → store lifetime value + project data
→ Gmail: send final delivery package + feedback form (Jotform)

Error handling: if contract is not signed within 72 hours → automated reminder via Gmail + follow-up task in ClickUp.
The critical configuration: the contract end date must be stored as a custom field in ClickUp from the onboarding stage. The renewal trigger is a Make scenario scheduled daily that checks all active client records and activates the renewal sequence when the condition is met.
Workflow 10 — Automated Lead Qualification System
Time to build: 3-4 hours.
Time saved: 30-45 minutes per new lead.
Tools required: Jotform (lead form) + Make + Gmail + ClickUp + Pipedrive (or Zoho CRM) + SavvyCal.
Best for: VAs building their own client acquisition system or supporting clients with lead management.
System architecture:
TRIGGER: Jotform — New lead submission

MODULE 1: Make — Score the lead
+ Budget mentioned explicitly → +3
+ Timeline under 30 days → +2
+ Service matches VA specialty → +2
+ Referral source (vs cold) → +1
+ Complete form submission (no blank required fields) → +1

MODULE 2: Router — Branch by score
Score ≥ 7 → HIGH PRIORITY
Score 4–6 → MEDIUM PRIORITY
Score ≤ 3 → LOW PRIORITY

HIGH: Gmail (AI-personalized response) + SavvyCal link
     ClickUp task: today, Priority High | CRM: Hot Lead
MEDIUM: Gmail (intake form follow-up)
     ClickUp task: +2 days, Priority Medium | CRM: Warm Lead
LOW: Gmail (standard info email)
     ClickUp task: +5 days, Priority Low | CRM: Cold Lead
Workflow 11 — Automated Content Production Pipeline
Time to build: 2-3 hours.
Time saved: 45-60 minutes per client per week for content-focused VAs.
Tools required: Make + ClickUp + Claude API + Buffer (or Later/SocialBee) + Gmail + Metricool (for analytics).
Best for: social media VAs, content managers, VAs managing end-to-end content production.
System architecture:
STAGE 1 — IDEATION (Monthly, first Monday)
Make Scheduler → Claude API: generate 4-week content plan
Prompt: "[Client niche + tone + pillars] — generate 20 ideas with platform, format, and hook for each"
→ ClickUp: create one task per idea | Custom fields: Platform, Format, Pillar, Publish Date, Status = "Idea"

STAGE 2 — PRODUCTION (Weekly)
VA sets status → "In Production"
→ ClickUp automation: assign subtasks (Brief, Caption, Design brief, CTA)
→ Claude API (via Make): generate caption draft from task name + pillar field

STAGE 3 — REVIEW
Status = "Client Review"
→ Gmail: send content for approval
→ ClickUp: assign to client (guest access)

STAGE 4 — PUBLICATION
Status = "Approved"
→ Buffer: schedule post
Status update → "Scheduled"

STAGE 5 — ANALYTICS (Weekly, Monday)
Metricool API → Google Sheets: log metrics per post
Monthly: Claude generates performance summary
👉 Make for Virtual Assistants: The Beginner Setup Guide — covers the five core Make concepts and workspace configuration that make the module sequences above buildable from scratch in a single session.
6. AI-Powered Workflows — The Intelligence Layer
AI workflow automation differs from standard automation in one fundamental way: they do not just move data, they interpret it, generate from it, and produce outputs that require human judgment to create manually. Three AI-powered workflows produce the most value in VA operations at scale.
Workflow 12 — AI Client Summary from Intake Form
When it runs: after every new client intake form submission.
What it replaces: 20-30 minutes of manual review and note-taking per new client.
Tools required: Jotform + Make + Claude API + ClickUp.
Implementation via Make HTTP module:
MODULE: HTTP — POST to Claude API
URL: https://api.anthropic.com/v1/messages

Prompt:
"Summarize this client intake form into a structured internal brief.

CLIENT OVERVIEW — Name, business, service requested: 2 sentences
PRIMARY GOALS — 3 bullet points maximum
CURRENT TOOLS — List all mentioned
COMMUNICATION PREFERENCES — Channel, frequency, time zone
ACCESS REQUIREMENTS — List all platforms mentioned
FLAGS — Any unusual requests, constraints, or red flags (write NONE if none)

Tone: factual. No padding. No introductory sentence.
Intake form data: [ALL FORM FIELDS FROM MAKE DATA STORE]"
Output saved automatically to ClickUp Doc “Client Brief — [Client Name]” in the client’s workspace.
Workflow 13 — AI-Drafted Client Emails
When it runs: triggered by specific ClickUp task status changes or on a weekly schedule.
What it replaces: 10-15 minutes of writing per client communication email.
Tools required: Make + Claude API + ClickUp + Gmail.
Weekly update email (Friday trigger):
"Write a professional weekly update email for [Client Name].

Format:
- Subject line (include client name and week dates)
- Opening: 1 sentence referencing their business goal
- Accomplished this week: bullet list (max 5 items)
- In progress: bullet list (max 3)
- Coming up next week: bullet list (max 3)
- Closing: 1 sentence + next touchpoint reference

Tone: professional and direct. Under 200 words. No filler phrases.
Completed tasks this week: [TASK LIST FROM CLICKUP]"
Post-meeting follow-up (Fireflies.ai / SavvyCal trigger):
"Write a post-meeting follow-up email from these meeting notes.
Include: meeting summary (2–3 sentences), agreed action items (numbered),
owner and deadline for each, next meeting confirmation if applicable.

Tone: professional and clear. Under 150 words.
Meeting notes: [TRANSCRIPT OR NOTES FIELD]"
Workflow 14 — AI-Enhanced Reporting
When it runs: weekly or monthly, on schedule.
What it replaces: 30-60 minutes of analysis and report writing per client per cycle.
Tools required: Make + Claude API + Databox (or Google Sheets) + Gmail.
This is the AI workflow with the highest perceived value differential, clients receive narrative insights instead of raw numbers, which elevates the VA’s service from data delivery to strategic interpretation.
Make scenario with Claude integration:
MODULE 1–3: Pull metrics from connected platforms

MODULE 4: HTTP — Claude API
Prompt:
"Analyze these metrics and write a professional [weekly/monthly] report section.

Include:
- 2-sentence executive summary
- What worked this period (specific, data-referenced)
- What underperformed and why (honest, not defensive)
- One strategic recommendation for next period
- Key metric callouts

Tone: professional analyst. Not promotional. Use specific numbers.
Under 250 words.

Metrics: [DATA FROM MODULES 1–3]
Previous period metrics: [IF AVAILABLE]
Client context: [CLIENT NICHE + GOALS]"
Category | Standard Automation | AI-Powered Automation |
Data Processing | Moves data between tools based on rules | Interprets data, extracts insights, identifies patterns |
Client Onboarding | Creates folders, tasks, sends standard emails | Generates personalized client brief, drafts tailored welcome |
Communication | Sends predefined templates | Writes context-aware emails, adapts tone per client |
Reporting | Compiles raw numbers into document | Analyzes metrics, writes narrative insights, flags anomalies |
Task Creation | Creates tasks from keywords or form fields | Generates task lists from briefs, content, or client notes |
Content Workflows | Moves content through stages | Generates outlines, captions, drafts to accelerate production |
n8n: Self-Hosted Power for High-Volume AI Workflows
When your AI-layer workflows scale across five or more client accounts, execution volume decides what you pay.
n8n runs the same Claude and ChatGPT API calls covered in this guide without the per-task cost of other platforms.
7. Real Workflow Examples — Implemented
The seven examples below demonstrate how this workflow automation system for VAs works in practice. They convert the workflow categories in sections 3–6 into concrete, named automation sequences, each with its exact tool chain and execution time. Use them as quick‑reference cards to choose your starting point.
Lead Capture System: Jotform contact form → Gmail confirmation + intake form link → ClickUp task “Follow up — [Name]” due today + 1 → Slack alert to VA → Pipedrive record created.
Build time: 20 min.
Tools: Jotform + Make + Gmail + ClickUp + Pipedrive.
Email-to-Task Converter: Gmail incoming email matching keywords → ClickUp task created with subject + body → Priority High → Due date today + 1.
Build time: 10 min.
Tools: Gmail + Make/Zapier + ClickUp.
Content Approval to Scheduling: ClickUp status → “Approved” → Buffer schedules post → Gmail notifies client → ClickUp analytics follow-up task created for +7 days.
Build time: 25 min.
Tools: ClickUp + Make/Zapier + Buffer + Gmail.
Full Client Onboarding Pipeline: Jotform submission → Google Drive folder from template → PandaDoc contract generated + sent → Wait for signature → ClickUp list from template → Welcome email → Access form → CRM updated → Slack notification.
Build time: 3–4 hours.
Tools: Jotform + Make + Drive + PandaDoc + ClickUp + Gmail + Pipedrive.
Weekly Reporting Pipeline: Make scheduler Friday 4PM → ClickUp completed tasks pulled → Iterator aggregates list → Claude API generates narrative → Gmail sends formatted report → Google Sheets logs metrics → Databox dashboard updated.
Build time: 2–3 hours.
Tools: Make + ClickUp + Claude API + Gmail + Sheets + Databox.
Lead Scoring and Routing: Jotform lead → Make scores based on criteria → Router branches High / Medium / Low → Gmail sends appropriate response + SavvyCal link for hot leads → ClickUp task priority set → CRM status updated.
Build time: 2–3 hours.
Tools: Jotform + Make + Gmail + ClickUp + Pipedrive + SavvyCal.
Recurring Client Delivery System: Recurring task activates weekly → ClickUp automation generates subtasks with due dates → Status → “In Progress” triggers Slack notification → Status → “Done” triggers Gmail client update → Clockify time log entry created automatically → Archive after 7 days.
Build time: 30–45 min (ClickUp native).
Tools: ClickUp + Slack + Gmail (Zapier) + Clockify.
👉 ClickUp for Virtual Assistants: Setup Guide & Templates — workspace configuration for the advanced client management system.
8. Automation by VA Niche: The Right Stack for Your Specialty
The workflows above apply across VA types, but the priority order, tool selection, and time investment differ significantly by niche. The four setups below reflect the highest-ROI configuration for each VA specialty.
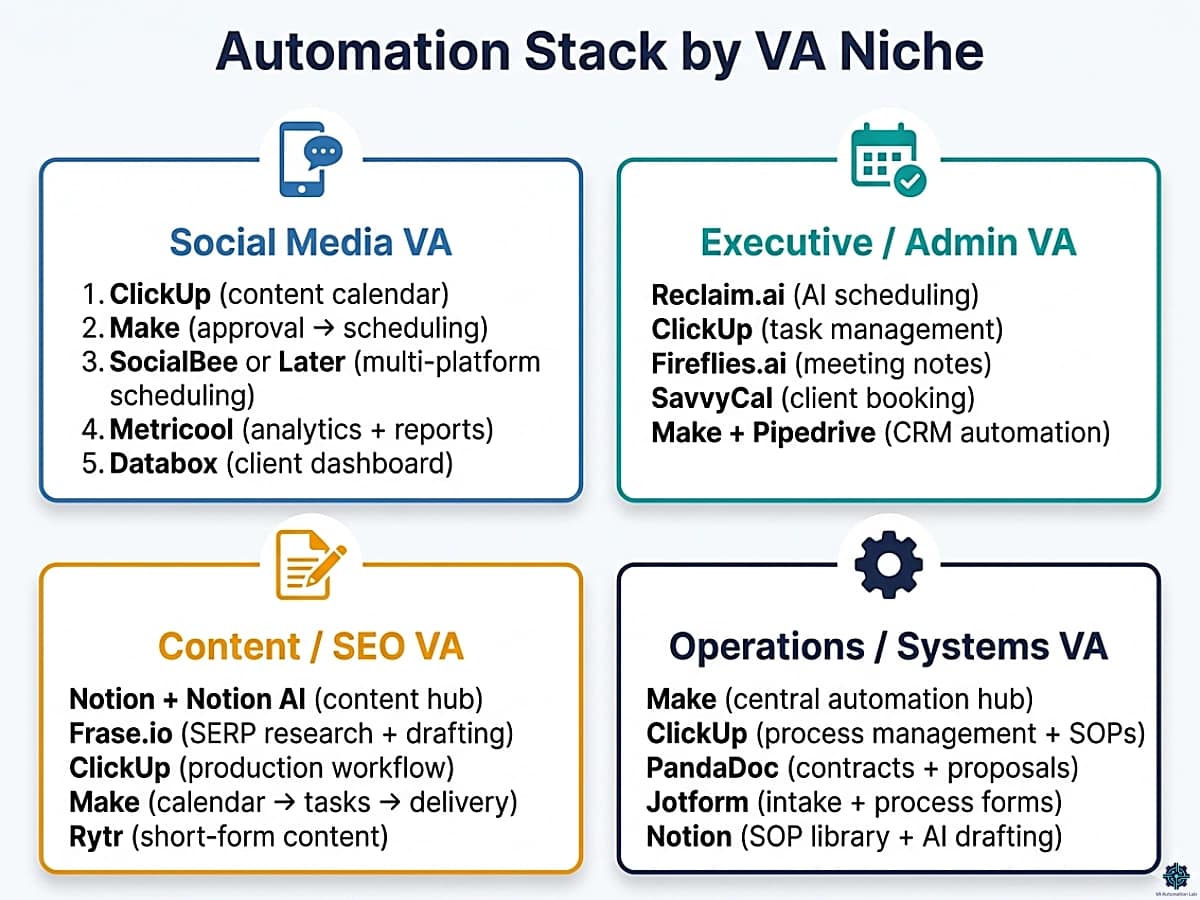
Social Media VA
Core problem: content creation, approval, scheduling, and analytics reporting across multiple platforms and clients.
Priority stack:
- ClickUp — content calendar as the master system of record
- Make — connects calendar approval status to scheduling tools
- SocialBee (Accelerate, $40/mo) or Later (Growth, $37.50/mo) — multi-platform scheduling with approval workflows
- Metricool (Starter, $20/mo) — analytics and PDF/PPT reporting for multiple brands
- Rytr or Frase.io — AI-assisted caption and content drafting
- Databox (free tier) — live client-facing performance dashboard
Workflows to build first: Workflow 11 (content production pipeline) → Workflow 6 (approval-to-scheduling) → Workflow 14 (AI-enhanced reporting).
Automation milestone: a social media VA with this stack running 3 clients saves approximately 10–15 hours per week on scheduling, reporting, and content coordination.
Executive / Admin VA
Core problem: calendar management, inbox triage, task tracking, meeting follow-ups, and client communication coordination.
Priority stack:
- Reclaim.ai (Starter, $10/mo) — AI time blocking for focus time, meetings, and habits
- ClickUp — central task and project management
- Fireflies.ai (Pro, $10/mo) — automated meeting transcription and action item extraction
- SavvyCal (Basic, $12/mo) — client scheduling with calendar overlay
- Make — connects meeting transcripts to ClickUp tasks and Gmail follow-ups
- Pipedrive (Lite, $16/mo) — if managing the client’s CRM alongside calendar
Workflows to build first: Workflow 1 (email-to-task) → Workflow 4 (task notifications) → Workflow 13 (AI-drafted meeting follow-ups).
Automation milestone: with Fireflies feeding action items into ClickUp tasks automatically after every meeting, an executive VA eliminates approximately 20–30 minutes of post-meeting administration per call.
Content / SEO VA
Core problem: content research, brief creation, drafting coordination, internal linking, and delivery tracking.
Priority stack:
- Notion (Plus, $10/mo) — content hub with AI-assisted drafting and internal linking
- Frase.io (Starter, $39/mo) — SERP research, competitor analysis, AI-optimized content
- ClickUp — content production workflow and deadline tracking
- Make — connects Notion content calendar to ClickUp tasks and Gmail client updates
- Rytr (Unlimited, $7.50/mo) — fast short-form content generation for social repurposing
- Databox — content performance tracking integrated with GA4
Workflows to build first: Workflow 11 (content pipeline) → Workflow 6 (approval-to-scheduling) → Workflow 12 (AI client summary from intake).
👉 Best AI Writing Tools for Virtual Assistants — tool comparison for content-focused VA workflows.
Operations / Systems VA
Core problem: client onboarding, SOP creation, process documentation, reporting, and multi-tool coordination.
Priority stack:
- Make — central automation hub for all cross-tool workflows
- ClickUp — process management, SOPs, recurring tasks, client dashboards
- PandaDoc (Starter, $19/mo) — contract automation and e-signatures
- Jotform (Bronze, $39/mo) — intake forms, process forms, client questionnaires
- Notion — SOP library and knowledge base with AI drafting
- n8n (Starter, $23/mo) — alternative or complement to Make for high-execution-volume operations
Workflows to build first: Workflow 5 (full client onboarding) → Workflow 9 (automated client management system) → Workflow 8 (client reporting).
Build a Custom VA System for Your Niche with ClickUp
Every VA niche needs a different workflow structure, and ClickUp is where you turn those workflows into a repeatable, scalable system.
Create niche-specific templates (social media, real estate, e-commerce, executive support). Organize clients, tasks, and deliverables in one centralized workspace. Automate recurring processes and standardize your operations. Adapt your system as your services and clients evolve.
Instead of rebuilding your workflow for every new client, build it once, and reuse it across your entire niche.
9. Time Tracking, Scheduling & Meeting Automation
These three functions (time tracking, scheduling, and meeting notes) are among the highest-frequency manual steps in any VA operation and the easiest to automate completely once the right tools are connected.
Automate Time Tracking
The objective: every billable task logs its time automatically, without manual start/stop, and feeds into invoicing and reporting without data entry.
Clockify: Clockify’s free plan covers unlimited tracking, timesheets, and billable rates; the Standard plan at $6/month adds invoicing and approval workflows directly inside Clockify, removing the need for a separate invoicing tool for time-based billing.
Automation with Make/Zapier:
TRIGGER: ClickUp — Task status changes to "In Progress"
ACTION: Clockify — Start timer for [Task Name] under [Client Project]

TRIGGER: ClickUp — Task status changes to "Done"
ACTION: Clockify — Stop timer
Toggl Track: Toggl Track’s Starter plan at $9/month adds billable rates, project time estimates, and revenue analysis. The free plan covers time tracking with Google/Outlook calendar integration, sufficient for solo VAs tracking hours across 1–3 clients.
Smart Scheduling Automation
The objective: eliminate the back-and-forth of scheduling coordination and protect focused work time automatically.
Reclaim.ai handles the internal scheduling layer, AI that automatically reschedules tasks, habits, and focus blocks around incoming meeting invitations. The Lite plan is free (1 scheduling link, 1 habit); Starter at $10/month unlocks 3 scheduling links, unlimited habits, 8-week scheduling range, and all integrations including ClickUp.
SavvyCal handles the client-facing layer, scheduling pages where clients see your actual availability with a calendar overlay. Basic at $12/month covers unlimited calendars and links. Premium at $20/month adds custom domains and delegation (for VAs scheduling on behalf of their clients).
Integrated setup: Reclaim manages your calendar internally, SavvyCal is what clients see. A new SavvyCal booking automatically creates a ClickUp task for prep and a Fireflies.ai recording session for the call.
Meeting Notes and Action Item Automation
The objective: every client call produces a structured summary, action items in ClickUp, and a follow-up email, automatically.
Fireflies.ai: The free plan (unlimited transcription, 800 minutes storage/seat, 2-hour recording limit) covers testing and occasional calls. Pro at $10/month unlocks 8,000 minutes storage, action item extraction, and unlimited integrations, the plan that makes the automation below buildable.
TRIGGER: Fireflies.ai — Meeting transcription completed (via Zapier integration)

ACTION 1: ClickUp — Create task for each action item
Name: [action item from Fireflies summary]
Due date: [date mentioned OR today + 3 days]
List: [Client Name] — Active

ACTION 2: Make — HTTP Claude API
Prompt: "Write a professional post-meeting follow-up email based on this transcript summary. Include: 2-sentence meeting summary, numbered action items with owners and deadlines, next meeting confirmation if mentioned."

ACTION 3: Gmail — Send draft to VA for review (not sent automatically — reviewed and sent manually)
Why the final email step stays manual: post-meeting communication carries relationship weight. The AI draft eliminates the writing time; human review ensures the tone is right before sending.
10. How to Automate Your VA Business Without Rebuilding Everything at Once
The most common reason VAs delay building an automation system is not technical, it is architectural. Seen in full, the system in sections 3–9 looks like a large, complex project. Built in sequence, it is four weeks of incremental work where each week adds one layer and the previous layer continues running while the next is being built.
What you need before starting:
- Make account (free plan is sufficient for Week 1)
- ClickUp account (free plan is sufficient for Weeks 1–2)
- Gmail / Google Workspace
- Google Drive with a folder structure in place
- Jotform account (free Starter plan)
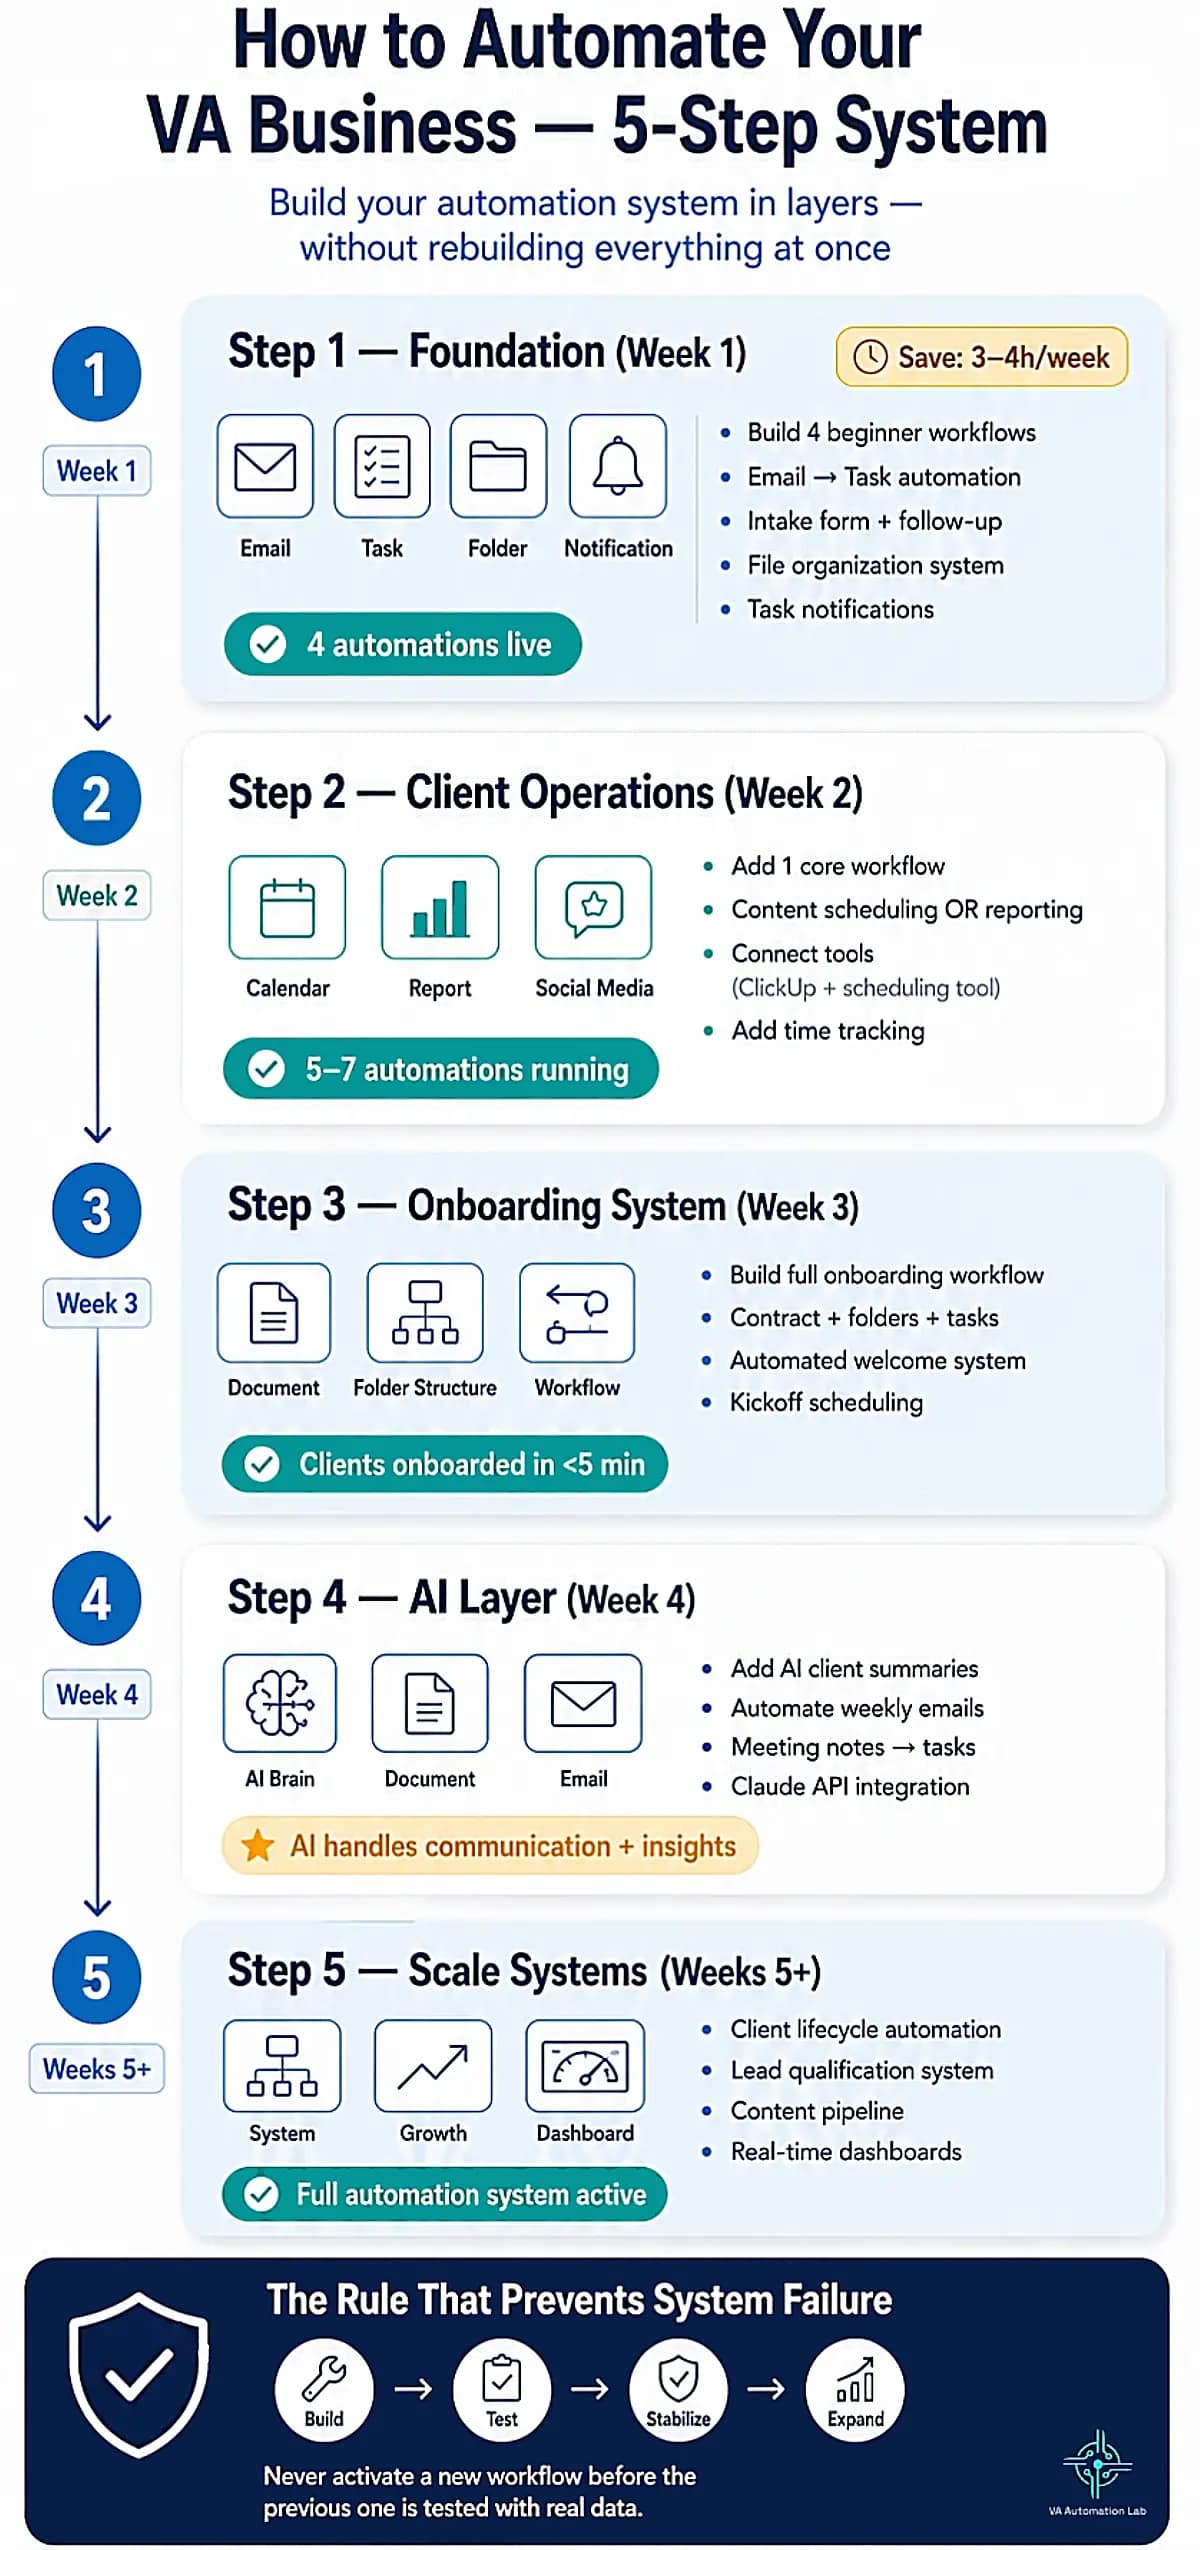
Step 1 — Build Your Foundation (Week 1)
Estimated time: 2–3 hours
Target cost: $0 (free tiers only)
Build all four beginner workflows in order. Test each with real data before building the next.
1. Create a Make account (free). Connect Gmail and ClickUp.
2. Build Workflow 1 (email-to-task): set the Gmail search filter, map the ClickUp fields, run a test email.
3. Set up a Jotform intake form (Starter, free). Build Workflow 2 (auto-send intake + follow-up task).
4. Build Workflow 3 (Google Drive file organization): create an /Inbox/ folder, configure the Make router with your client naming conventions, test with 3–4 files.
5. Build Workflow 4 (task notifications): connect ClickUp to Slack or Gmail, test with a manually created task.
End of Week 1: 4 automations running.
Estimated time saved: 3–4 hours per week.
Verification checklist before proceeding:
– Workflow 1 ran at least 5 times with real emails
– Workflow 2 sent the intake form to a test address correctly
– Workflow 3 sorted at least 10 files correctly with zero manual intervention
– Workflow 4 delivered notifications for every new task without duplicates
Step 2 — Add Client Operations (Week 2)
Estimated time: 2–3 hours
Target cost: Make Core $9/month
Choose the intermediate workflow with the highest time cost in your current operation. For most VAs, this is the reporting automation (Workflow 8) or the content scheduling automation (Workflow 6). Build one, test thoroughly, activate.
1. Upgrade Make to Core ($9/month) if not already done, you need unlimited active scenarios and minute-level scheduling.
2. Choose one: Workflow 6 (content scheduling) OR Workflow 8 (client reporting).
3. For Workflow 6: connect ClickUp to Buffer via Make. Create a test post, set it to “Approved” status, verify it schedules correctly.
4. For Workflow 8: build the Make scheduler with ClickUp task query, add the Claude API module, test the full sequence with a test client.
5. Connect Clockify or Toggl Track to ClickUp for automated time tracking.
End of Week 2: 5–7 automations running. New tools likely added: a scheduling tool + time tracker.
Step 3 — Build the Onboarding System (Week 3)
Estimated time: 3–4 hours
Target cost: PandaDoc Starter $19/month
This is the highest-impact single workflow in the system, it deserves its own dedicated week.
1. Create a PandaDoc account (Starter, $19/month). Build your service agreement template with variables for client name, service type, start date, and rate.
2. Create a Google Drive Master Client Folder Template (folders: 01 Onboarding / 02 Deliverables / 03 Reports / 04 Admin).
3. Create a ClickUp project template for your most common service type.
4. Build Workflow 5 (full client onboarding) in Make: Jotform → Drive → PandaDoc → ClickUp → Gmail → Access form.
5. Run a complete simulation: submit your own intake form, follow every step through to completion, verify every output.
6. Add SavvyCal Basic ($12/month) — include the booking link in the welcome email for kickoff call scheduling.
End of Week 3: Full onboarding system live. New clients onboard in under 5 minutes of VA time.
Step 4 — Activate the AI Layer (Week 4)
Estimated time: 2–3 hours
Target cost: Claude API usage (pay-per-use, typically $5–15/month for a full VA workflow stack)
1. Get a Claude API key (Anthropic console). Add it to Make as a stored credential.
2. Add Workflow 12 (AI client summary) to your onboarding scenario: after the intake form submission, add the HTTP module with the client summary prompt. Test with a real intake submission.
3. Add Workflow 13 (AI weekly email) to your reporting scenario: after the task list is compiled, add the Claude prompt and wire the output to a Gmail draft. Review the first 3 drafts manually before trusting the output.
4. Connect Fireflies.ai (free plan) and build the meeting notes → ClickUp task automation via Zapier.
End of Week 4: Full AI layer active. Client summaries, weekly updates, and post-meeting follow-ups are drafted automatically.
Step 5 — Scale with Advanced Systems (Weeks 5+)
Estimated time: 2–4 hours per advanced workflow
Add one at a time, 2–3 weeks apart
1. Build Workflow 9 (automated client management system), lifecycle automation covering onboarding, active delivery, renewal, and offboarding.
2. Add Databox free plan, build one live client dashboard and show it in the next review call.
3. Build Workflow 10 (lead qualification) if business development is active.
4. Build Workflow 11 (content production pipeline) for content-focused clients.
5. Add niche-specific tools from Section 8 based on your VA specialty.
The one rule that prevents system failure: build, test, stabilize, then expand. Every automation failure that damages a client experience traces back to the same root cause: a workflow was activated before the previous layer was tested with real data. The sequence above prevents this by design.
11. Common Mistakes That Break Automation Systems
Automating an Undefined Process
Automation executes a process exactly as configured, including every inconsistency, exception, and gap in the underlying process. A VA who automates an onboarding sequence that was previously executed differently for each client produces an automated system that is inconsistently configured and requires constant manual correction.
The consequence: the automation runs but produces unreliable outputs, the wrong folder structure for some clients, missing tasks for others, welcome emails that reference the wrong service type.
The fix: map every step of the process in writing before opening any automation tool. Define the trigger, the action for every step, the expected output, and the handling for exceptions (what happens if the form is incomplete, if the contract is not signed within 48 hours, if the payment fails). Automation is the execution layer, the process design must precede it.
Building Without Testing
An automation tested only in theory will fail at the worst possible moment, when a real client is waiting for a contract that did not generate or a welcome email that did not arrive.
The consequence: client experience damage that cannot be undone by explaining that “the automation failed.”
The fix: before any workflow goes live, run a complete end-to-end test with your own email address as the test client. Submit the form. Follow every action through to completion. Verify every output: the folder was created with the correct structure, the email arrived with the correct content, the ClickUp task was generated with the correct due date and custom fields. Fix every failure before the first real client uses the system.
Over-Automating Communication
The highest risk in client-facing automation is mechanizing touchpoints that carry relationship weight. An automated welcome email that arrives in 90 seconds, followed by an access form 30 minutes later, followed by a reminder 48 hours after that, creates a conveyor-belt experience that signals the absence of human attention, exactly the opposite of what premium VA services are supposed to deliver.
The fix: audit every automated communication for relationship weight. Automate transactional communications (confirmations, form links, reminders, status updates). Keep manual the touchpoints that carry personal significance: the post-kickoff check-in, the feedback request, the renewal conversation, the message when something goes wrong.
Ignoring Edge Cases
Most automation failures in production are not bugs, they are edge cases that were not considered during build. A field left blank on the intake form. A client who signs the contract but does not pay within the expected window. A file uploaded with a naming convention that does not match the router filter.
The fix: for every automation, ask “what happens if…” for each input the automation depends on. Missing field: does the automation fail silently, fail visibly, or route to a fallback? Unexpected value: does the router have a default branch? Delayed trigger: does the automation re-trigger correctly or create a duplicate? Map these scenarios before build and configure handling for each one.
Not Documenting the System
An automation system that lives only in the automation platform, with no written documentation of what triggers what, what each workflow does, and where the manual steps are, cannot be maintained, audited, or handed to anyone else. When something breaks (and it will), diagnosing the failure requires reconstructing the logic from the platform interface instead of consulting a document.
The fix: maintain a single ClickUp Doc or Notion page titled “Automation System Documentation” with: a plain-language description of every active automation, the trigger, the tools involved, the expected output, the manual steps, and the last test date. Update it every time the system changes. 30 minutes of documentation per workflow prevents hours of diagnosis when something breaks.
Failing to Maintain Workflows
Automation is not “set it and forget it”. Tools update APIs, apps change authentication requirements, field names shift between platform versions, and connected services deprecate integrations. A workflow that ran correctly in February may fail silently in June because a connected app updated its API without notice.
The fix: schedule a monthly 30-minute automation audit, open each active scenario in Make or Zap in Zapier, check the execution log for recent failures, verify every connected app is still authenticated, and test any workflow that has not run recently with a manual trigger. Quarterly: review whether the workflow still reflects the current version of your process or whether the underlying process has changed and the automation has not kept up.
12. Conclusion
The best automation workflows for virtual assistants are not individual time-saving tricks, they are layers of a connected system that, built in the right sequence, transforms the economics of a VA business.
The measurable outcome of a complete stack (beginner layer, client operations, advanced systems, AI intelligence layer) is 8–15 hours per month of recovered time for a VA managing three to five active clients. That time is the return on 20–30 hours of setup investment. The payback period is one to two months. The compounding returns, more capacity, more consistency, more scalable service delivery, continue for as long as the system runs.
The implementation sequence in Section 10 is the starting point. One layer at a time. Tested before the next is added. Stabilized before complexity increases.
Start with Workflow 1 this week. Connect Gmail to ClickUp. Test it with a real email. Then build the next one.
Build Your Complete Automation System with Make
If you’ve followed the workflows in this guide, you’ve already seen what’s possible when your tools are connected into one system. Make is the engine that powers it all, from simple automations to fully scalable, multi-step workflows.
Build advanced workflows with branching logic and full control. Connect your entire stack: ClickUp, CRM, email, AI, and more. Automate onboarding, reporting, content, and client management. Scale from your first automation to a complete VA system.
Start simple, then expand into a fully automated business, one workflow at a time.
Frequently Asked Questions About Automation Workflows for Virtual Assistants
Where should I start if I have never built an automation workflow before?
Start with Workflow 1, the email-to-task automation in Make or Zapier. It takes 10–15 minutes to build, requires only a Gmail account and a ClickUp free account, and produces an immediately visible result: emails with specific keywords generate ClickUp tasks automatically. Building and seeing the first automation work with real data is the fastest way to develop the mental model for all subsequent workflows. After that, build Workflow 2 (intake form automation), the two together cover the highest-frequency manual steps in most VA operations.
Do I need both Zapier and Make, or is one sufficient?
One platform is sufficient to start. Make handles both simple and complex workflows, it does everything Zapier does and scales further without the per-task cost escalation. Zapier makes sense if you are already using it and your workflows are linear (under 5 steps, no branching). The practical approach: start with Make. Add Zapier only for specific integrations that Make does not yet support natively, which is rare given Make’s 3,000+ app library.
What is the total cost to build a complete VA automation system?
A functional beginner stack costs $0, Make free plan, ClickUp free, Jotform Starter free, Gmail, Google Drive. An intermediate stack with Make Core, ClickUp Unlimited, and PandaDoc Starter runs approximately $35/month ($9 + $7 + $19). Adding time tracking (Clockify free), scheduling (SavvyCal Basic $12), and meeting notes (Fireflies.ai Pro $10) brings the full intermediate stack to approximately $57/month. The advanced stack with a scheduling tool, CRM, and social scheduling tool typically runs $100–150/month total, equivalent to approximately 2–3 billable hours at a $50/hour rate.
How long does it take to build all 14 workflows?
The four-week implementation sequence requires approximately 8–12 hours of total active build time: 2–3 hours in Week 1 (four beginner workflows), 2–3 hours in Week 2 (one intermediate workflow), 3–4 hours in Week 3 (the onboarding system), 2–3 hours in Week 4 (AI layer). The advanced workflows in Section 5 add 6–12 additional hours if implemented, with proportionally higher time savings. This investment is recovered within 6–8 weeks of operation, after which the system runs indefinitely with approximately 30–45 minutes per month of maintenance.
How do I know when an automation breaks?
Configure failure notifications before going live. In Make: add an error handling route to every scenario that sends a Slack message or Gmail notification when any module fails. Make also sends email alerts for repeated scenario failures by default, verify this is enabled in your account settings. Run a monthly 30-minute execution log review: open Make, check all scenarios for the last 30 days, verify all show “Success” status. Silent failures, automations that stop running without notification, are the most dangerous because they may go undetected until a client asks why something did not happen.
Can I build these workflows without technical skills?
Yes. All 14 workflows in this guide are no-code automation for virtual assistants, no programming required. Make’s interface requires understanding the visual module canvas, which has a steeper initial learning curve than Zapier but still no code. The most technically demanding step in this guide is the Claude API call (Workflows 12–14), which requires copying an API URL and a JSON body from documentation — not writing code. A VA with no prior automation experience who reads the Zapier vs Make guide can build all four beginner workflows in a single afternoon.
How many automations should I build before considering my system complete?
There is no target count, the correct metric is coverage, not quantity. A complete VA automation system covers four functional areas: lead capture and intake (beginner workflows), client onboarding and operations (intermediate workflows), recurring delivery and reporting (advanced workflows), and AI-assisted communication (AI layer). A system with 8–10 well-configured automations covering all four areas is more complete than one with 25 automations covering only task creation and notifications.
Glossary: Essential Automation Terms for Virtual Assistants
Automation Workflow: A sequence of automated actions triggered by a specific event, the core unit of any virtual assistant automation system. Example: form submitted → folder created → email sent.
Trigger: The event that starts an automation sequence, a form submission, status change, scheduled time, payment received, or API webhook.
Action: The automated step that executes after a trigger, creating a task, sending an email, updating a CRM record, or calling an AI API.
Multi-Step Workflow: A workflow with three or more sequential actions after the trigger, the standard for intermediate and advanced VA automation.
Scenario (Make): The name for a workflow built in Make, a visual canvas of connected modules supporting branching logic, data transformation, and parallel paths.
Zap (Zapier): The name for a workflow built in Zapier, one trigger followed by one or more actions in linear sequence.
Router (Make): A Make module that splits a scenario into multiple conditional branches, used when different inputs require different automation sequences.
No-Code Automation: Automation built through visual interfaces with dropdown menus and field mapping, no programming required. All workflows in this guide are no-code.
Webhook: A real-time data push from one app to another triggered by a specific event, used as triggers in Make for events like contract signatures or payment confirmations.
Native Automation: Automation built inside a tool’s own automation engine rather than through an external platform — ClickUp automations are native; they do not require Zapier or Make to function.
Iterator (Make): A Make module that processes an array of items one at a time, used for bulk operations like looping through all completed tasks in a week to compile a report.
Error Handling: Configuration within an automation that defines what happens when a step fails, a well-configured workflow routes failures to a notification or fallback action rather than stopping silently.
AI API Call: A request made from an automation platform (Make, n8n) to an AI model’s API, allowing Claude or ChatGPT to generate content, summaries, or analysis as a step inside an automation scenario.
Execution (Make / n8n): One run of a scenario or workflow, the unit Make and n8n use to meter usage and calculate plan limits.
About the Author
Alex Stratton has spent the better part of a decade working at the intersection of virtual assistance and operational systems, first as a VA supporting founders and small business owners, then as a workflow consultant helping remote teams reduce the manual overhead that accumulates when businesses grow faster than their processes. The tools and workflows here reflect decisions made repeatedly in real client contexts, where the wrong choice costs hours, not minutes. Learn more about VA Automation Lab → About.