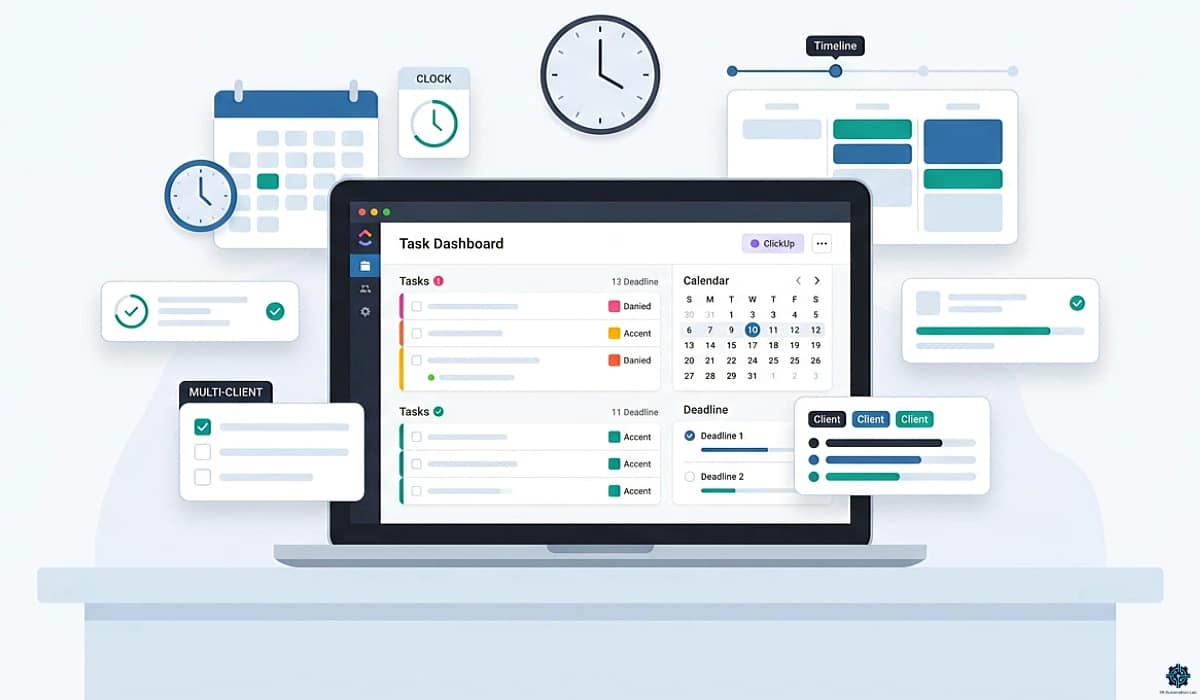
ClickUp for Virtual Assistants: Setup Guide, Templates & Workflows (2026)
Disclosure: This article contains affiliate links. If you purchase through them, VA Automation Lab earns a commission at no additional cost to you. All tools are evaluated independently.
The complete guide to ClickUp for virtual assistants: workspace setup step-by-step, ClickUp client management for multiple clients, the automations that eliminate manual admin, four ready-to-use templates, a 7-day onboarding plan, common mistakes to avoid, the recommended tool stack, and daily, weekly, and monthly workflows for a multi-client VA operation that runs without friction.
The most common operational failure in a growing VA business is not a lack of skill, it is a lack of system. Tasks live in email threads, client deliverables are tracked in spreadsheets, recurring work is managed from memory, and the cognitive overhead of coordinating everything increases with every new client. At two clients, this is manageable. At four or five, it becomes the primary constraint on growth.
ClickUp for virtual assistants solves this at the structural level. Configured correctly, it becomes the single operational hub where client work, internal operations, recurring tasks, documentation, and automations live in one place, with enough flexibility to adapt to any service type and enough automation capability to eliminate the mechanical repetition that consumes hours every week.
This guide covers:
- Why ClickUp is the strongest platform for VA task management
- ClickUp pricing: which plan is right for your VA business
- Step-by-step workspace setup
- The best ClickUp features by VA use case (including ClickUp Brain AI)
- How to organize multiple clients without overlap
- The best way to use ClickUp as a virtual assistant
- ClickUp automations, basic to advanced
- Your first 7 days onboarding plan
- Common mistakes VAs make and how to avoid them
- The recommended tool stack: ClickUp + the tools that connect to it
- Daily, weekly, and monthly workflow routines
👉 Productivity Systems for Virtual Assistants: The Complete Guide — for a complete framework on building a scalable VA operating system, including the 7 core components, tool stack architecture, and a step-by-step 4-week implementation plan.
👉 AI Tools for Virtual Assistants: The Complete Practical Guide — the full reference for every AI tool category in VA work.
Want to Start Using ClickUp the Right Way?
If you’re setting up ClickUp, this free toolkit gives you the full AI and automation tool map for VA operations, so you know exactly which tools to connect and in what order.
It includes templates, tool recommendations, and workflow starters curated for virtual assistants.
Table of Contents
1. Why ClickUp Is the Strongest Platform for VA Task Management
Task management for virtual assistants has a specific set of requirements that most project management tools are not designed to meet simultaneously: the ability to manage multiple separate client contexts in a single workspace, native automation that does not require a third-party connector, documentation storage alongside task management, and view flexibility to support the different operational modes a VA operates in across a single day.
ClickUp covers all four without requiring multiple subscriptions or complex integrations. That is the core reason it has become the dominant platform for VA operations in 2026, not because it has the most features, but because the specific combination of features it offers maps more directly to VA workflow requirements than any alternative.
Multi-client management in one workspace. ClickUp’s folder and list hierarchy lets a VA maintain completely separate environments for each client (separate task lists, separate custom fields, separate automations, separate views) all within a single workspace accessed through one login. No context switching between accounts, no risk of one client’s data appearing in another’s view.
Native automation without Zapier dependency. Most project management tools require Zapier or Make to automate even basic actions. ClickUp automations are built into the platform: status changes trigger task moves, due dates update automatically, recurring tasks generate on schedule, and notifications fire without an external connector. For the highest-frequency automations in VA operations, this eliminates both the connector cost and the failure points that come with multi-tool automation chains.
Documentation alongside operations. ClickUp Docs stores SOPs, client briefs, onboarding materials, and reference documents in the same workspace as the tasks they support. A VA building an SOP for a client process can link it directly to the recurring task that follows that process, one click from the task to the procedure.
Scalability without restructuring. Adding a new client to a well-configured ClickUp setup takes 15–20 minutes: duplicate the client folder template, update the client name, activate the relevant automations, adjust recurring task dates. The existing structure does not need to change, it absorbs the new client into the established pattern.
For VAs who have outgrown spreadsheets and are managing two or more clients with ongoing deliverables, the structured setup below is the starting point.
2. ClickUp Pricing for Virtual Assistants
ClickUp’s pricing is structured by user, billed annually. For a solo VA or a small VA team, the decision typically comes down to three tiers.
Plan | Price (billed annually) | Best For |
Free | $0 | 1–2 clients, testing the setup |
Unlimited | $7/user/month | 3–5+ active clients, core operations |
Business | $12/user/month | Full automation suite, advanced reporting |
Brain AI Add-On | +$9/user/month | AI-assisted task management |
Everything AI Add-On | +$28/user/month | Full AI suite (notetaker, image gen, AI fields) |
Free plan includes unlimited tasks, unlimited members, 60MB storage, basic views, and one Form. Automation is limited to 5 Active Rules and 100 executions per month, enough to test the Layer 1 automations described in this guide with one client list, but not sufficient for a multi-client VA operation running recurring automations across three or more lists.
Unlimited plan at $7/user/month is the recommended starting point for a VA managing 3+ active clients. It removes storage limits, unlocks unlimited Gantt charts, integrations, custom fields, and expands automation to 500 Active Rules and 1,000 executions per month, enough headroom for a solo VA running Layer 1 and Layer 2 automations across four to six client lists.
Business plan at $12/user/month removes the automation ceiling entirely: Unlimited Active Rules and 5,000 executions per month, plus unlimited dashboards with advanced widgets, workload management, and advanced reporting. This is the tier that makes sense once your Layer 3 automations are live and running across multiple clients simultaneously.
ClickUp Brain AI Add-On at $9/user/month includes unlimited AI writing, the ClickUp AI Assistant, and 1,500 AI Super Credits monthly for Agents and Automations. For VAs who want AI-assisted task drafting, meeting summaries, or workflow suggestions directly inside ClickUp, this is the cleanest addition.
The honest recommendation: start with Unlimited at $7/month and evaluate Brain AI after 60 days. The Everything AI Add-On at $28/month is extensive, most VAs will get more practical value from dedicated AI writing tools used outside ClickUp than from the full add-on.
Start Your ClickUp Setup — Free Plan Available
ClickUp‘s free plan covers unlimited tasks, basic views, and enough workspace structure to test the setup described in this guide.
The Unlimited plan at $7/month unlocks the full feature set recommended for VAs managing 3+ active clients, unlimited custom fields, integrations, and storage.
3. How to Set Up ClickUp for Virtual Assistants — Step-by-Step
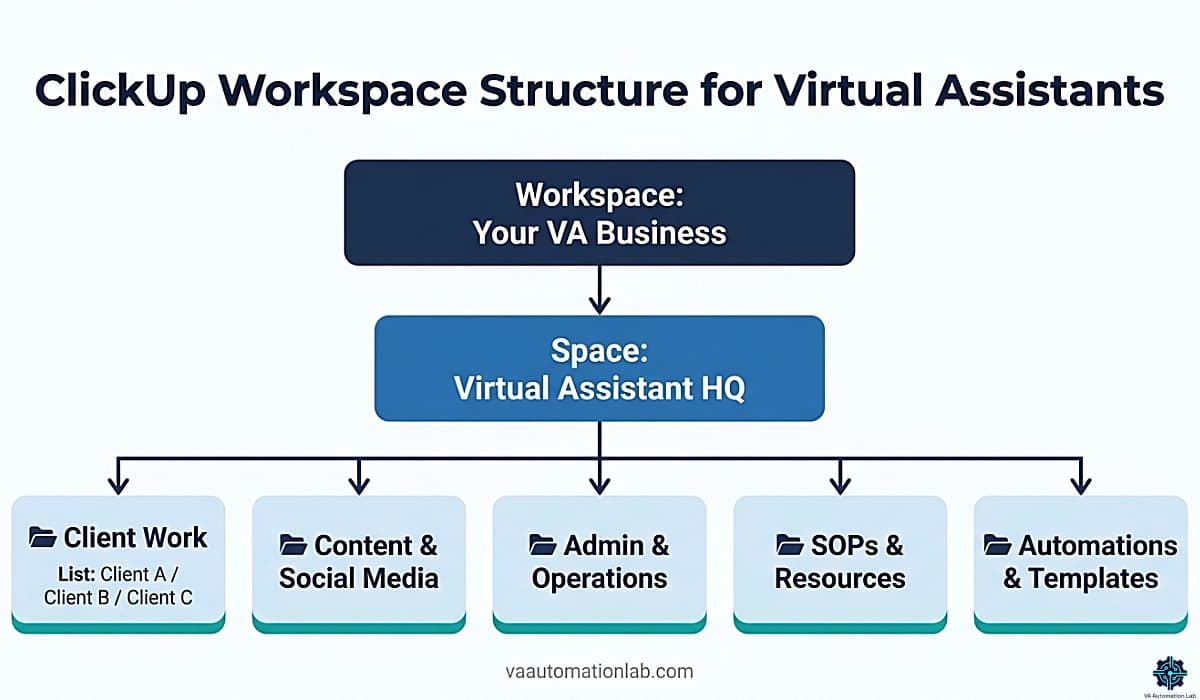
The ClickUp setup for virtual assistants that produces the most durable results follows a consistent hierarchy: one Workspace, one Space, five core Folders, and Lists that map to individual clients or workflow categories. This structure scales from a solo VA with two clients to a VA agency with ten, without requiring a rebuild at any growth stage.
Recommended Workspace Hierarchy:
Workspace: [Your VA Business Name]
└── Space: Virtual Assistant HQ
    ├── Folder: Client Work
    │   ├── List: Client A
    │   ├── List: Client B
    │   └── List: Client C
    ├── Folder: Content & Social Media
    ├── Folder: Admin & Operations
    ├── Folder: SOPs & Resources
    └── Folder: Automations & Templates
Step 1 — Create Your Workspace and Space
Time required: 5 minutes.
Sign up or log into ClickUp. Name your Workspace with your VA business name. Inside it, create one Space named “Virtual Assistant HQ.” This Space is the container for everything, all folders, lists, and tasks will live inside it.
Step 2 — Create the Five Core Folders
Time required: 10 minutes.
Inside the VA HQ Space, create five folders with these exact names and purposes:
– Client Work — the primary operational folder; each client gets their own List here
– Content & Social Media — content workflows that cross client boundaries
– Admin & Operations — invoicing, subscriptions, business planning, onboarding
– SOPs & Resources — ClickUp Docs library for all process documentation
– Automations & Templates — documentation and template lists for the system itself
Step 3 — Configure Custom Fields at Space Level
Time required: 15 minutes.
Add these fields to the Client Work Space before creating any client lists:
– Client Name -> type: Dropdown -> Filter workspace by client instantly
– Service Category -> type: Dropdown (Admin / Content / Social / Operations / Executive) -> Group tasks by service type
– Estimated Time -> type: Number (minutes) -> Time blocking and capacity planning
– Billable -> type: Checkbox -> One-click billable hour tracking
– Deliverable Type -> type: Dropdown (Recurring / One-off / Project) -> Separate task types for reporting
Step 4 — Set Up the Status Flow
Time required: 5 minutes.
Configure a single status flow at the Space level so all client lists share the same stages:
To Do → In Progress → Waiting for Client → In Review → Done → Archived
Consistent statuses across all client lists mean your automations and filters work uniformly, and you can read task stage at a glance without learning a different flow per client.
Step 5 — Configure Notification Settings
Time required: 5 minutes.
In Workspace Settings → Notifications: enable only “Assigned to Me” and “Due Date Reminders.” Disable everything else.
This single configuration decision determines whether ClickUp feels like a useful system or an incessant interruption. Notification overload is the most common reason VAs abandon the platform within the first month, not the learning curve.
Step 6 — Add Your First Client List
Time required: 20–30 minutes per client.
Inside the Client Work folder, create a List named for your first client. Inside it, create these sections:
– Active Tasks — current deliverables and in-progress work
– Recurring Tasks — weekly/monthly deliverables that repeat
– Waiting for Client — tasks paused pending client input
– In Review — submitted deliverables awaiting approval
– Reference — non-task items: links, assets, access credentials
Set the Client Name dropdown default to this client’s name. Add recurring tasks for every contracted deliverable, weekly reports, monthly invoices, regular deliverables.
Step 7 — Enable Time Tracking and Set Default View
Time required: 5 minutes.
Enable ClickUp’s native time tracking on all client lists if you bill hourly or report hours to clients. Set List View as the default for every client list, this saves the step of switching views every time you open a client’s workspace.
Total setup time for a first-time ClickUp setup for virtual assistants: approximately 2–3 hours for the workspace structure and first client, 15–20 minutes per additional client using a duplicated template.
4. Best ClickUp Features for Virtual Assistants
ClickUp has over 100 features. For VA task management, seven produce 90% of the operational value. The others are worth exploring once the core system is stable.
Task Management
The foundation of the entire system. ClickUp’s task structure (task, subtask, checklist item) maps directly to the three levels of VA work: projects (tasks), deliverables within projects (subtasks), and execution steps (checklists).
High-value configuration: subtask view set to “expanded” by default; checklist templates saved for recurring task types (weekly client update, content publishing, onboarding call preparation); dependencies enabled for multi-step deliverables.
Custom Fields
The feature that transforms a generic project management tool into a VA-specific operational system. Custom fields make every task filterable, groupable, and automation-ready. The five fields from Step 3 above cover the majority of VA reporting and filtering needs.
Views
The feature that determines whether ClickUp feels like a useful system or an overwhelming list. Full view configuration is in section 7.
Automations
The feature with the highest time-saving impact per hour of setup investment. Full automation configuration is in section 8.
Docs
ClickUp Docs stores SOPs and reference materials in the same workspace as the tasks that use them, linkable at the task level. A recurring task “Publish weekly newsletter” can link directly to the SOP doc “Newsletter Publishing Checklist.” One click from task to procedure, no platform switching.
Most valuable Docs use cases for VAs: client onboarding SOP linked to the onboarding task; service delivery checklists linked to recurring delivery tasks; email templates linked to communication tasks; tool access and credential reference linked to the relevant client list.
ClickUp Brain AI (Add-On)
For VAs who add the Brain AI Add-On ($9/user/month), several functions become genuinely useful in day-to-day operations:
- AI task summaries — generate a status summary of any task or list without reviewing every subtask
- AI writing — draft task descriptions, client update emails, and meeting agendas directly inside ClickUp
- @Brain — ask natural language questions about your workspace: “What tasks are overdue for Client A?” or “Which recurring tasks are due this week?”
- AI Agents — automate multi-step actions triggered by workspace events (included in Brain Add-On)
- Super Agents (Everything AI Add-On, $28/user/month) — fully autonomous agents that monitor tasks, generate updates, and execute actions across multiple client lists without manual triggers; the practical VA use case is automated cross-client status reporting triggered by task completions, without building an external Make scenario to handle it
The Brain add-on makes the most sense for VAs who spend significant time inside ClickUp drafting content or synthesizing task data for client reports. For VAs who use a dedicated AI tool (Claude, ChatGPT) outside ClickUp for those same functions, the $9 add-on is optional. The Everything AI Add-On ($28/user/month) is worth evaluating only if Super Agents — autonomous agents that execute complex cross-list workflows without manual triggers — would replace automation logic you are currently building and maintaining in Make or n8n.
Dashboards
Dashboards solve the most common visibility problem in multi-client operations: knowing at a glance, without navigating multiple lists, what is due today, what is overdue, and where capacity is concentrated.
Minimum viable Dashboard for a VA managing 3+ clients:
- Tasks Due Today (filtered: assigned to me)
- Overdue Tasks (all lists)
- Tasks by List (count per client list)
- Time Tracked This Week (if billing hourly)
Feature | What It Does | Primary VA Use Case |
Task Management | Tasks, subtasks, checklists, dependencies | Daily operations across all clients |
Custom Fields | Client, service type, time, billable flag | Multi-client filtering and reporting |
Views | List, Board, Calendar, Timeline, Table, Dashboard | Context-specific work management |
Automations | Status triggers, recurring tasks, notifications | Eliminating manual admin steps |
Docs | SOPs, templates, reference materials | Process documentation linked to tasks |
Brain AI Add-On | Summarizes tasks, drafts updates, answers workspace questions | AI writing, task Q&A, workflow agents |
Dashboards | Workload, deadlines, time tracking overview | Multi-client visibility and reporting |
5. How to Organize Multiple Clients in ClickUp
ClickUp client management for virtual assistants requires choosing between two structural approaches early in the setup process, the choice determines how automations work, how views filter, and how the workspace scales as new clients are added. The wrong choice for your service model is recoverable but time-consuming to fix after clients have been added and tasks have been created.
Option A — One List Per Client (Recommended for Most VAs)
Best for: retainer clients, ongoing relationships, multi-step deliverables, clients with high task volume.
Structure:
Folder: Client Work
├── List: Client A (with their own statuses, fields, automations)
├── List: Client B
└── List: Client C
Inside each client list, the recommended sections:
- Active Tasks (current deliverables and in-progress work)
- Recurring Tasks (weekly/monthly deliverables that repeat)
- Waiting (tasks paused pending client input or approval)
- Meeting Notes (linked to Docs or as task descriptions)
- Reference (non-task items: links, assets, credentials)
Configuration for each new client list:
- Duplicate the client list template (see section 7)
- Rename to the client’s name
- Update the Client Name custom field default value
- Activate the client-specific automations
- Add recurring tasks for the contracted deliverables
- Link the client’s onboarding SOP from the Docs library
Client-facing access (optional — free on all ClickUp plans)
Once a client list is configured, you can give the client direct visibility into their work without exposing your internal operations or other clients’ lists. Setup takes under 5 minutes per client:
- Open the client’s list → click the Members icon → Invite Guest → enter the client’s email address.
- Set the shared view to Board View — clients understand stage-based task visibility (To Do / In Progress / In Review / Done) more intuitively than a status-filtered List View.
- Set permission to Comment only — the client can ask questions on specific tasks without moving, editing, or deleting them.
- Save the Board View link and include it in the client’s onboarding SOP under “How to check your project status” so both parties have a single reference point from day one.
Clients with Board View access generate significantly fewer “can you send me an update?” requests, because the answer is visible without waiting for a reply. The time saved in email coordination typically recovers the 5-minute setup cost within the first week of a new client relationship.
Why this structure scales: adding client 5 is identical to adding client 2, same process, same template, same automation configuration. The workspace structure does not change.
Option B — One Master List with Client Field
Best for: many small clients with low task volume, ad-hoc or hourly support, one-off projects.
Structure:
Folder: Client Work
└── List: All Clients
    Custom Field: Client Name (dropdown, one value per client)
How to use it effectively:
- Group tasks by Client Name in List View
- Save a filtered view per client (filter: Client Name = X) so each client view is accessible in one click
- Use automations based on the Client Name field value to route tasks correctly
When Option B becomes problematic: When any individual client reaches 20+ active tasks or needs client-specific automations, the master list approach becomes difficult to maintain. Migrate that client to their own list at that point.
Which Option for Your VA Business
If you… | Use… |
Manage 2-5 retainer clients with ongoing work | Option A |
Handle 10+ small clients with few tasks each | Option B |
Offer both retainer and ad-hoc services | Option A for retainers, Option B for ad-hoc |
Expect to add clients frequently | Option A — templates make it fast |
Bill hourly and need clean time tracking | Option A — time tracking per list |
6. What Is the Best Way to Use ClickUp as a Virtual Assistant?
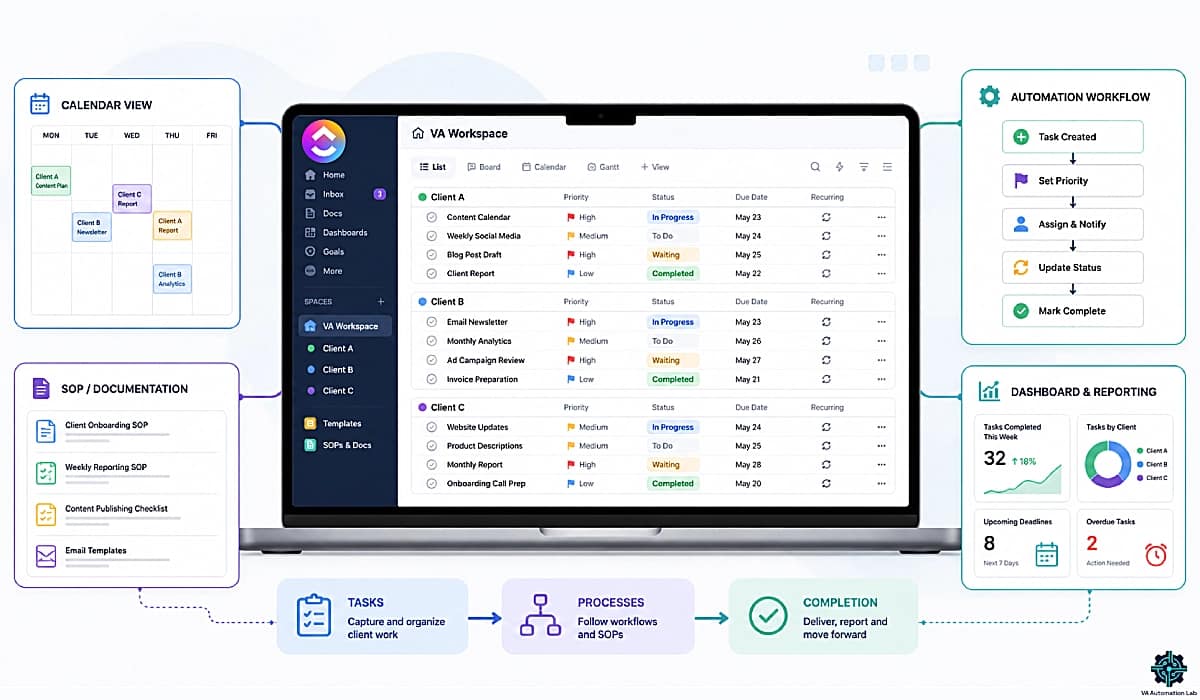
The best way to use ClickUp as a virtual assistant is to configure it as a single operational hub: separate client lists, native automations for recurring deliverables, a dedicated internal operations folder, and a Dashboard that surfaces every due task across all clients at a glance — so you spend time on delivery, not on managing the system.
Use ClickUp as a Task Engine, Not a To-Do List
The most common misuse of ClickUp for VAs is treating it as a digital sticky note, tasks added, no due dates, no statuses, no automation. This creates more cognitive load than it removes.
The setup that produces real time savings treats every deliverable as a structured task: it has a status, a due date, an estimated time, a client name field, and a recurring schedule if it repeats. Every task can be filtered, reported on, and automated. Tasks without structure are noise.
Use Automations to Remove Decision Points
The best ClickUp automations for VAs do not just save clicks, they remove the need to remember. A task changes status to “In Progress” and the due date sets automatically. A task stays untouched for five days and a notification fires. A recurring monthly deliverable generates on the first of the month without any input.
Every automation you build is a decision you no longer need to make manually. The goal is a workspace that surfaces what needs attention rather than one you need to interrogate.
Use Views as Context Switchers
Most VAs who feel overwhelmed by ClickUp are using one view for all contexts. The correct pattern is role-based:
- Dashboard View at the start of each day — operational overview, all clients at once
- List View during client work — single client context, status-grouped
- Calendar View for weekly planning — deadline distribution across all clients
- Board View for pipeline management — stage-based visibility for content or onboarding workflows
Switching views as the work context changes is not extra overhead, it is the behavior that makes ClickUp feel like it was built for your workflow.
Use Templates to Make Onboarding Repeatable
A VA who adds a new client without templates is rebuilding the same structure from scratch every time, list sections, custom field values, recurring tasks, automation configuration. A VA with templates is running a 15-minute duplication process. At scale, the difference is hours per month.
Build your client list template before your third client, not after your fifth.
Use ClickUp for Operations, Not for Documentation
ClickUp Docs is useful for process documentation linked to tasks. It is not a replacement for a dedicated documentation system. For knowledge-heavy VA work (SOPs that require rich formatting, client wikis, reference databases) a tool like Notion is more capable. The combination that works: ClickUp for what needs to happen and when, Notion for how it happens and why.
7. Essential ClickUp Views for Daily Operations
Views determine how your ClickUp setup for virtual assistants feels in daily use. The same task data displayed in the wrong view creates friction; displayed in the right view, it provides instant operational clarity. The five views below cover every mode of VA work across a standard day or week.
List View — Primary Daily Operations
The default view for most client lists, shows all tasks with full field visibility, subtask structure, and filter controls.
Configure your List View:
- Group by: Status
- Sort by: Due Date (ascending)
- Show: Priority, Estimated Time, Client Name
- Filter: Assigned to Me (when working across multiple lists in the space view)
- Enable: Subtasks visible without expanding
When to use: every day, for every client. Open each client list in List View during the morning triage session.
Board View — Kanban Workflow Management
Visualizes tasks as cards in columns corresponding to workflow stages. Most useful for processes with clear stage progression.
Best configurations for VAs:
- Content pipeline: Idea → Brief → Draft → Review → Approved → Scheduled → Published
- Client onboarding: Intake → Contract → Kickoff → Active → Offboarding → Archived
- Deliverable pipeline: To Do → In Progress → Waiting → In Review → Done
When to use: when managing a multi-stage process where knowing which stage each task is at matters more than knowing which task is due soonest.
Calendar View — Scheduling and Deadlines
Displays tasks on a calendar based on due date. Essential for content scheduling, deadline management, and visual workload distribution across the month.
Configuration:
- Display by: Due Date
- Show: all client lists in one calendar (use the Space-level Calendar View to see all clients simultaneously)
- Color by: List (each client gets a distinct color)
When to use: Sunday planning session to review the week ahead; monthly review to verify no deadline clusters or gap weeks exist.
Table View — Data and Reporting
Spreadsheet-style view that shows all custom fields as columns. Most useful for reporting, auditing task data quality, and bulk editing.
When to use:
- Monthly review — filter by Done tasks, export time tracked per client for invoicing
- Quarterly audit — verify all recurring tasks have correct due dates and estimated times
- Onboarding a new client — bulk-create tasks from a list with all fields populated
Dashboard View — Multi-Client Command Center
The view that provides operational visibility across all clients simultaneously — the closest equivalent to an executive dashboard for a VA business.
Recommended widget configuration:
Widget | Configuration | Why |
Tasks Due Today | Assigned to Me, all lists | Immediate daily priority |
Overdue Tasks | All lists, sorted by days overdue | Catch anything slipping |
Tasks by List | Count per client list | Workload distribution at a glance |
Time Tracked | This week, by list | Billable hour visibility |
Upcoming Deadlines | Next 7 days | Forward planning |
When to use: start of each day as the first screen before opening any client list. Provides the full operational picture in under 60 seconds.
8. ClickUp Automations for Virtual Assistants
ClickUp automations eliminate the manual steps between task stages that collectively consume 30-60 minutes per day in a typical multi-client VA operation. Every automation below is configured inside ClickUp natively, no Zapier required for the core workflow layer.
The automations are organized by implementation priority: Layer 1 covers the automations every VA should implement in the first session; Layers 2 and 3 add progressively more sophisticated logic as the baseline system becomes stable.
Layer 1 — Foundation Automations
(Implement First — All VA Types)
These automations address the highest-frequency manual actions in any VA workflow. Build these before anything else.
Auto-assign on task creation:
WHEN task is created
IN List: [Any Client List]
THEN assign to: Me
AND set Priority: Medium
Eliminates the step of manually assigning every task that enters the workspace from external sources (forms, integrations, quick captures).
Due date enforcement:
WHEN status changes to "In Progress"
THEN set due date: Today + 3 days
WHEN due date is within 48 hours
AND status is NOT "Done"
THEN set Priority: HighKeeps urgency levels accurate without manual priority updates across dozens of tasks.
Status-based task routing:
WHEN status changes to "Waiting for Client"
THEN move task to Section: Waiting
AND notify: Me via ClickUp notification
Maintains a clean Waiting section without manually dragging tasks between sections.
Recurring task generation:
WHEN task marked as Done
AND task has recurrence setting
THEN create new task with same name and fields
DUE: [recurrence interval from today]
All weekly and monthly deliverables generate automatically. Configure this on every recurring task during client setup.
Layer 2 — Client Management Automations
These automations support ClickUp client management specifically: routing, tagging, and tracking by client.
Client-specific task routing:
WHEN task is created
IF Custom Field "Client Name" = Client A
THEN move to List: Client A
AND apply Tag: Client-A
Useful when tasks arrive in a central inbox list before being routed to client lists.
Auto-tagging by content type:
WHEN task name contains "invoice" OR "payment"
THEN apply Tag: Finance
WHEN task name contains "meeting" OR "call" OR "agenda"
THEN apply Tag: Meeting
WHEN task name contains "SOP" OR "process" OR "documentation"
THEN apply Tag: Documentation
Makes filtering by task type across all client lists accurate without manual tagging.
Inactivity follow-up:
WHEN task has NOT been updated in 5 days
AND status is NOT "Done" OR "Archived"
THEN notify: Me
WITH message: "Task stalled, review required"
Surfaces tasks that have fallen off the radar before they become overdue client deliverables.
New client onboarding trigger:
WHEN new List is created
IN Folder: Client Work
THEN create task: "Complete client setup checklist"
ASSIGNED TO: Me
DUE: Today + 1 day
Ensures every new client list gets the setup checklist task automatically.
Layer 3 — Advanced Workflow Automations
These automations handle multi-step workflows and are specific to VA service types. Implement only after Layer 1 and 2 are stable.
Content pipeline — for Social Media and Content VAs:
WHEN status changes to "Draft Complete"
THEN assign to: Client (add client as guest)
AND set status: "Waiting for Client Review"
AND send email notification to client
WHEN status changes to "Approved"
THEN move to Section: Scheduled
AND set status: "Scheduled"
AND apply Tag: Ready to PublishExecutive support — meeting workflow:
WHEN task name contains "meeting" OR "call"
AND task is created
THEN create subtask: "Prepare agenda"
    DUE: 24h before parent task due date
AND create subtask: "Send follow-up email"
    DUE: 2h after parent task due date
Project management — dependency-based timing:
WHEN dependency task status = "Done"
THEN set dependent task status: "Ready to Start"
AND notify assigned member
Finance — invoice and payment cycle:
WHEN task tagged "Invoice Sent"
THEN create task: "Payment follow-up — [client name]"
    DUE: Today + 7 days
    Priority: High
Deadline risk flagging:
WHEN due date is within 24 hours
AND status is NOT "Done"
AND status is NOT "In Review"
THEN apply Tag: At Risk
AND notify: Me
Automation Implementation Order
Build automations in this sequence to avoid configuration conflicts and ensure each layer is tested before adding complexity:
Week 1: Layer 1 — all four foundation automations. Run for one full week across all client lists. Verify each triggers correctly.
Week 2: Layer 2 — client routing and tagging. Test with one client list first, then replicate.
Week 3+: Layer 3 — service-specific advanced automations relevant to your VA service type. Build one at a time, test for 3-5 trigger events before treating as stable.
Extending ClickUp Automations with Make or n8n
For automations that cross platforms (when a ClickUp task is completed, automatically update a Google Sheet, send a Slack message, or trigger an email sequence) ClickUp’s native automation layer connects to an external workflow tool for the inter-platform layer.
The workflow: ClickUp native automations handle intra-workspace logic (status changes, task routing, field updates); Make or n8n handle the cross-platform connections (ClickUp → Gmail, ClickUp → Google Drive, ClickUp → Notion). The two layers complement without overlap. Make’s Core plan starts at $9/month; n8n’s Starter plan at $23/month suits VAs who need more technical control or custom API logic.
👉 Automate Repetitive Tasks as a Virtual Assistant — how to build the full automation stack beyond ClickUp.
Take Your ClickUp Automations Beyond the Workspace
ClickUp handles the automation logic inside your workspace.
Make connects it to everything outside, Google Sheets, Gmail, Notion, Slack, and 3,000+ other apps.
One scenario can turn a completed ClickUp task into a client email, a logged row, and a Notion update simultaneously.
The Core plan starts at $9/month.
9. Your First 7 Days Using ClickUp as a Virtual Assistant
The most common ClickUp failure mode is adding too much, too fast. This 7-day plan builds the system one validated layer at a time, so you have a working operational hub by the end of the week, not a half-built tool with 40 unused features.
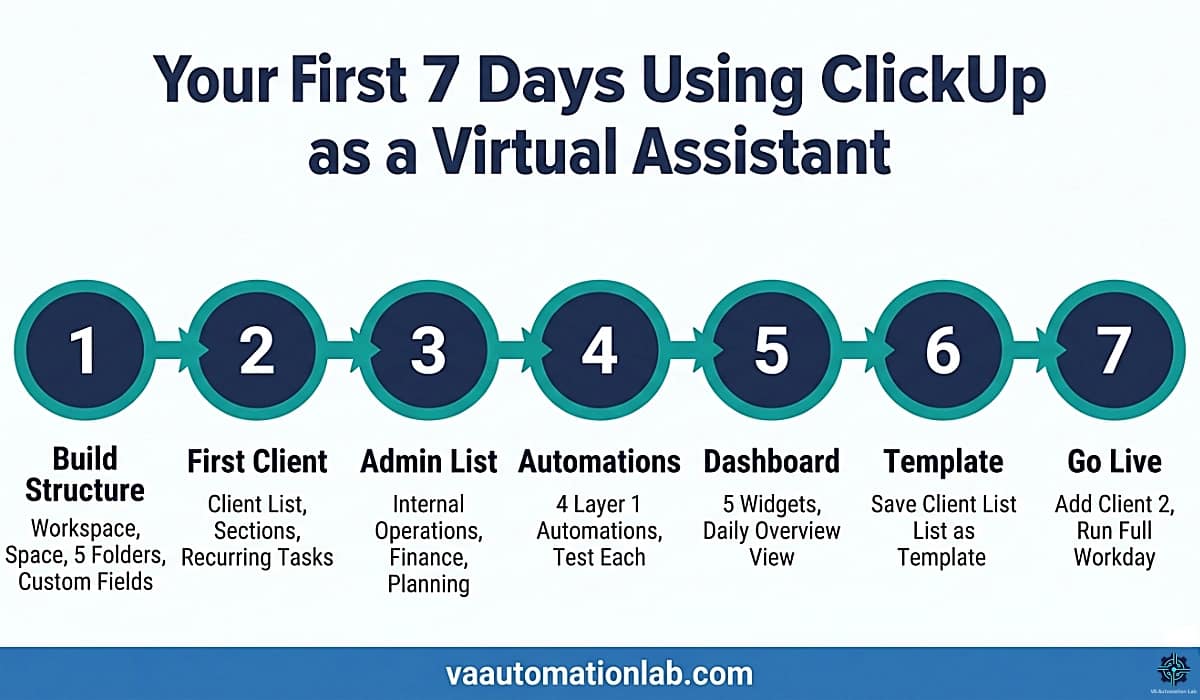
Day 1 — Build the Workspace Structure
Time: 60–90 minutes
Create your Workspace, Space, and five folders (Client Work, Content & Social Media, Admin & Operations, SOPs & Resources, Automations & Templates). Configure the five Space-level custom fields: Client Name, Service Category, Estimated Time, Billable, Deliverable Type.
Do not add any client yet. Get the container right before filling it.
Checklist:
- Workspace created and named
- VA HQ Space created
- Five folders created
- Custom fields added at Space level
- Status flow configured: To Do → In Progress → Waiting for Client → In Review → Done → Archived
- Notifications configured (assigned to me + due date reminders only)
Day 2 — Add Your First Client List
Time: 30–45 minutes
Create your first client list inside the Client Work folder. Add sections: Active Tasks, Recurring Tasks, Waiting for Client, In Review, Reference. Set the Client Name field default. Add every contracted recurring deliverable as a recurring task with the correct frequency and due date.
Checklist:
- First client list created with sections
- Client Name custom field default set
- All recurring deliverables added as recurring tasks
- List View set as default
- Time tracking enabled
Day 3 — Set Up the Admin & Operations List
Time: 30 minutes
Create the internal operations list inside Admin & Operations. Add sections: Weekly Admin, Monthly Operations, Invoicing & Finance, Business Development, Tools & Subscriptions. Load the pre-built recurring tasks: weekly planning session (Monday), monthly invoice run (last day of month), weekly client dashboard review (Friday).
This is the list that runs your business, not your clients’ businesses.
Day 4 — Implement Layer 1 Automations
Time: 45–60 minutes
Build all four Layer 1 automations inside your first client list: auto-assign on task creation, due date enforcement, waiting section routing, recurring task generation. Test each automation by triggering the condition manually and verifying the action fires correctly.
Do not move to Layer 2 until all four Layer 1 automations are confirmed working.
Checklist:
- Auto-assign automation live and tested
- Due date enforcement automation live and tested
- Waiting section routing live and tested
- Recurring task generation confirmed on one recurring task
Day 5 — Build the Dashboard
Time: 20–30 minutes
Create a Dashboard view at the Space level. Add five widgets: Tasks Due Today (assigned to me), Overdue Tasks (all lists), Tasks by List (task count per client), Time Tracked This Week, Upcoming Deadlines (next 7 days).
Set this Dashboard as the first tab you open when starting work each day.
Day 6 — Create the Client List Template
Time: 30–45 minutes
Save your first client list as a ClickUp template. This is the structure you will duplicate for every new client going forward. Before saving, verify it contains: all five sections, all five custom field defaults, all four Layer 1 automations, and the standard recurring task set.
From now on, adding a new client takes 15 minutes, not 2 hours.
Day 7 — Add Your Second Client and Run a Full Day
Time: 30 minutes setup + 1 full workday
Duplicate the client list template for your second client, update the client name field, add the client’s specific recurring deliverables. Then run a full workday entirely through ClickUp, morning Dashboard review, task execution in List View, status updates throughout the day, end-of-day priority setting.
By end of Day 7, you will know what is working, what needs adjustment, and what Layer 2 automations to build next.
10. ClickUp Templates for Virtual Assistants
Templates are the mechanism that makes ClickUp client management scalable, not just organized. Without templates, adding a new client requires rebuilding the same list structure from scratch. With templates, it is a 15-minute duplication and customization process.
The four templates below cover the highest-priority VA workflow categories. Each is designed as a Space-level or List-level template that can be duplicated for any new client or project.
Template 1 — Client List Template
What it is: the standard structure duplicated for every new client added to the workspace.
List sections:
- Active Tasks
- Recurring Tasks
- Waiting for Client
- In Review
- Completed (auto-archive after 30 days)
Pre-configured custom fields:
- Client Name (filled on duplication)
- Service Category (filled on duplication)
- Estimated Time
- Billable (checkbox)
- Deliverable Type
Pre-configured automations active on duplication:
- Auto-assign on task creation
- Due date enforcement
- Waiting section routing
- Inactivity notification (5 days)
Pre-loaded recurring tasks (edit dates on duplication):
- Weekly client update (every Friday)
- Monthly report (first Monday of month)
- Invoice (last day of month)
- Monthly planning call (first week of month)
Time to set up a new client: 15-20 minutes using this template.
Template 2 — Content Calendar Template
What it is: a List-level template for managing content production workflows for any client.
Task structure per content piece:
- Task name: [Platform] — [Topic/Hook]
- Custom fields: Platform, Format, Publish Date, Status, Content Pillar, Approved By
- Subtasks: Brief, Draft, Design asset, Caption copy, Scheduling confirmation
Status flow: Idea → Brief → Draft → Client Review → Approved → Scheduled → Published → Archived
Pre-configured automations:
- When status = Client Review → assign to client (guest access) + notify
- When status = Approved → move to Scheduled section + apply “Ready to Publish” tag
- When publish date arrives → set status to “Publish Today” + notify VA
Recurring tasks:
- Weekly content planning (Monday)
- Monthly analytics review (last Friday of month)
Template 3 — Admin and Operations Template
What it is: the internal business management list, separate from all client lists.
Sections:
- Weekly Admin (resets every Monday)
- Monthly Operations
- Invoicing and Finance
- Business Development
- Tools and Subscriptions
Pre-loaded recurring tasks:
- Weekly planning session (Monday 9am)
- Invoice all clients (last day of month)
- Review all client dashboards (Friday)
- Update SOP library (monthly)
- Tool subscription audit (quarterly)
- Quarterly business review (Q1/Q2/Q3/Q4)
Why this template matters: Without a dedicated internal operations list, VA business management tasks compete with client deliverables for attention, and consistently lose. A separate, template-driven operations list ensures internal work is scheduled and tracked with the same consistency as client work.
Template 4 — SOP Template (ClickUp Doc)
For virtual assistants, SOPs are not documentation, they are a time-saving system. A well-structured SOP eliminates decision-making, reduces errors, and ensures consistent delivery across all clients.
What it is: a standardized ClickUp Doc template for all process documentation, both internal SOPs and client-specific processes.
Why it matters:
- eliminates repeated thinking for recurring tasks
- reduces onboarding time for new clients
- ensures consistent quality across all deliverables
- makes it easier to delegate or scale your VA business
Structure:
SOP TITLE: [Process Name]
Last updated: [DATE]
Applies to: [Client / Internal / All]

PURPOSE
What this process accomplishes and when to use it.

TOOLS REQUIRED
- [Tool 1 with link]
- [Tool 2 with link]

PREREQUISITES
What must be in place before starting.

STEP-BY-STEP INSTRUCTIONS
1. [Step — include specific clicks, settings, values]
2. [Step — include specific clicks, settings, values]
3. [Step — include specific clicks, settings, values]
[continue for all steps in the process]

QUALITY CHECK
How to verify the process was completed correctly.

TROUBLESHOOTING
Common issue 1 → Solution
Common issue 2 → Solution

RELATED TASKS
[Link to ClickUp task that uses this SOP]

RELATED DOCS
[Link to connected SOPs or reference docs]
For VAs managing high volumes of repetitive written communication (client update emails, standard replies, onboarding messages) TextExpander ($3/month Individual, $8/month Business) pairs naturally with the SOP system: common phrases and templates are stored as TextExpander snippets and triggered by keyboard shortcuts, keeping the writing consistent without copy-pasting from a separate document.
11. Common ClickUp Mistakes Virtual Assistants Make
ClickUp has a high abandonment rate among new users. Almost all of it is preventable. These are the configuration and behavioral mistakes that cause VAs to give up on a platform that would have worked if set up correctly.
Starting With the Everything View
The Everything View shows all tasks across all lists, all clients, simultaneously, with no filter applied. For a VA managing three or more clients, this is hundreds of tasks with no clear structure.
Fix: Set List View as the default for every client list. Use the Dashboard for multi-client overview, not Everything View.
Ignoring Notification Settings
ClickUp’s default notification settings generate alerts for almost every workspace event, tasks created, assigned, commented on, status changed, due date modified. Across multiple active client lists, this is unworkable.
Fix: In Workspace Settings → Notifications, enable only “Assigned to Me” and “Due Date Reminders.” Do this on Day 1, before adding any tasks.
Adding All Features Before Adding the First Client
ClickUp has over 100 features. New users often spend hours exploring Mind Maps, Whiteboards, and Goals before configuring the basic task structure that makes daily operations work.
Fix: Follow the 7-day plan above. Build the minimum viable workspace structure first, add one client, and run it for a week. Explore advanced features only after the core system is stable.
Not Using Templates
Every VA who sets up a new client list from scratch is doing unnecessary work. The structure is always the same: sections, custom field defaults, recurring tasks, Layer 1 automations. Building it each time costs 2 hours instead of 15 minutes.
Fix: Save the first client list as a template after Day 6 setup. Every subsequent client is a duplication and customization, not a rebuild.
Using ClickUp as a Documentation System
ClickUp Docs is useful for SOPs and process notes linked to tasks. It is not a full documentation system, rich tables, embedded databases, nested content structures, and collaborative wikis are better served by a dedicated tool.
Fix: Use ClickUp Docs for operational process notes linked at the task level. Use a dedicated knowledge management tool for client wikis, reference databases, and complex SOPs. The Notion AI for Virtual Assistants guide covers the documentation layer in detail.
Not Setting Up Recurring Tasks for Retainer Deliverables
The most common reason VAs miss recurring deadlines is that they rely on memory or a separate reminder system to generate the task when it is due. This breaks down under load.
Fix: Every contracted recurring deliverable (weekly report, monthly newsletter, regular social posts) should exist as a recurring task in ClickUp with the correct frequency set. When the previous task is marked Done, the next one generates automatically.
Over-Automating Before the Manual Workflow Is Validated
Building 20 automations before you know how the workflow actually runs in practice produces a brittle, hard-to-debug system. Automation logic that fires incorrectly is worse than no automation, it creates tasks in the wrong places, sets incorrect due dates, and generates noise.
Fix: Validate each automation manually for at least a week before treating it as stable. Build Layer 1, run it for a week, build Layer 2, run it for a week, then advance to Layer 3.
Not Inviting Clients as Guests
VAs who manage client deliverables without giving clients any ClickUp visibility end up handling more status update requests, back-and-forth emails, and approval delays than necessary.
Fix: Invite clients as guests to their specific list. Guests see only their designated area, not your internal operations or other clients. Guest access is free on all ClickUp plans. Use the Board View for client-facing task visibility so the stage is clear at a glance.
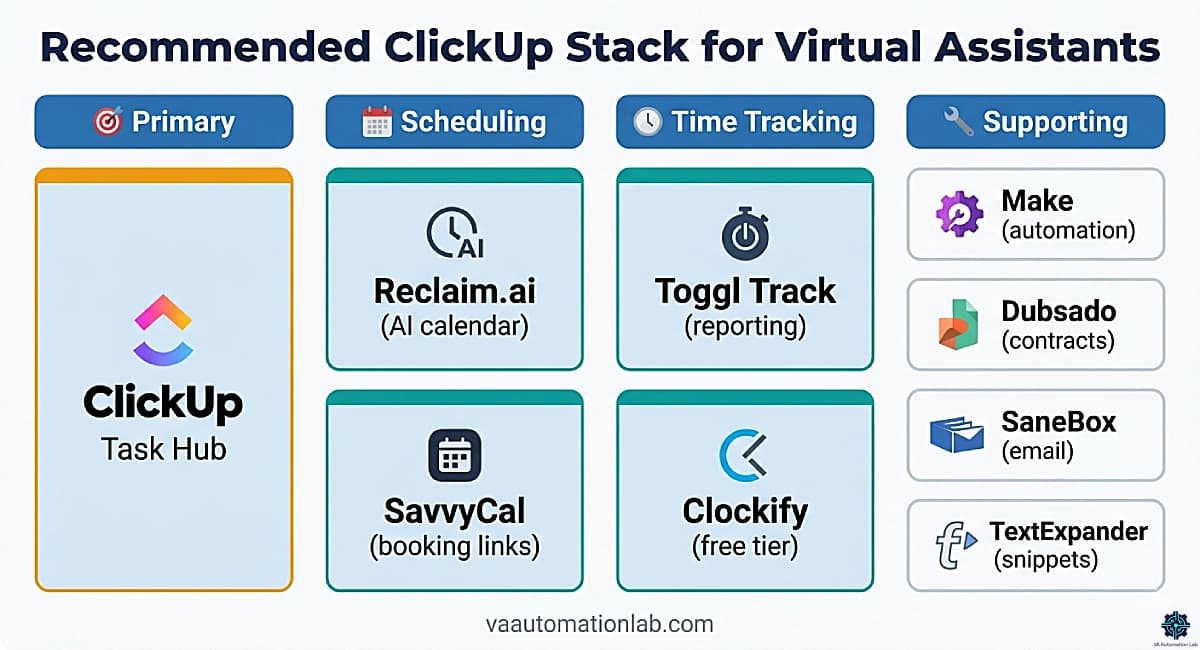
12. Recommended ClickUp Stack for Virtual Assistants
ClickUp works well on its own. But when combined with the right tools, it becomes a complete productivity system, not just for managing tasks, but for controlling time, communication, and client workflows.
The key is not to use more tools, but to use the right ones for each layer of your workflow.
Scheduling — Control When Work Happens
Scheduling sits directly inside the ClickUp workflow: time blocks map to tasks, focus time protects delivery windows, and client-facing booking links reduce coordination overhead. Both tools below earn their place through deep calendar integration that makes ClickUp’s task deadlines actionable.
- Reclaim.ai (Free–$15/month) — AI scheduling that integrates with Google Calendar and protects focus time, buffer time, and task time automatically. The Starter plan at $10/month covers most solo VA scheduling needs: 8-week scheduling range, 3 scheduling links, unlimited habits, and unlimited tasks. The Business plan at $15/month adds unlimited scheduling links and delegated calendar access, the tier that makes sense for VAs managing scheduling on behalf of clients. The combination of Reclaim.ai (calendar protection) and ClickUp (task tracking) is particularly effective: Reclaim can pull tasks from ClickUp and auto-schedule them into your calendar, so deadline pressure is visible at both the task level and the calendar level simultaneously.
- SavvyCal (Free–$20/month) — scheduling link tool built for precision booking. The free plan covers 1 scheduling, 1 calendar connection. The Basic plan at $12/month covers unlimited calendars and booking links. The Premium plan at $20/month adds custom domains, delegate-to-assistant functionality, and paid booking capability. SavvyCal’s overlay feature, which lets the recipient overlay their own calendar over your availability before selecting a time, is the specific function that reduces back-and-forth for VAs managing client meetings. Integrates with ClickUp via Zapier to auto-create follow-up tasks after a meeting is booked.
Time Tracking — Turn Work Into Billable Hours
ClickUp has native time tracking, but both tools below offer cleaner reporting interfaces, more granular billable rate configuration, and better invoicing features than ClickUp’s built-in tracker, which is why most VAs who bill hourly keep a dedicated time tracker alongside ClickUp.
- Toggl Track (Free–$21/month) — the most readable reporting interface in this category. The Free plan covers time tracking on web, desktop, and mobile, productivity reports, and 100+ tool integrations via browser extension, sufficient for a VA tracking hours for internal reporting. The Starter plan at $10/month adds billable rates, project time estimates, and revenue analysis, which is the tier that makes sense for VAs billing hourly to clients and generating monthly invoices from tracked data.
- Clockify (Free–$9/month) — the strongest free tier of any time tracker available. The Free plan covers unlimited tracking, timesheets, calendar view, mobile and desktop app, billable rates, and data export. For VAs who need invoicing within the same tool, the Standard plan at $6/month adds invoicing, recurring invoices, and time approval. The Pro plan at $9/month adds scheduling, project budgets, and custom fields. For a solo VA not yet billing complex hourly arrangements, Clockify’s Free plan handles the full tracking workflow at zero cost.
Both tools integrate with ClickUp natively, time tracked in either syncs to ClickUp task time entries, so your Dashboard widgets reflect real hours without double entry.
Automation — Reduce Repetitive Work
ClickUp’s native automations handle basic workflows. These tools extend automation across your entire stack.
Before adding an external automation tool, check what ClickUp already connects to natively — no Make or n8n required: Google Calendar (two-way sync for task deadlines and calendar events), Google Drive (attach Drive files directly to tasks), Slack (task status changes and deadline alerts posted to Slack channels), Zoom (meeting links auto-attached to task descriptions), and Gmail (send emails directly from within a task). If your day-to-day stack is built around these five tools, ClickUp’s native integration layer handles most inter-platform coordination at no additional cost. Make and n8n become necessary when workflows cross into tools outside this list — Notion, Airtable, Typeform, custom CRMs — or when you need multi-step conditional logic beyond what ClickUp’s native automation builder supports.
- Make (Free-$9/month) — cross-platform automation. Where ClickUp’s native automations end, Make extends them: ClickUp task completed → update Google Sheets, trigger email, log to Notion, notify via Slack. The Core plan covers the automation volume most solo VAs need. Use when a VA’s workflow requires integrations between ClickUp and external platforms not connected natively.
- n8n (Free-$23/month) — self-hosted or cloud automation with stronger API capabilities and custom logic options. Better suited than Make for VAs comfortable with technical workflow building or those with complex multi-step API integrations. 2,500 workflow executions per month on the Starter plan.
Communication & Inbox Management
Most tasks originate from communication. Managing your inbox efficiently reduces the number of tasks you need to process manually.
- SaneBox ($6-30/month) — email filtering and prioritization. Snack plan at $6/month covers one email account with two core features. Dinner plan at $30/month covers four email accounts and all features. Combined with a Make automation, SaneBox-filtered priority emails can auto-create ClickUp tasks in the relevant client list.
- Brevo (Free–$16/month) — email marketing platform for VAs managing newsletters or email campaigns for clients. Free plan covers 300 emails/day. Starter plan at $8/month covers 5,000+ emails/month with advanced segmentation and automation. Standard plan at $16/month adds marketing automation, A/B testing, and up to 3 users.
Client Management (CRM Layer)
ClickUp manages the work. These tools manage the client lifecycle, from lead to long-term collaboration.
- Dubsado ($28–44/month) — the client-facing operations layer. Handles proposals, contracts, invoices, client portals, and automated client workflows. Starter plan at $28/month covers unlimited projects, invoicing, and form templates. Premier plan at $44/month adds automated workflows, scheduling, and Zapier integration. 21-day free trial (no credit card). Best for VAs running project-based or retainer service businesses.
- Pipedrive ($16–46/month) — CRM for VAs managing sales pipelines, lead tracking, or CRM functions for clients. Lite plan at $16/month covers pipeline management and 500+ integrations. Growth plan at $46/month adds full email sync with tracking and automation sequences. Integrates with ClickUp via Make for deal-to-task automation.
Productivity Boosters
These tools don’t change your system, they make everything inside it faster.
- TextExpander ($3–11/month) — text expansion and snippet management. Individual plan at $3/month. Business plan at $8/month. Growth plan at $11/month. Ideal for VAs who use the same phrases, templates, and structured responses repeatedly across multiple clients, standard client update phrases, email openers, SOP boilerplate, form copy. Pairs directly with ClickUp’s SOP template system: keep the full process in ClickUp Docs, trigger the written output via TextExpander shortcut.
How to Build Your Stack (Without Overwhelm)
Don’t implement everything at once.
Start with:
1. ClickUp
2. One scheduling tool
3. One time tracking tool
Then add automation and additional layers only when your workload requires it.
A simple system used consistently will always outperform a complex system you don’t maintain.
Let AI Schedule Your Focus Time Around Your Tasks
Reclaim.ai integrates with Google Calendar to automatically protect focus time, buffer time, and task blocks, so your ClickUp deadlines translate into actual calendar time, not just dates on a list.
The Starter plan covers unlimited tasks and habits, and can pull tasks directly from ClickUp to auto-schedule them into your week.
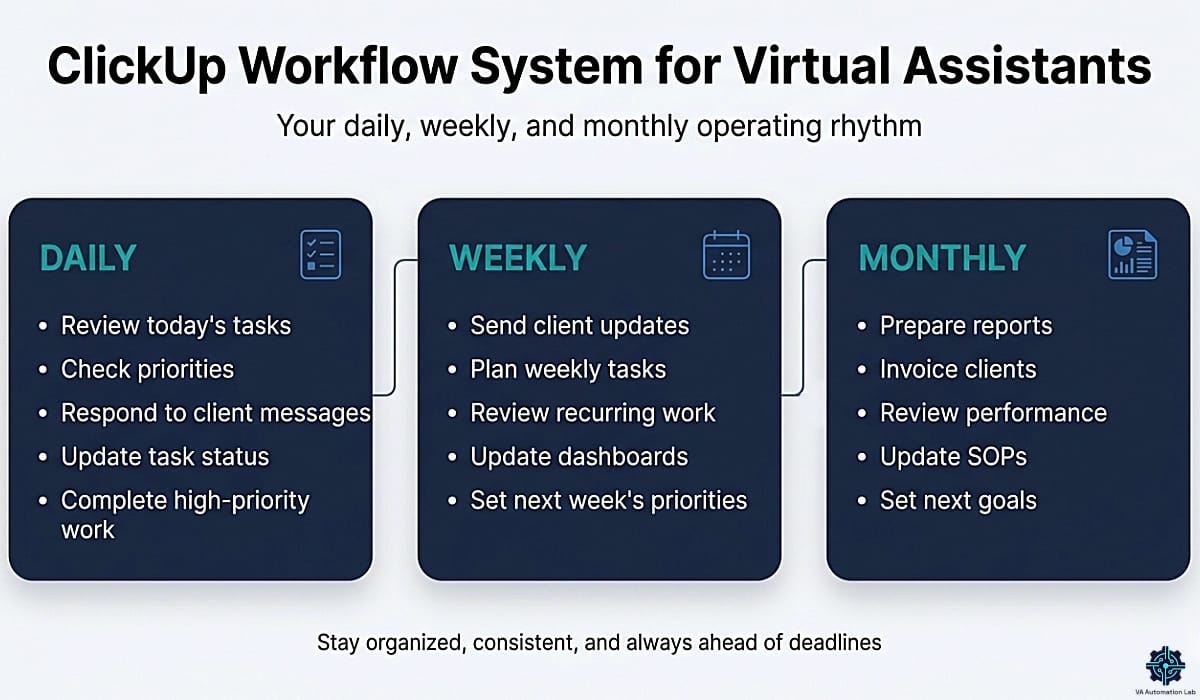
13. Daily, Weekly, and Monthly Workflow Routines
The workflow routines below are the operational layer that makes the ClickUp setup for virtual assistants run consistently, not as a theoretical framework but as a timed, actionable sequence for each planning cycle. Each routine is designed to take the minimum time necessary while maintaining full operational visibility.
The three cycles total roughly 3–4 hours of operational overhead per week for a VA managing three to five active clients — less time than a single unplanned client escalation. If any routine consistently runs longer than the time estimate shown, the workspace has a gap the routine itself will surface: a missing automation, an overcrowded list, or a structure that needs simplifying before the next client is added.
Daily Routine (20-25 minutes total)
Morning session (15 minutes):
- Open Dashboard View, scan Tasks Due Today and Overdue Tasks widgets. Identify any surprises before opening client lists. (2 min)
- Open each active client list in sequence. Review List View grouped by Status. Confirm all “In Progress” tasks are correctly assigned and have accurate due dates. (8 min for 3 clients)
- Update any tasks that changed status overnight, move from Waiting to In Progress if client replied, mark Done if deliverable was completed yesterday. (3 min)
- Check ClickUp notifications, address any automation-triggered alerts from overnight. Delete notification noise, action genuine alerts. (2 min)
End-of-day session (5-10 minutes):
- Update task statuses for the day’s work.
- Set tomorrow’s priorities (Priority field on the 2-3 most important tasks per client).
- Verify no tasks moved to “At Risk” tag by the due date proximity automation.
Weekly Routine (45-60 minutes total)
Monday — Planning (20 minutes):
- Open Calendar View at Space level, review the full week’s deadline distribution across all clients. Identify any days with 4+ concurrent deadlines and redistribute if possible.
- Review all recurring tasks that generated this week, verify dates and content are accurate for each client.
- Set weekly priorities per client, add a “This Week” tag to the 3 highest-priority tasks per client list.
Friday — Review and Reporting (25-40 minutes):
- Filter Done tasks from this week per client. Use this as the source data for weekly client updates: one filter, complete activity list, no manual recall required.
- Generate weekly client updates using the filtered task list as input to Claude or ChatGPT
- Review “Waiting for Client” section across all lists. Any task waiting more than 5 days triggers a follow-up, the inactivity automation should have flagged these already.
- Archive all Done tasks older than 7 days.
Monthly Routine (90-120 minutes total)
First Monday of month — Planning (30 minutes):
- Review the previous month’s completed tasks per client using Table View filtered by Done and date range. Export time tracked for invoicing.
- Verify all recurring tasks for the month ahead are generated correctly with accurate due dates.
- Review client SOPs, any process that changed this month needs the SOP updated before the new month begins.
Last Friday of month — Operations (60-90 minutes):
- Generate monthly client reports using the filtered Done task list as source data.
- Process all invoices, the recurring invoice task in the Admin list triggers this reminder.
- Update the Admin & Operations Template with any new recurring tasks, tool changes, or process modifications.
- Quarterly (every 3 months): full workspace audit, archive stale tasks, update all custom field dropdowns, review automation trigger logs for any failed automations.
👉 Best Automation Workflows for Virtual Assistants (Beginner → Advanced) — Discover the best automation tools to streamline admin work, client communication, content scheduling, and recurring tasks. A curated list of AI and workflow tools that integrate seamlessly with ClickUp and help you save hours every week.
14. ClickUp vs Notion vs Trello vs monday.com — Choosing the Right Tool
The four most common tools VAs evaluate for task management each have a distinct operational profile. The choice is not about which tool is objectively better, it is about which tool’s strengths map to your specific workflow requirements.
Feature | ClickUp | Notion | Trello | monday.com |
Task Management | ✅ Excellent | ✅ Good | ✅ Basic | ✅ Excellent |
Native Automation | ✅ Strong | ❌ Limited | ❌ Limited | ✅ Strong |
Multi-client Structure | ✅ Excellent | ✅ Good | ⚠️ Basic | ✅ Good |
Documentation (SOPs) | ✅ Good | ✅ Excellent | ❌ None | ⚠️ Basic |
AI Integration | ✅ Brain Add-On | ✅ Notion AI | ❌ None | ✅ AI Sidekick |
Views and Flexibility | ✅ Excellent | ✅ Good | ❌ Kanban only | ✅ Good |
Learning Curve | High | Medium | Low | Medium |
Free Tier | Generous | Limited | Generous | Limited |
Pricing | From $7/user/mo | From $10/user/mo | From $5/user/mo | From $10.50/user/mo |
Best For | Operations-heavy VAs | Documentation-heavy VAs | Simple project tracking | Team operations |
When to Choose ClickUp
- You manage 3+ active clients with ongoing deliverables
- You need native automation without Zapier for the core workflow layer
- You want multiple views (Board, Calendar, Timeline, Dashboard) without switching tools
- Time tracking and billable hour management are part of your service delivery
- You prioritize operational structure over documentation flexibility
When to Choose Notion
- Your primary workflow is documentation-heavy, SOPs, knowledge bases, client wikis
- You want AI assistance integrated directly into your workspace (Notion AI is more capable than ClickUp AI for content generation)
- Clients are invited into shared workspaces and need to navigate the tool themselves
- Your task volume is moderate and does not require complex multi-status automation
👉 Notion AI for Virtual Assistants: Complete Guide — the complete Notion AI guide for VA workflows.
When to Choose Trello
For VAs just starting out with one or two clients and a primarily Kanban-based workflow, Trello is the fastest setup. Its limitations, no native automations beyond basic Butler, no time tracking, no Dashboard views, become apparent quickly. Most VAs who start with Trello migrate within six to twelve months of growth.
When to Choose monday.com
monday.com‘s Standard plan ($14/month) includes timeline and Gantt views, calendar view, guest access, and 250 automations per month, a competitive feature set for VAs who prefer a simpler interface than ClickUp. The limitation is that monday.com’s automation depth and free tier are both less generous than ClickUp’s. For a VA managing complex multi-client operations with heavy automation requirements, ClickUp’s $7 Unlimited plan outperforms monday.com’s $14 Standard plan.
monday.com is a reasonable choice if you are already using it for a client and need to manage work within their system, not the optimal choice for building your own VA operations hub from scratch.
The Combination Most VAs Use in Practice
ClickUp for task management for virtual assistants: the operational layer where tasks, automations, deadlines, and client work live.
Notion for documentation: SOPs, client briefs, knowledge bases, and reference materials that benefit from Notion AI’s generation capabilities.
This combination covers the full operational stack without overlap: ClickUp handles what needs to happen and when, Notion documents how it happens and why. Tasks in ClickUp link to SOPs in Notion. The two tools complement rather than compete.
👉 Notion vs ClickUp for Virtual Assistants: Complete Comparison Guide — the complete analysis including pricing, automation gap, AI features, and the five VA profile recommendations.
15. Conclusion
ClickUp for virtual assistants is not a tool you configure once and forget, it is a system you build incrementally, layer by layer, starting with the structure that prevents the workspace from becoming another source of administrative overhead.
The sequence that produces the best results: configure the workspace hierarchy first, add one client list using the 7-day plan, implement the four Layer 1 automations, run the system for two weeks, then add the next client and the Layer 2 automations. The compound effect becomes visible when the third and fourth clients are added, setup takes 15 minutes instead of two hours, and the system absorbs the new workload without friction.
The common mistakes (using Everything View, ignoring notification settings, adding all features before adding the first client) are all solvable if you know they exist before you encounter them. The 7-day plan above is designed to navigate around all of them.
For the cross-platform automation layer, Make at $9/month Core is the tool that extends ClickUp’s reach into Gmail, Google Drive, Notion, and every other platform in your stack. For scheduling, Reclaim.ai and SavvyCal handle the calendar layer. For time tracking, Toggl Track or Clockify handle billable hour visibility. For client-facing operations, Dubsado handles proposals, contracts, and invoices.
None of these additions are mandatory on day one. Build ClickUp first, validate it for two weeks, then layer in the tools that solve specific friction points.
The alternative (adding all features, all automations, and all templates in the first week) produces a workspace that is technically complete but operationally overwhelming. Build one layer at a time, validate it works, then expand.
Your VA System Starts Here — Set Up ClickUp Today
The workspace structure, the 7-day plan, the automations, everything in this guide runs on ClickUp.
The free plan is enough to build the full hierarchy and test your first client list.
When you’re ready to scale, Unlimited at $7/month removes every limit that matters: storage, custom fields, integrations, and 1,000 automation executions per month across all your client lists.
Frequently Asked Questions About ClickUp for Virtual Assistants
Is ClickUp free for virtual assistants?
ClickUp’s Free plan supports a VA managing 1–2 clients with unlimited tasks, unlimited members, 60MB storage, basic views, one Form, and up to 100 automation executions per month across 5 Active Rules. The 100-execution limit is the primary constraint for growing VA operations, a multi-client workflow with recurring automations will exceed this within the first week. The Unlimited plan at $7/month expands automation to 500 Active Rules and 1,000 executions per month, which covers a solo VA running Layer 1 and Layer 2 automations across four to six client lists. The Business plan at $12/month removes the ceiling entirely: Unlimited Active Rules and 5,000 executions per month.d plan’s automation limits are consistently hit.
How long does it take to set up ClickUp for a VA business?
Following the 7-day plan: the initial workspace structure and first client list take 2–3 hours (Day 1–2). Each subsequent client list using a duplicated template takes 15–20 minutes. The four Layer 1 automations take approximately 45 minutes to configure and test. The Dashboard view setup takes 20–30 minutes. Total realistic time from zero to a fully operational ClickUp setup: one dedicated session of 3–4 hours, or spread across seven shorter sessions as laid out above.
Can I use ClickUp to manage my clients’ projects as well as my own business?
Yes, and this is one of ClickUp’s primary advantages for VAs. The workspace structure separates your internal business operations (Admin & Operations folder) from your client work (Client Work folder) while keeping both accessible through the same workspace. You can invite clients as guests to specific lists or folders, they see only their designated area, not your internal operations or other clients’ work. Guest access is free on all ClickUp plans.
What is the best ClickUp view for managing multiple clients simultaneously?
The Dashboard View with the widget configuration from section 7 (Tasks Due Today, Overdue Tasks, Tasks by List (one widget per client), and Time Tracked) provides the most complete multi-client visibility in a single screen. For daily task execution within a specific client’s context, List View grouped by Status is the most effective. Use Calendar View at the Space level once per week to verify deadline distribution across all clients.
Should I use ClickUp or Notion for my VA business?
Use ClickUp as your primary operational system if your work is task-and-delivery-heavy, recurring deliverables, multi-step projects, client pipelines, and billing management. Use Notion as your primary system if your work is documentation-and-knowledge-heavy, SOPs, client wikis, content planning, and knowledge base management. Most VAs at scale use both: ClickUp for task management, Notion for documentation. The two tools integrate via Make if you want tasks in ClickUp to link to Notion pages automatically.
How do I prevent ClickUp from becoming overwhelming?
Four configuration decisions prevent workspace overwhelm: disable all notifications except “Assigned to Me” and “Due Date Reminders”; set List View as the default for all lists rather than the Everything View; build templates before adding clients so setup is always structured; and implement automations in the Layer 1–2–3 sequence rather than all at once. The most common reason VAs abandon ClickUp within the first month is notification overload combined with an undifferentiated Everything View showing hundreds of unfiltered tasks. Both are configuration problems, not platform problems.
Is the ClickUp Brain AI Add-On worth it for virtual assistants?
The Brain AI Add-On at $9/user/month is worth evaluating if you spend significant time inside ClickUp drafting task descriptions, generating client update summaries, or need to query your workspace in natural language (“What tasks are overdue for Client A this week?”). If you already use a dedicated AI tool (Claude, ChatGPT) outside ClickUp for writing and synthesis tasks, the overlap is significant. The practical test: add Brain for one month, track which AI functions you actually use inside ClickUp versus outside it, then decide whether the $9 is earning its place.
What tools work best with ClickUp for a VA business?
The stack that works best with ClickUp in practice: Reclaim.ai or SavvyCal for scheduling (both integrate with Google Calendar and reduce meeting coordination overhead), Toggl Track or Clockify for time tracking (both sync with ClickUp task time entries natively), and Dubsado for client-facing operations, proposals, contracts, and invoices. For cross-platform automation between ClickUp and external tools, Make (Core plan, $9/month) or n8n (Starter plan, $23/month) handle the inter-platform layer. The full recommended stack is in section 12 with specific plan recommendations and pricing.
Does ClickUp have a mobile app for virtual assistants?
Yes. ClickUp has iOS and Android apps that support task management, status updates, time tracking, comments, and notification management — the core functions needed for managing client work away from a desktop. One practical constraint: workspace configuration tasks (building automations, configuring custom fields, setting up Dashboard widgets, and managing notification rules) are significantly easier in the desktop or web app. The recommended workflow is to build and configure the workspace on desktop, then use the mobile app for morning triage, real-time status updates, and time logging between sessions. The mobile app handles the operational layer well; the desktop handles the architectural layer.
Glossary: Key ClickUp Terms for Virtual Assistants
Workspace — The top-level container in ClickUp. Your entire VA business lives in one Workspace accessed through one login.
Space — The second level of the ClickUp hierarchy, a major operational area such as “Virtual Assistant HQ.” Contains Folders and Lists.
Folder — A grouping of Lists within a Space, used to separate major workflow categories such as Client Work, Admin, and SOPs.
List — The primary operational unit for ClickUp client management. Each client or major project has its own List containing all related tasks.
Task — The core unit of work in ClickUp. Has a name, status, due date, assignee, and custom fields. Can contain subtasks and checklists.
Custom Field — A user-defined data field added to tasks, used to store client name, service category, estimated time, and other VA-specific data that makes tasks filterable and automation-ready.
Automation — A rule that triggers an action automatically when a condition is met. Built with WHEN / IF / THEN logic inside ClickUp’s automation builder. The core of ClickUp automations for virtual assistants.
Status — The current stage of a task in its workflow, configured per Space or List. Standard VA flow: To Do → In Progress → Waiting for Client → In Review → Done.
View — A visual representation of task data: List, Board, Calendar, Timeline, Table, or Dashboard. Each View displays the same underlying tasks in a different format optimized for different work contexts.
Dashboard — A customizable screen with data widgets that provides operational visibility across multiple Lists and clients — the multi-client command center for VAs.
ClickUp Docs — The built-in documentation tool within ClickUp, used for SOPs, templates, and reference materials that are linked directly to the tasks that use them.
Recurring Task — A task configured to regenerate automatically at a defined interval: daily, weekly, monthly, or custom. The foundation of consistent delivery for retainer clients.
Guest Access — A free ClickUp feature that allows clients to access their specific List or Folder without seeing your internal operations or other clients’ workspaces. Available on all ClickUp plans.
Brain AI (ClickUp) — ClickUp’s AI add-on ($9/user/month) that includes an AI writing assistant, natural-language workspace queries (@Brain), and AI Super Credits for Agents and Automations.
About the Author
Alex Stratton has spent the better part of a decade working at the intersection of virtual assistance and operational systems, first as a VA supporting founders and small business owners, then as a workflow consultant helping remote teams reduce the manual overhead that accumulates when businesses grow faster than their processes. The tools and workflows here reflect decisions made repeatedly in real client contexts, where the wrong choice costs hours, not minutes. Learn more about VA Automation Lab → About.