Automation Workflows for Virtual Assistants

Work smarter with systems that support your work.
The most common mistake virtual assistants make with automation is starting in the wrong place. They build a Zapier workflow before their process is documented. They automate a task they still do inconsistently. They add automation to fix a broken system instead of supporting a working one. The result is an automation that breaks the first time an edge case appears, and a VA who decides automation isn’t worth the effort.
This page is built around a different principle. Automation workflows for virtual assistants work reliably when they are built on top of stable, documented processes, not instead of them. Every workflow here follows that logic: document first, stabilize second, automate third.
What you’ll find on this page: the three no-code automation platforms worth your attention, four real VA automation workflows documented step by step, a practical framework for combining automation with AI tools, and a clear recommendation on where to start if you haven’t automated anything yet.
No technical skills required. No paid tools required to get started. No workflows included that don’t deliver a measurable return in the first week of use.
Table of Contents
Who This Page Is For
This page is for virtual assistants who have at least one recurring workflow running manually, client onboarding, task intake, weekly reporting, and want to know how to automate the repetitive parts without building something fragile. If you’re still figuring out your core processes, start here first:
👉 Start From Zero — The Complete Beginner’s Guide
If your processes are stable and you’re ready to build automation workflows for virtual assistants that run reliably, you’re in the right place.
Core Automation Platforms
Three platforms cover the full range of virtual assistant workflow automation needs, from first workflow in thirty minutes to complex multi-step systems. Each has a distinct strength. Choose based on where you are, not where you want to be.
Zapier
Best for: beginner no-code automation for virtual assistants, simple two-step workflows, fast setup.
Zapier is the right starting point for most VAs. Its trigger-action logic (“when this happens, do this”) is intuitive from the first session, its template library covers the most common VA workflows out of the box, and its free tier of 100 tasks per month is sufficient for a solo VA running two to three automations at low volume. The 7,000+ app integrations mean that whatever tools you use for client work, Zapier almost certainly connects them.
Where Zapier shows its limits: conditional logic (“if this, do that, otherwise do this”), high-volume automations, and multi-step workflows with data transformation. Those use cases belong to Make.
Free tier: 100 tasks/month, unlimited two-step Zaps
Paid: from $19.99/month
Learning curve: low, first working automation in under two hours
Make (formerly Integromat)
Best for: advanced virtual assistant workflow automation, conditional logic, high task volume at lower cost.
Make uses a visual canvas that shows the full structure of a workflow as a diagram, every module, every data path, every conditional branch visible at once. That visual transparency makes it easier to understand and debug complex automations than Zapier‘s linear interface, once you’ve invested the time to learn it. Its free tier of 1,000 operations per month is ten times more generous than Zapier’s, and its paid plans cost significantly less for equivalent functionality.
The trade-off: the learning curve is steeper. Plan for three to four hours of investment before your first complex automation runs cleanly. Worth it once you have stable, documented workflows that run at volume.
Free tier: 1,000 operations/month
Paid: from $9/month
Learning curve: medium to high, more powerful, requires more deliberate setup
Pabbly Connect
Best for: high-volume automations at predictable cost, budget-conscious VA operations
Pabbly’s primary advantage is pricing structure, flat-rate plans cover unlimited workflows regardless of task volume, which makes it cost-effective for VAs managing many automations across multiple clients. Its integration library is smaller than Zapier’s (around 2,000 apps vs 7,000+) and its interface is less polished, but for standard VA automation use cases it covers the essentials reliably.
Start with Zapier or Make. Consider Pabbly when your task volume consistently hits paid tier limits on either platform and the cost savings justify switching.
Free tier: limited
Paid: from $19/month flat-rate
Learning curve: low to medium
Feature | Zapier | Make |
Best for | Simple 2-step automations, beginners | Complex multi-step workflows |
Interface | Linear, beginner-friendly | Visual canvas, more powerful |
No-code | ✓ Yes | ✓ Yes |
Free tier | 100 tasks / month | 1,000 operations / month |
Paid plan | From $19.99 / month | From $9 / month |
Conditional logic | ~ Basic (paid) | ✓ Advanced, native |
App integrations | 7,000+ | 1,500+ |
Learning curve | Low | Medium to high |
Switch when | — | Zapier task limits hit consistently |
Recommendation | Start here | Graduate to this |
For the full breakdown with real VA automation examples and a recommendation based on your current workflow stage: 👉 Zapier vs Make for Virtual Assistants: The Complete Comparison Guide
Not sure which platform to start with?
The free toolkit removes the decision, the specific tools, the first automation to build, and the exact order to do it in.
Four Essential VA Automation Workflows
These four automation workflows for virtual assistants cover the highest-impact opportunities in a solo VA operation. Each is documented with the trigger, the sequence, the tools, and a clear explanation of why it matters. Start with Client Onboarding, it’s the workflow that most immediately changes how clients perceive your professionalism.
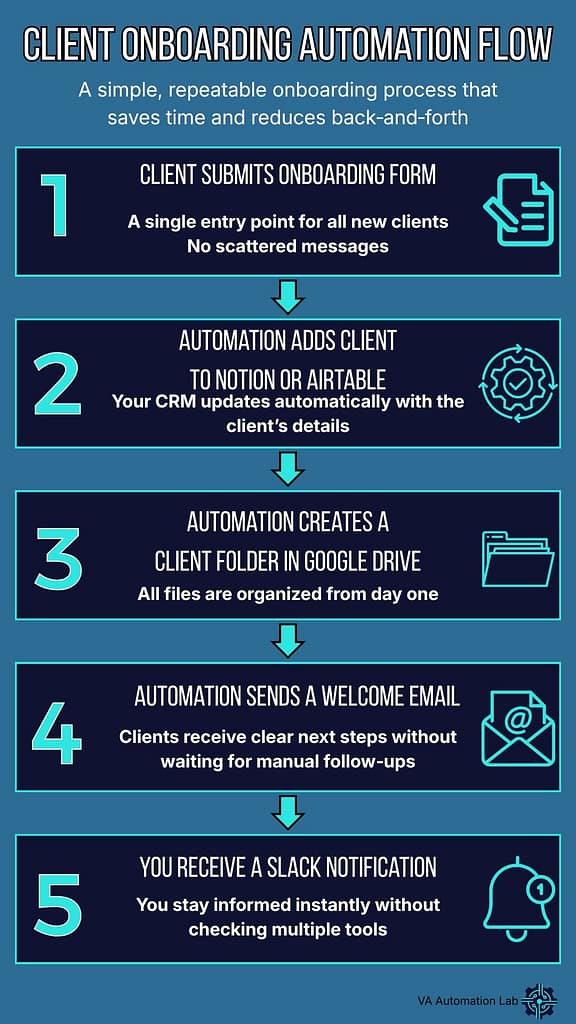
Workflow 1: Client Onboarding
What it automates: the manual steps between a new client signing and their first working week
Why it matters first: every new client experiences your onboarding. An automated, consistent onboarding sequence signals professionalism before you’ve delivered a single task. VAs who automate this workflow report that clients consistently describe the experience as “more professional than agencies I’ve worked with.”
Trigger: client completes onboarding form (Tally or Google Forms)
Sequence:
- New form submission received
- Client record created in Notion or Airtable automatically
- Client folder created in Google Drive with standard subfolder structure
- Welcome email sent from Gmail with next steps and key documents
- Slack or email notification sent to you confirming the onboarding triggered
Tools:
- Tally or Google Forms (form)
- Zapier or Make (automation layer)
- Notion or Airtable (client database)
- Google Drive (file management)
- Gmail (client communication)
Platform recommendation: Zapier, this is a linear five-step workflow with no conditional logic, exactly the use case Zapier handles best.
Setup time: 2–3 hours including testing.
Before automating: run this sequence manually a minimum of three times. Document each step. Confirm the folder structure and email content are stable before connecting them to an automation trigger.
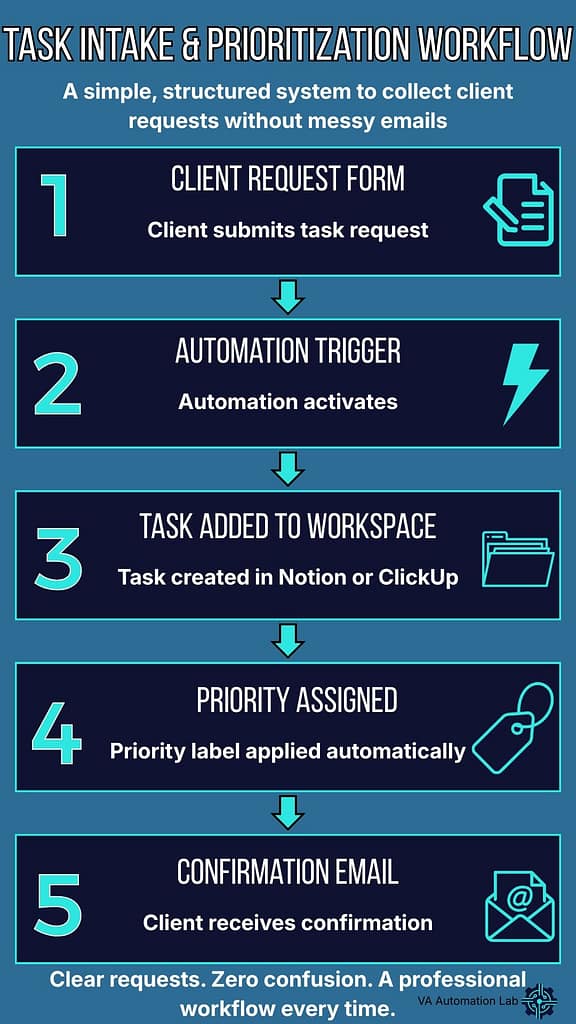
Workflow 2: Task Intake and Prioritization
What it automates: the process of receiving, logging, and acknowledging client task requests.
Why it matters: without a structured intake system, tasks arrive through email, WhatsApp, Slack, and voice notes, each requiring manual logging, manual acknowledgment, and manual prioritization. The cognitive overhead of managing unstructured incoming requests is one of the leading causes of VA burnout and missed tasks.
Trigger: client submits task request via dedicated form (Tally, Typeform, or Google Forms)
Sequence:
- Form submission received
- Task created automatically in Notion or ClickUp with client name, task description, and submission timestamp
- Priority label assigned based on client-defined urgency field in the form
- Automated confirmation email sent to client: “Your request has been received and logged.”
- You receive a notification with task summary
Tools:
- Tally or Typeform (intake form)
- Zapier or Make (automation layer)
- Notion or ClickUp (task management)
- Gmail (client confirmation)
Platform recommendation: Zapier for a straightforward setup. Make if you want conditional priority logic, for example, high-priority requests triggering a different notification than standard ones.
Setup time: 1–2 hours.
The client-side benefit: clients who submit tasks through a structured form stop sending informal requests through other channels within two to three weeks. The form itself trains the communication pattern.
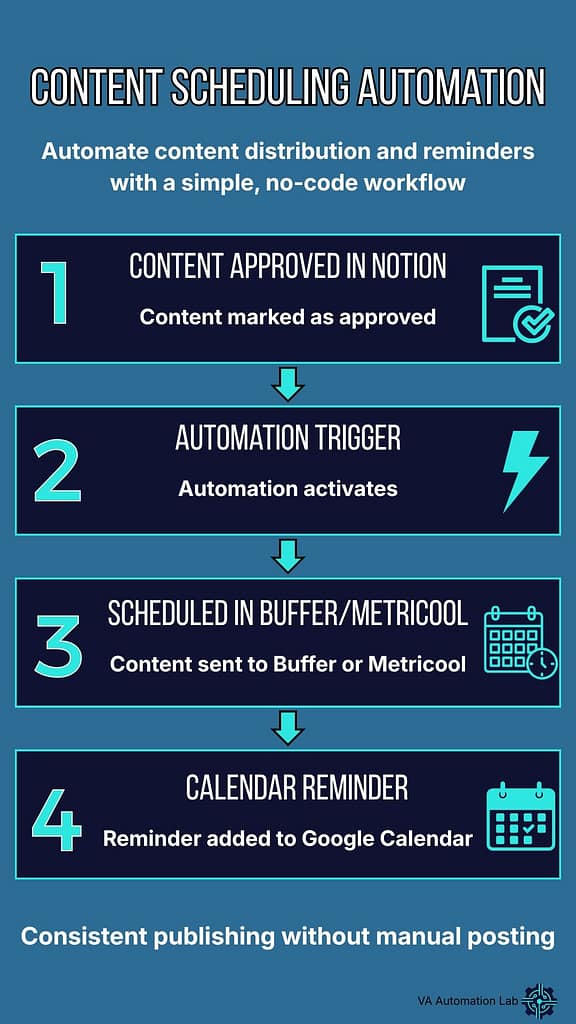
Workflow 3: Content Scheduling Support
What it automates: the handoff between content approval and publishing queue.
Why it matters: VAs who manage social media or content calendars for clients spend significant time manually copying approved content from one tool to a scheduling platform. This workflow eliminates that manual transfer and the errors that come with it.
Trigger: content item status changed to “Approved” in Notion or Airtable
Sequence:
- Content item marked as approved in client workspace
- Automation sends content (copy, image link, target date) to Buffer or Metricool for scheduling
- Event created in Google Calendar with publication date and platform
- Optional: notification sent to client confirming content has been queued
Tools:
- Notion or Airtable (content calendar)
- Zapier or Make (automation layer)
- Buffer or Metricool (scheduling)
- Google Calendar (visibility)
Platform recommendation: Make. Buffer and Metricool integrations with conditional logic (different platforms, different posting times) are more elegantly handled in Make’s visual canvas.
Setup time: 2–4 hours including platform-specific configuration.
Prerequisite: a stable content approval workflow running manually. Don’t automate the handoff until the approval process itself is documented and consistently followed.
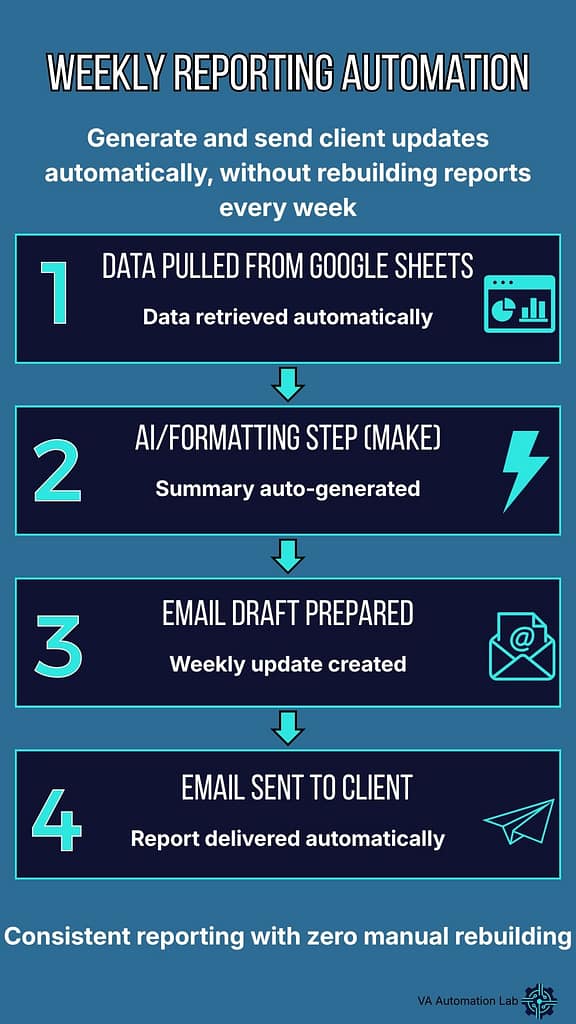
Workflow 4: Weekly Client Reporting
What it automates: the weekly process of compiling, formatting, and sending client status updates.
Why it matters: most VAs who track time and tasks have the raw data they need for weekly reports, they just spend 30-45 minutes per client manually compiling and formatting it. This workflow reduces that to under five minutes of review before the report sends automatically.
Trigger: scheduled (every Friday at a defined time, or client-specific schedule)
Sequence:
- Automation pulls time tracking data from Toggl Track for the week
- Task completion data pulled from Notion or ClickUp
- Data formatted into a structured report template
- Report sent to client via Gmail
Tools:
- Toggl Track (time tracking)
- Notion or ClickUp (task data)
- Make (data formatting, this workflow requires Make, not Zapier, for the formatting step)
- Gmail (delivery)
Platform recommendation: Make, data aggregation and formatting across multiple sources is where Make’s module system outperforms Zapier’s linear structure.
Setup time: 3–5 hours, more than the other workflows due to the data formatting configuration.
Start simpler: if this feels complex, begin with a manual Google Sheets template that you fill in weekly, then automate the send step only. Automate the data pull once the format is stable.
Key Takeaway: The Four Workflows
Implement these four automation workflows for virtual assistants in order. Client Onboarding first, it’s the highest-visibility workflow and the one clients notice immediately. Task Intake second, it restructures how requests arrive, which affects everything downstream. Content Scheduling third, only if content management is part of your current client work. Weekly Reporting fourth, it requires the most setup but delivers the most consistent weekly time saving.
For a complete deep-dive on the onboarding workflow specifically:
👉 How to Automate Client Onboarding for Virtual Assistants
For a broader automation curriculum from first workflow to advanced systems:
👉 Best Automation Workflows for Virtual Assistants: Beginner to Advanced
Automation + AI: Smart Combinations
Automation handles process: moving data, triggering actions, connecting tools. AI handles judgment: drafting, summarizing, evaluating, generating. The most powerful VA workflows combine both: automation triggers the sequence, AI handles the content layer within it. Here are three combinations that deliver immediate practical value.
Combo 1: New Task → AI Summary → Saved to Notion
The problem it solves: clients often submit task requests with ambiguous, incomplete, or poorly structured descriptions. You spend time clarifying before you can start.
How it works:
- Client submits task via intake form
- Automation sends task description to Claude or ChatGPT via API
- AI generates a structured task summary: objective, deliverables, suggested approach, questions to clarify
- Summary saved automatically to the task record in Notion or ClickUp
- You receive the task with a structured brief instead of raw text
Tools: Tally + Zapier/Make + Claude API or ChatGPT API + Notion.
Complexity: medium, requires API connection, not available on free tiers of automation platforms.
Value: high, eliminates the back-and-forth clarification loop on every new task.
Combo 2: Client Email → AI Draft Reply → Your Review
The problem it solves: responding to client emails takes disproportionate time when the emails are routine, status requests, scheduling questions, standard updates.
How it works:
- New email arrives in a labeled Gmail folder (client-specific label)
- Automation sends email content to Claude or ChatGPT
- AI generates a professional draft reply in your tone
- Draft saved as a Gmail draft, you review, edit if needed, send
- You never write a routine email from scratch again
Tools: Gmail + Zapier/Make + Claude API + Gmail drafts.
Complexity: medium.
Value: high for VAs whose work involves significant client email volume.
Important: this workflow keeps you in the loop on every send. The AI drafts, you approve. Never configure it to send without review.
Combo 3: Meeting Transcript → AI Summary → Sent to Client
The problem it solves: meeting summaries take 20-30 minutes to write manually and are often delayed, reducing their usefulness.
How it works:
- Otter.ai records and transcribes the meeting automatically
- Automation sends transcript to Claude or ChatGPT
- AI generates a structured summary: key decisions, action items, owner and deadline for each item
- Summary emailed to client within minutes of the meeting ending
Tools: Otter.ai + Zapier/Make + Claude API + Gmail.
Complexity: medium.
Value: very high, clients who receive a structured summary within thirty minutes of a call consistently rate it as one of the highest-value things their VA does.
Note on Otter.ai integration: Otter.ai’s direct Zapier integration is limited. For this workflow, use Make with Otter.ai’s API or export transcripts to Google Drive and trigger from there.
Automation manages the flow. AI elevates the quality of every step.
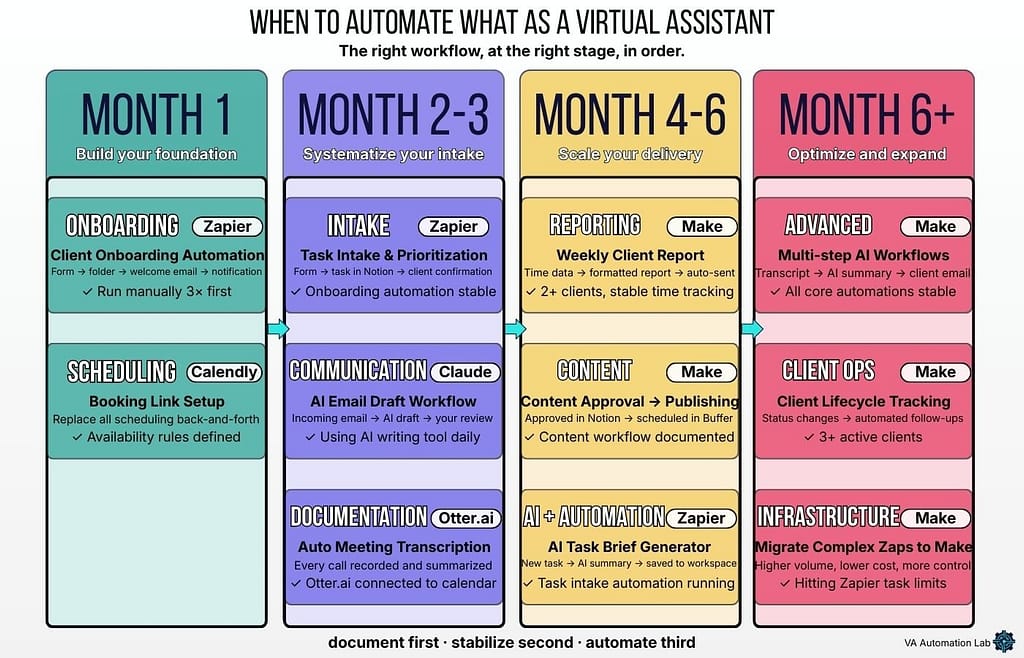
When to Automate and When to Wait
The decision of when to automate is as important as knowing how. Most automation failures, automation workflows for virtual assistants included, have the same root cause: the underlying process wasn’t stable when the automation was built.
The rule is simple: automate only what you do the same way, every time, with no exceptions. If you make judgment calls within a process (deciding which tasks are high priority, deciding how to respond to a specific type of email) that judgment cannot be automated away. It can be supported by AI, but the automation layer can only handle the parts that are truly identical every time.
Before building any automation, ask yourself three questions:
- Have you documented this process in writing? Not in your head, in writing, step by step. If the answer is no, document it first and run it manually three times before touching any automation tool.
- Have you run this process consistently for at least two weeks without changing the steps? If your workflow is still evolving, automating it now means rebuilding it every time you make a change.
- What happens when the automation fails? Every automation fails eventually, a tool goes down, an API changes, a form field gets renamed. If you don’t have a manual fallback documented, a failed automation becomes a client crisis.
When the answer to all three questions is yes, you’re ready to automate. Start with one workflow. Run it for two weeks alongside the manual version to confirm it produces the same output. Then remove the manual version. Then build the next one.
The VA who has three solid, reliable automations running consistently outperforms the VA with fifteen fragile ones maintained with constant intervention, every time.
For a complete practical guide on identifying and implementing high-impact automations:
👉 How Virtual Assistants Can Automate Repetitive Tasks

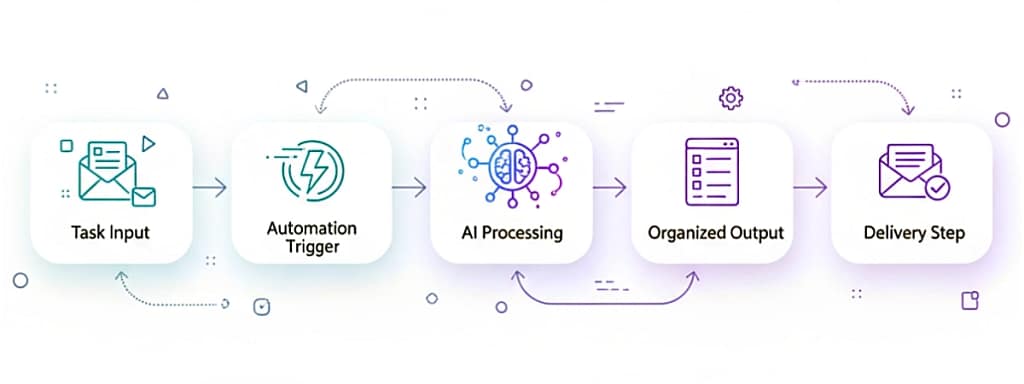
A clear, no‑code automation workflow designed for virtual assistants, showing how simple, connected steps can streamline daily tasks and support efficient, scalable systems.
Frequently Asked Questions About Automation Workflows for Virtual Assistants
What are the best automation tools for virtual assistants?
For most virtual assistants, the practical starting stack for building automation workflows for virtual assistants is Zapier for simple two-step automations and Make for anything that requires conditional logic, data formatting, or multi-step sequences. Zapier’s free tier of 100 tasks per month covers the basics, and its beginner-friendly interface produces a working automation in under two hours. Make’s free tier of 1,000 operations per month is more generous, but the learning curve is steeper, plan for a larger upfront investment before the first complex automation runs reliably. Both are no-code, both have extensive documentation, and together they cover the full range of automation workflows a solo VA typically needs.
How do I start automating as a virtual assistant?
Start with one process that you already do manually every week, follows the same steps every time, and takes more than thirty minutes per occurrence. For most VAs, that’s client onboarding. Document every step in writing before opening any automation tool. Run the documented process manually three times to confirm the steps are stable. Then build the automation one step at a time, testing each trigger-action pair before adding the next. The goal for your first automation is not a complex system, it’s a working two-step connection that runs reliably without your intervention. Build confidence with the first one before adding the second.
Can I automate my work as a virtual assistant without coding?
Yes. Zapier, Make, and Pabbly Connect are all no-code platforms designed for non-technical users. They use visual interfaces, connecting apps with drag-and-drop triggers and actions, that require no programming knowledge. The learning curve is measured in hours, not weeks. The four workflows documented on this page are all buildable on Zapier or Make free tiers without writing a single line of code. The only exception is AI integration via API, combining automation with Claude or ChatGPT’s API requires a paid plan on the automation platform and some basic configuration that goes slightly beyond pure no-code, but is well-documented and achievable by most VAs within a half day of setup.
How much does automation cost for a virtual assistant?
Starting cost: $0. Zapier, Make, and Pabbly Connect all offer free tiers sufficient for a solo VA in the first three to six months. The three most impactful automation workflows for virtual assistants (client onboarding, task intake, and weekly reporting) can all be built and run on free tiers. Paid plans become worth evaluating when you consistently hit task or operation limits on the free tier, which typically happens around month four to six for a VA with three or more active clients running multiple automations. At that stage, Zapier Starter at $19.99/month or Make Core at $9/month provide significantly expanded capacity for a cost that is easily recovered within the time savings they generate.
What’s the difference between Zapier and Make for VA work?
Zapier is better for simple, linear automations, “when this happens, do this” sequences with two to five steps and no conditional logic. Its interface is more intuitive for beginners and its app library is larger (7,000+ vs Make’s 1,500+). Make is better for complex, multi-step workflows that involve conditional paths (“if this, then that, otherwise this”), data transformation, or high task volume. Make’s free tier is also ten times more generous (1,000 operations vs Zapier’s 100 tasks). The practical recommendation for most VAs: start with Zapier, switch to Make when your automations outgrow it. Many experienced VAs run both simultaneously; Zapier for simple connections, Make for complex scenarios.
When should I not automate a workflow?
Don’t automate a process that you haven’t documented in writing and run manually at least three times. Don’t automate a process that is still changing, if the steps aren’t stable, automating them means rebuilding the automation every time you refine the process. Don’t automate a process that requires judgment calls that vary by client or context, AI can assist with judgment, but automation handles only consistent, rule-based steps. And don’t automate your highest-visibility client touchpoints, client calls, complex feedback responses, relationship-building communication, where the human layer is the point. Automation is most valuable in the invisible operational layer: the steps clients never see but feel through consistency and reliability.
The four automation workflows for virtual assistants on this page are enough to transform the operational layer of a solo VA practice, less manual overhead, fewer errors, more consistent client experience. The right order is always the same: document first, run manually until stable, automate one workflow at a time.
👉 Start From Zero — The Complete Beginner’s Guide If you haven’t yet built your operational foundation, the core tools and processes that automation runs on top of.
👉 AI Tools for Virtual Assistants To understand how AI pairs with the automation workflows above.
👉 Best Automation Workflows for Virtual Assistants: Beginner to Advanced To go deeper on any of the four workflows with full implementation guides.
👉 How Virtual Assistants Can Automate Repetitive Tasks Read this when the four automation workflows for virtual assistants on this page are running and you’re ready to identify what to automate next.
👉 How to Automate Client Onboarding for Virtual Assistants: Complete Workflow Guide Read this when you’re ready to build the onboarding workflow automation, not just understand it.
👉 How to Automate Social Media as a Virtual Assistant The complete four-layer automation system for VAs who manage social media for clients.
Ready to build your first automation?
The free toolkit includes the exact starting stack and the first workflow to build, without having to decide where to begin.